by Tracy | Apr 20, 2017 | Uncategorized

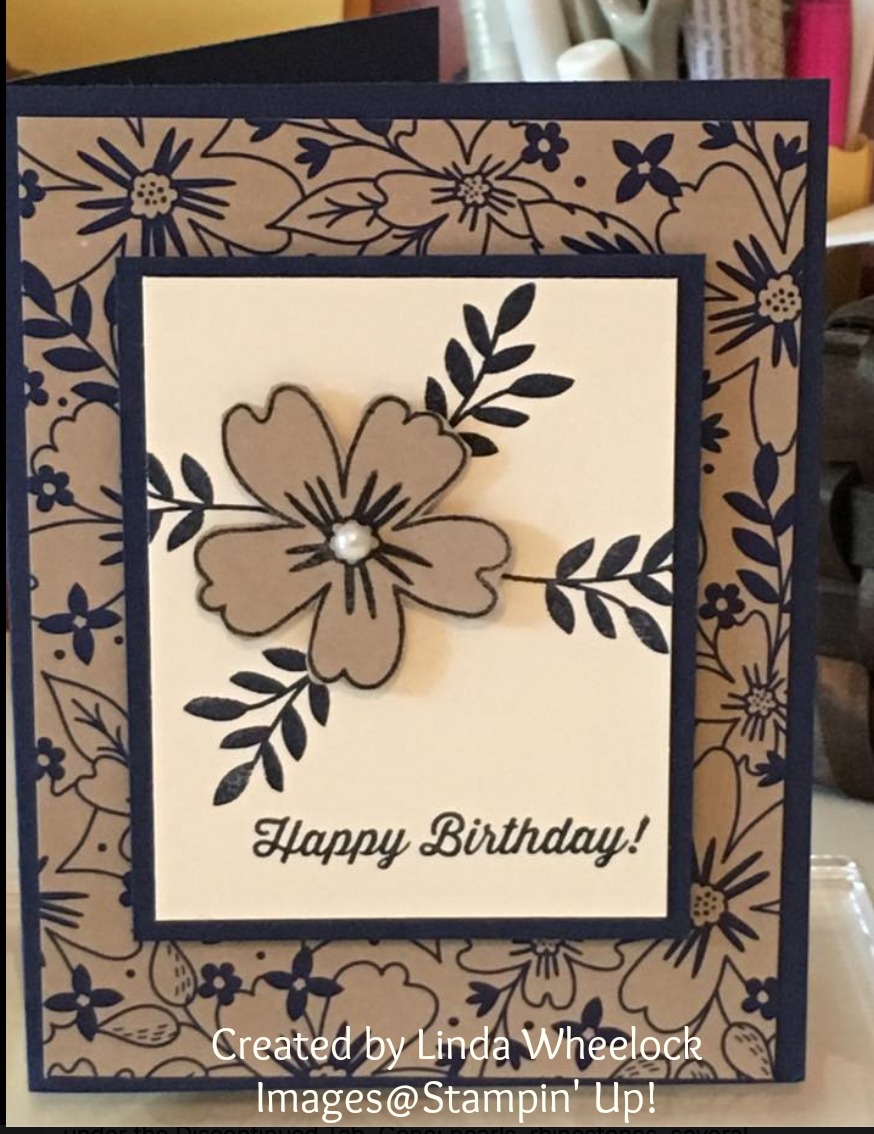
Today I wanted to share a card made by Linda Wheelock, a member of my Stampin’ Up! team. Isn’t it beautiful? She used the Speciality Designer Series Paper, Affectionately Yours which is on the retired list AND on sale. It’s normally $13.00 but while supplies last, you can pick it up for $9.10.

It looks like Linda used Night of Navy cardstock which matches beautifully with this paper. The stamp set, Love and Affection (#141545) was used for the leaves and the the flower in the middle. The stamp set Birthday Banners (#141506) was used for the sentiment, Happy Birthday. To finish the card, Linda used a pearl in the center. Unfortunately the Basic Pearls are no longer available until June when the new catalog comes out.
I’m so glad that Linda agreed to let me show you her card!
Ready to place an order? Click HERE to shop at my online Stampin’ Up! store!
by Tracy | Apr 19, 2017 | Uncategorized
Did you know that there are Bundle prices throughout the Occasions and Annual Catalogs? Two products are bundled together for a discount of 10%. ALL of the bundles are retiring but this doesn’t mean that the products themselves are retiring.

The Ready to Pop Bundle (click on the picture to see it enlarged) is one of the retiring bundles. The stamp set and Thinlits will be in the new catalog but the 10% discount won’t be available. This bundle is WHILE SUPPLIES LAST.
But please note this, if you are interested in a bundle, PLEASE check on the individual pieces FIRST. In some instances, buying the two items individually is cheaper than the bundle!! Normally this isn’t the case but with the retiring sale, you need to check!
The Birthday Fiesta Bundle is another bundle in the catalog. Both the stamp set and the Framelits are retiring. Neither product is on sale so your best price IS the bundle but the bundle is while supplies last!

The Sweet Cupcake Bundle includes the Sweet Cupcake stamp set and the Cupcake Cutouts Framelits. Neither of these two products are retiring so the bundle is a great deal! Again, while supplies last! 
If you have any questions about any of the bundles, don’t hesitate to email me!
by Tracy | Apr 18, 2017 | Uncategorized
It’s April and you probably aren’t thinking about December right now but I wanted to let you know about two products on sale!

The stamp set, Embellished Ornaments, comes in Wood and Clear mount but the WOOD mount is on sale for 25% off. The Delicate Ornament Thinlits which coordinate with the set are 20% off! The stamp set can be ordered as late as May 22nd and then after that time, what’s left will be while supplies last. The Thinlits are NOW while supplies last!!

Embellished Ornaments
Wood #139756 $28.00 on sale $21.00
Clear#139759 $20.00

Both the stamp set and Thinlits are just beautiful. In the card below, I used just the Thinlits. I love all of the detail!


If you’d like to see everything on the retirement list, click here!
If you’d like to place an order, click HERE!
Enjoy the rest of your day!
by Tracy | Apr 17, 2017 | Uncategorized
I hope your week has started off well! Today I am sharing cards I made over the weekend to send out to customers who placed orders in the last few days.

I don’t like sharing product that you can’t purchase so while I would normally add some pearls or rhinestones to my card, I didn’t as they’ve sold out.
The paper I used to cut out the butterflies, Floral Boutique, is on the retired list but as of right now, it’s available and not showing up as being low inventory. I used the Petal Burst embossing folder for the Whisper White layer. You could definitely make the card without the embossing but I think it adds a nice touch.
Tip: I used glue dots down the center of the butterfly. You could also use Stampin’ Dimensionals.
You’ll find a list of all the products I used to make this card below as well as the measurements for the layers.

Measurements for Layers
Thick Whisper White: 8-1/2″ x 5-1/2″ scored at 4-1/4″
Night of Navy cardstock: 4″ x 5-1/4″
Whisper White: 3-3/4″ x 5″
Stamping Supplies – Click on any product and you’ll be directed to my Stampin’ Up! online store! Once there, it’s easy to add items to your cart!
Click HERE to see all the products on the Retiring List!
by Tracy | Apr 16, 2017 | Uncategorized

I wanted to pop in today to wish you a very Happy Easter!
These beautiful eggs were decorated by my granddaughter, Audrey! What child doesn’t love decorating eggs??
I hope you have a wonderful day!