by Tracy | Nov 16, 2016 | Uncategorized

I really do love fall weather but it definitely isn’t fall like where I am in southern California. It was in the high 80s today and seriously, this isn’t the type of weather I enjoy in November. If my weather app is correct, I think it’s supposed to be in the low seventies next week. I. can’t. wait.
While I was visiting my mom a few weeks ago this tree was right outside the room I set up as my temporary craft area. I loved being able to see it with all of its beautiful colors.

I started today’s card while I was with my mom and the little tree was definitely my inspiration. I die cut the leaves using the Leaflets Framelits and then sponged color all over them. When I started placing them on my paper, I decided that some should be hanging off, just as if they had fluttered down onto the paper. My white layer is embossed with the Softly Falling embossing folder and the sentiment is cut out of Basic Black using the Hello You Thinlits. It may not seem like fall but looking at my card reminds me that it really is!
Product List – These are the Stampin’ Up! products I used to create my card. Click on any of them below for more information or to place an order!
by Tracy | Nov 15, 2016 | Uncategorized
I wanted to give you a quick update on the Stitched Shapes Framelits. First, I gave incorrect information in my blog post earlier today and I’ve corrected it. I originally said that you wouldn’t be able to get these Framelits after November 30th and would have to wait for the new annual catalog. That is incorrect!! They aren’t going away. So sorry for that!
With that being said, I just heard from Stampin’ Up! that they are extremely popular and I really am not surprised. Unfortunately they will be in backorder status very soon and will be placed on non-orderable status on November 21, 2016, at 10:00 AM (MT). Additionally, when ordering this item, you will receive a pop-up notification asking if you would like to be notified via email when this product is back in stock. This will allow you to find out immediately when the item’s status changes and it is again available for purchase.
If you really want to purchase these, I would do it today! It may be possible to snag one before they go on backorder! Click here to head over to my online store and start shopping!! Any questions, don’t hesitate to ask!

by Tracy | Nov 15, 2016 | Uncategorized
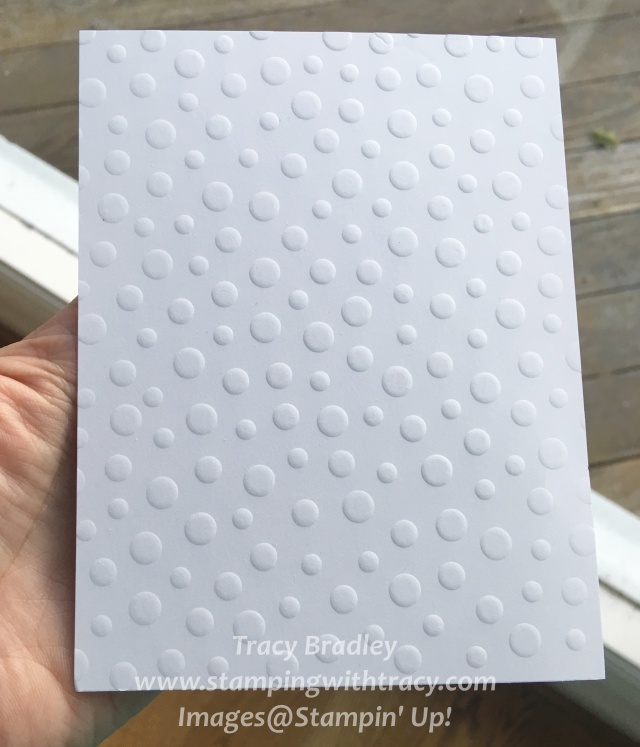
Are you looking at this picture and wondering which embossing folder I used? I didn’t use an embossing folder! I used one of our Seasonal Decorative Masks! Isn’t that cool???!!!

To do this you will need a rubber embossing mat. Stampin’ Up! doesn’t sell these but I found one on Amazon. Here’s the sandwich you’ll use in your Big Shot:
- Big Shot platform
- Standard Cutting Pad
- Rubber embossing mat
- Whisper White cardstock (or another color of your choice)
- Decorative Mask (carefully place it on the platform because it is the same size as the platform – you don’t want it damaged as it goes through)
- A piece of printing paper folded in half. This part is very important! You are adding this paper to add more “height”. Each Big Shot is calibrated differently so it’s possible you won’t even need to do this step. You will have to experiment to find out. Slowly run this sandwich through your Big Shot. If it is very difficult to run through, STOP, and take the printing paper off. It’s also possible that it will go through easily and your paper won’t emboss in which case, fold your printing paper in fourths. You’ll see what I mean when you give it a try!
- You’ll now have a beautifully embossed piece of paper!
Here’s a card I made using the embossed piece. It’s difficult to see it in my photo, but if you scroll down, you’ll see a close up.


The adorable dog comes from the set Bella & Friends and I colored her with Copic Markers. The sentiment is from the set Endless Birthday Wishes. I also used the new Stitched Shapes Framelits – love them!!! If you love them too, get them before November 30th, otherwise you’ll have to wait for their debut in the 2017 Annual Catalog which comes out in June 2017. CORRECTION: I apologize for giving wrong information here!! The Framelits WILL be available after November 30th. Yippee!!
All of the products I used to make my card are listed below. To place an order or for more information about each product, simply click on it. If you have any questions, don’t hesitate to ask!
Product List
by Tracy | Nov 14, 2016 | Uncategorized

Everyone loves a sale and during the month of November, a select group of stamp sets are 25% off! Baby Bear, one of the sets on sale, comes with 12 photopolymer stamps. It’s a two-step stamp set which means you can combine individual stamps (the bear in this set) to build up the final image. Seven different sentiments are also included.
Below are all of the stamps sets on sale until November 30th. Click on any of the images for more information or to place an order!

I’m in LOVE with our new Stitched Shapes Framelits! They will be in the 2017 Annual Catalog but you can purchase them now during the month of November! After November 30th, you’ll have to wait for the new catalog to come out! For more information, click here!

Stitched Shapes Framelits #145372 $30.00
If you have any questions, don’t hesitate to ask!
by Tracy | Nov 13, 2016 | Uncategorized

Happy Sunday! I hope you’re having a relaxing weekend!
Yesterday I posted a video from Stampin’ Up! but for those of you who receive notification of my blog posts via email, the video didn’t show up in the email. I have no idea why this happens but I’ll try to remember to let you know next time to click the title of the post so that you can see the post in its entirety.
Today I want to share a card I made for a friend of mine for her birthday using the stamp set Bunch of Blossoms. This is a Two-Step Stamp set which allows you to combine individual stamps to build the final image you want, in the colors you want. In this stamp set you get a whopping 26 pieces! I’ve pointed out below which ones I used to create my card.

Bunch of Blossoms Stamp Set #141573
This was the first time I’d used this stamp set and I did a lot of experimenting to get the look I wanted. For the petals, I used one color but when I used the stamp on the right (the one with more coverage), I stamped onto my ink pad and then stamped off on my grid paper before stamping onto my Whisper White piece. The other stamp was used full strength. I did the same thing with the leaves. I recommend trying it out and seeing what you like!
I added Wink of Stella to the petals and leaves which gave it a pretty shimmery look! I embossed a piece of Whisper White with the Petal Burst embossing folder. My sentiment is from the stamp set Birthday Banners.

Product List – Below you can find the products I used to make my card. For more information or to place an order, click on the pictures. Any questions, don’t hesitate to email me!