by Tracy | Aug 22, 2015 | Uncategorized

Oh my! You certainly can make some beautiful butterflies with the stamp set Watercolor Wings! There are so many possibilities! To create my large butterfly, I used the stamps that I’ve labeled below. First, I stamped with Pool Party. Next, using Bermuda Bay, I inked up the stamp and then stamped off onto my grid paper before stamping over the Pool Party image. Blackberry Bliss was last and I used this full strength. I tried stamping it off first but really like how it looks full strength. The thing is, you can try all different combinations and have a beautiful creation!

Watercolor Wings
#139424 $26.00
Photopolymer
I cut it out using the coordinating Bold Butterfly Framelits (the Framelits and stamp set can be purchased as a bundle with a 15% discount) but you could also cut it out with your scissors. My Blackberry Bliss butterfly on the top was made using the Butterflies Thinlits dies. All of these supplies will be listed in my Product List below. My sentiment is also from the Watercolor Wings stamp set along with the dots which I did in Bermuda Bay. I did some of the dots full strength and others I stamped off one or two times. I decided at the last minute to run it through the Decorative Dots embossing folder. I can’t wait to see what else I can create with this set!
Product List – Click on any item below for more information or to make a purchase.
August Ordering Incentive
Just a few days left to receive these three completed cards with a $35 order! Read here for more details!

Ordering Suggestions for the August Incentive:
Watercolor Wings & Bold Butterfly Framelits #140232 $36.50
OR
Watercolor Wings stamp set #139424 $26.00
Whisper White cardstock #100730 $8.50
Stampin’ Dimensionals #104430 $4.00
Total: $38.50
by Tracy | Aug 20, 2015 | Uncategorized

I was finally able to sit down and play with the Cottage Greetings Card Kit. I am so impressed with the contents! You’ll get enough supplies to make 15 cards. There are three different 5″ x 5″ card bases which all have silver sparkle on them. In addition, you’ll receive silver foil envelope liners, envelopes, die cut paper and foil images, baker’s twine, sequins, wood veneer sheets, enamel dots and Stampin’ Dimensionals. You need to supply stamp pads, Snail adhesive, Multipurpose Liquid Glue and a stamp set. I used the one that coordinates with the set, Cottage Greetings (I’ll provide a link to all of these extras in my supply list below) but you could use whatever you already own.
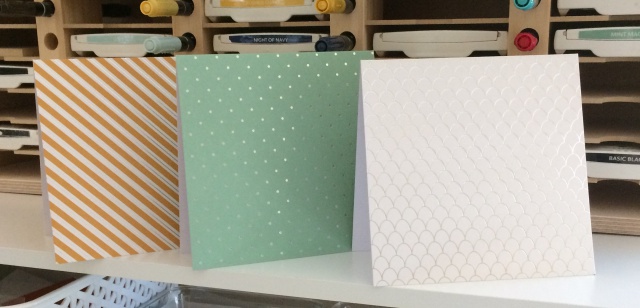
Three different card bases
You can put the cards together as shown on the cover of the kit or switch things around. I did a little of both!


If you would love to make your own cards and want something quick, easy and CUTE, this kit might be just what you’re looking for!
Product List – Click on any item below for more information or to place an order at my Stampin’ Up! online store!
August Ordering Incentive
Place a minimum $35 order and I’ll send you these three completed cards, a PDF for each card that includes cutting instructions and supplies, and you’ll have access to two videos with tips and tricks to make them on your own! Click here for more details!
Ordering Suggestion for August Ordering Incentive
Cottage Greetings Card Kit (138377) $16.00
Cottage Greetings Clear Mount Stamp Set (139962) $16.00
Delightful Dijon Stamp Pad (138327) $6.50
Total: $38.50
by Tracy | Aug 18, 2015 | Uncategorized

The Weekly Deals are here! These prices are good until Monday, August 24, 2015 or while supplies last! Click on any item for more information or to place an order at my Stampin’ Up! online store!
August Ordering Incentive
Place a minimum $35 order and I will send you these three completed cards, a PDF with all the supplies needed along with cutting instructions and access to a private video showing you tips for making the cards. For more details, click here!
by Tracy | Aug 16, 2015 | Uncategorized
I realize that it still Sunday evening but I am posting my Monday blog post just a little bit early.
Kathy over at thedailymarker.com is having what she is calling a Pop up Challenge and it is all about lines! I was intrigued with her Day 1 Challenge and thought I would give it a try! The idea is to make lines on your paper and then start coloring! I figured that was easy enough so I drew my lines with a black Sharpie and then colored in my areas with Copic markers. I started out with a half piece of Whisper White cardstock and created what you see below.

I cut this piece down to 5″ x 3 3/4″ and then added little “eyelash lines” as Kathy refers to them using a fine tip Sharpie. My base is Whisper White cardstock with a piece of Basic Black on top of it. My sentiment is one of the words in the Greetings Thinlits.

As I was coloring, I was thinking how fun this would have been for my second graders. If there are any teachers reading this, definitely try this with your students! I think they would love it and I know they would create gorgeous art pieces!
If you decide to give it a try, I would love to see your creations! Have a terrific week!
Product List – Click on any item for more information or to place an order at my Stampin’ Up! online store!
Place a minimum $35 order and I’ll send these three completed cards to you! Click here for more details!
by Tracy | Aug 15, 2015 | Uncategorized

I hope you are enjoying your weekend so far! Several weeks ago my husband and I received an anniversary card (see below) and I immediately knew that I wanted to try and make a similar looking card.
It was really easy to make and each time you do it, you get a completely different look! I used one of my acrylic blocks, several Stampin’ Write markers and a spritzer. I colored directly onto my block with the markers. There’s no right way to do this. Then I spritzed it with water and stamped it onto my paper. I did try doing this directly onto the base of my card but I was never happy with it – it always seemed crooked to me. So, I ended up cutting it and mounting it onto Bermuda Bay cardstock. As I said, this is really easy and it will look very different each time you do it. You can lightly stamp it or press down harder for a different look. I used Whisper White cardstock which is fine as long as you don’t get the paper too terribly wet but you can use watercolor paper too. The markers I used were: Pacific Point, Bermuda Bay, Tempting Turquoise and Island Indigo. The first three can only be purchased as a set in the Brights collection but the Island Indigo can be purchased separately. See the product list below.
I finished the card by embossing my sentiment (from the set Build a Birthday) with silver embossing powder. Give this technique a try! I’d love to see what you create!

Product List – Click on any item below to make a purchase.
Place a minimum $35 order using the host code MHW93RAY and receive these three completed cards. Click here for more details!