by Tracy | Jun 17, 2025 | Appreciation Card
The card I’m sharing with you today was created using the Mixed Florals Bundle – because this bundle doesn’t have any sentiments, I was using the Textured Notes Dies and I decided to use the stamp set, too, Textured Notes Bundle, Floral Impressions Designer Series Paper and Starburst Sequins. All of these products are Online Exclusives.
If the links don’t work, please try them again! Look for the prices in the Supply List.


I started with Fresh Freesia cardstock for the base of my card. I then, adhered a piece of Floral Impressions Designer Series Paper to the front of the card. Next, I used the Textured Notes Dies and cut a rectangle out of Basic White cardstock.
I stamped using Memento Black Ink onto Basic White cardstock using the Mixed Florals stamp set. I colored the flowers and leaves using Stampin’ Blends: Fresh Freesia, Granny Apple Green, Lemon Lolly and Balmy Blue.


I adhered the Basic White rectangle to front of the card and adhered the flowers to the rectangle. I stamped the sentiment onto Basic White cardstock using Fresh Freesia ink and cut it out using the Textured Notes Dies. I added Stampin’ Dimensionals to the back and adhered it to the front of the card.


I completed my card by adding three Starburst Sequins in Fresh Freesia to the front of the card and I adhered a piece of Basic White cardstock to the inside.


Supply List
Below you’ll find all the Stampin’ Up! supplies I used for today’s card. If you need any stamping supplies, I’d love to be your demonstrator! You can place an order by clicking any of the images below to go to my Stampin’ Up! online store.
Measurements
- Fresh Freesia cardstock: 4-1/4″ x 11″
- Basic White cardstock (rectangle): approximately 3-3/4″ x 5-1/4″
- Basic White cardstock (sentiment): 1″ x 2-1/2″ Sorry, I made a mistake on the sentiment! It has been corrected.
- Basic White cardstock (inside card): 4″ x 5-1/4″
- Basic White cardstock (flowers): approximately 3″ x 5-1/4″
- Floral Impressions Designer Series Paper: 4″ x 5-1/4″
Month by Month Album Retreat 2025 Kit
Calling all scrapbookers! Simply purchase the Month by Month Album Retreat 2025 Kit, and you can attend the event Stampin’ Up! is putting on. Stock of this item is only while supplies last!
- Who: Crafters who love to scrapbook!
- When: July 16–18, 2025, 2:00–10:30 p.m. (MT)
- Where: Private Facebook Group
- Registration: There is no registration for this event! By purchasing the Month by Month Album Retreat 2025 Kit, you’ll get access to an exclusive Facebook group where the live event will stream.
- Price of Month by Month Album Retreat 2025 kit: $250
- Language of Event: This event will be presented in English only.
- After the Event: You can access the recorded event videos on the Virtual Album Retreat Facebook group page.


All Suites & Suite Products, Buy One, Get One 50% Off

- All available suites and suite products from the 2025–2026 Annual Catalog and Online Exclusives are buy one, get one 50% off.
- When you shop the sale, the 50% off discount will apply to the lower-priced item (for example, if you buy a suite collection and a stamp set from a suite, the suite would be full price, and the stamp set would be 50% off).
- Suite collections are available if all items are in stock; if all items are not in stock, you can still shop the available suite products.
- You don’t have to buy a suite and suite products all from the same suite collection for the discount to apply. You can buy any suite products from any suite.
- The discount will appear in your cart once you’ve added two items within the sale parameters to your cart.
- Products are available only while supplies last.
Last Chance Products
 t!
t!
Click here to go straight to the Last Chance Products page on the Stampin’ Up! site!
Two New Stampin’ Up! Kits
Click each graphic below for more information about the kit. These kits can be found in the Online Exclusives part of the Stampin’ Up! website.


Sweeter With You Paper Pumpkin Kit
You can now order subscriptions and manage your Paper Pumpkin subscription on the Stampin’ Up! website! You can cancel your Paper Pumpkin subscription at any time. If you want to skip the next kit, you can do that! You also receive Stampin’ Rewards when you order a single kit or purchase a 3-month, 6-month or 12-month subscription to Paper Pumpkin. If you’d like to subscribe, please click the graphic below.

An additional coordinating add-on is available but only for Paper Pumpkin subscribers. Click the image below for more information.

Thanks for stopping by today!
by Tracy | Jun 14, 2025 | Thank You Card
I was going to post another card using the Happy Hibiscus Bundle but I couldn’t find the dies on my messy desk! Does that happen to you? I’ve looked and looked for them but to no avail! They are probably right in front of me but I don’t see them.
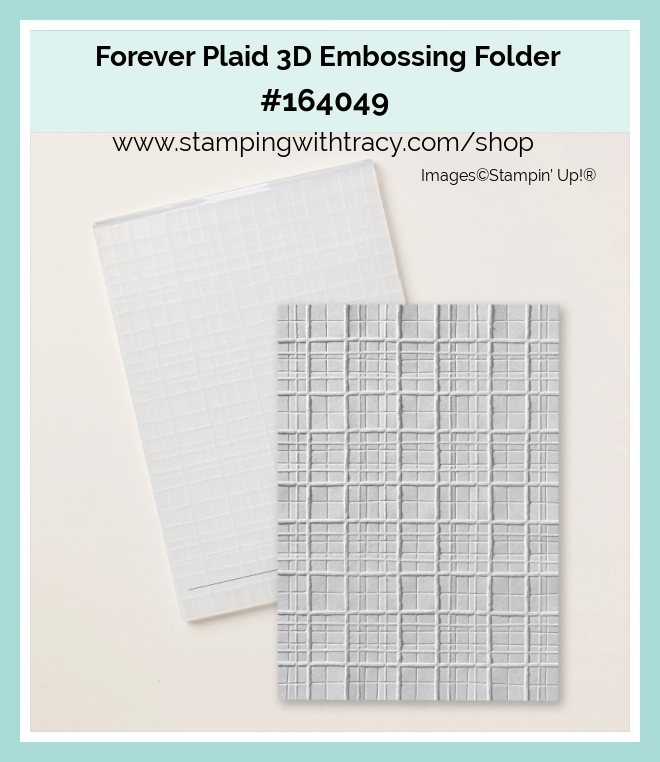
Instead I’m going to share a card I made yesterday using the Gallery Blooms Bundle, With You in Mind stamp set, Everyday Arches Dies, Forever Plaid 3D Embossing Folder and Strawberry Slush & Pretty in Pink Gems. You can find the measurements I used below the Supply List.


I started with a piece of Strawberry Slush cardstock for the base of my card. Then, I embossed a piece of Basic White cardstock using the Forever Plaid 3D Embossing Folder and adhered it to the front of the card.


I cut an arch out of Strawberry Slush cardstock and another one out of Basic White cardstock using the Everyday Arches Dies. I stamped the sentiment onto the Basic White arch, using the stamp set, With You in Mind. I adhered the arches together.
Then, I stamped the flowers onto Basic White cardstock in Memento ink using the Gallery Blooms stamp set. I colored the flowers with my Stampin’ Blends: Strawberry Slush (flowers), Granny Apple Green (leaves) and Pumpkin Pie (center of flowers). I cut them out using the Gallery Blooms Dies.

I adhered the flowers to the top of the arches, then, added Stampin’ Dimensionals to the back of the arches and adhered it to the front of the card.
To complete my card, I added a piece of Basic White cardstock to the inside of the card and added five Strawberry Slush gems to the front of the card.


Supply List
Below you’ll find all the Stampin’ Up! supplies I used for today’s card. If you need any stamping supplies, I’d love to be your demonstrator! You can place an order by clicking any of the images below to go to my Stampin’ Up! online store.
The Specialty Plate is used with 3D Embossing Folders and Hybrid Embossing Folders.
Measurements
- Strawberry Slush cardstock: 4-1/4″ x 11″ score at 5-1/2″
- Strawberry Slush cardstock (arch – 6th smallest die): approximately 3″ x 4-1/4″
- Basic White cardstock (embossed and inside card): (2) 4″ x 5 1/4″
- Basic White cardstock (arch – 5th smallest die): approximately 2-3/4″ x 4″
- Basic White cardstock (flowers): 2-1/2″ x 3-1/4″
Month by Month Album Retreat 2025 Kit
Calling all scrapbookers! Simply purchase the Month by Month Album Retreat 2025 Kit, and you can attend the event Stampin’ Up! is putting on. Stock of this item is only while supplies last!
- Who: Crafters who love to scrapbook!
- When: July 16–18, 2025, 2:00–10:30 p.m. (MT)
- Where: Private Facebook Group
- Registration: There is no registration for this event! By purchasing the Month by Month Album Retreat 2025 Kit, you’ll get access to an exclusive Facebook group where the live event will stream.
- Price of Month by Month Album Retreat 2025 kit: $250
- Language of Event: This event will be presented in English only.
- After the Event: You can access the recorded event videos on the Virtual Album Retreat Facebook group page.
All Suites & Suite Products, Buy One, Get One 50% Off
- All available suites and suite products from the 2025–2026 Annual Catalog and Online Exclusives are buy one, get one 50% off.
- When you shop the sale, the 50% off discount will apply to the lower-priced item (for example, if you buy a suite collection and a stamp set from a suite, the suite would be full price, and the stamp set would be 50% off).
- Suite collections are available if all items are in stock; if all items are not in stock, you can still shop the available suite products.
- You don’t have to buy a suite and suite products all from the same suite collection for the discount to apply. You can buy any suite products from any suite.
- The discount will appear in your cart once you’ve added two items within the sale parameters to your cart.
- Products are available only while supplies last.
Last Chance Products
Click here to go straight to the Last Chance Products page on the Stampin’ Up! site!
Two New Stampin’ Up! Kits
Click each graphic below for more information about the kit. These kits can be found in the Online Exclusives part of the Stampin’ Up! website.
Sweeter With You Paper Pumpkin Kit
You can now order subscriptions and manage your Paper Pumpkin subscription on the Stampin’ Up! website! You can cancel your Paper Pumpkin subscription at any time. If you want to skip the next kit, you can do that! You also receive Stampin’ Rewards when you order a single kit or purchase a 3-month, 6-month or 12-month subscription to Paper Pumpkin. If you’d like to subscribe, please click the graphic below.
An additional coordinating add-on is available but only for Paper Pumpkin subscribers. Click the image below for more information.
Thanks for stopping by today! Enjoy your weekend!
by Tracy | Jun 11, 2025 | Kindness Card
I made today’s card out of the Happy Hibiscus Bundle, Stylish Shapes Dies and Rainbow Adhesive-Backed Dots. The Happy Hibiscus Bundle is an Online Exclusive and it comes with the Happy Hibiscus stamp set and the Happy Hibiscus Hybrid Embossing Folders which comes with eleven dies. I made another card on Monday using this bundle and you can see it here.
If my links don’t work, please try them again!


I started with a piece of Flirty Flamingo cardstock for the base of my card. Then, I embossed a piece of Basic White cardstock using the Happy Hibiscus Hybrid Embossing Folder, and then I adhered it to the front of my card.


I die cut four leaves out of Granny Apple Green cardstock (the leaf die is included in the Hybrid Embossing Folder) and then I cut two hibiscus flowers out of Basic White cardstock (you can’t tell from the above picture, but there is a way to cut three flowers out of one die – I saved the others for another project).
I used my small blending brush and the Flirty Flamingo ink pad on a piece of Grid Paper and blended the color onto the two hibiscus flowers. Once I was finished, I set them aside.
I cut the largest circle in the Stylish Shapes Dies out of Basic White cardstock and I stamped the sentiment ( in the Happy Hibiscus stamp set) towards the bottom of the circle in Flirty Flamingo ink.


I adhered the flowers to the top of the circle placing one leaf under the left hibiscus. I added Stampin’ Dimensionals to the back of the circle and adhered it to the front of the card. Then, I added the three other leaves, slipping them behind the circle.
To complete my card, I added five Rainbow Adhesive-Backed Dots in Flirty Flamingo onto the card front and added a piece of Basic White cardstock to the inside of the card.

Supply List
Below you’ll find all the Stampin’ Up! supplies I used for today’s card. If you need any stamping supplies, I’d love to be your demonstrator! You can place an order by clicking any of the images below to go to my Stampin’ Up! online store.
The Specialty Plate is used with 3D Embossing Folders and Hybrid Embossing Folders.
Measurements
- Flirty Flamingo cardstock: 4-1/4″ x 11″ score at 5-1/2″
- Granny Apple Green cardstock (four leaves): each piece will be approx. 1-1/4″ x 2″
- Basic White cardstock (embossed and inside card): (2) 4″ x 5-1/4″
- Basic White cardstock (circle): approx. 3-1/2″ x 3 1/2″
- Basic White cardstock (2 hibiscus): (As I explained in the directions, I cut all three flowers out and saved them for another project: approx. 4-1/2″ x 3″
Month by Month Album Retreat 2025 Kit
Calling all scrapbookers! Simply purchase the Month by Month Album Retreat 2025 Kit, and you can attend the event Stampin’ Up! is putting on. Stock of the item is only while supplies last!
- Who: Crafters who love to scrapbook!
- When: July 16–18, 2025, 2:00–10:30 p.m. (MT)
- Where: Private Facebook Group
- Registration: There is no registration for this event! By purchasing the Month by Month Album Retreat 2025 Kit, you’ll get access to an exclusive Facebook group where the live event will stream.
- Price of Month by Month Album Retreat 2025 kit: $250
- Language of Event: This event will be presented in English only.
- After the Event: You can access the recorded event videos on the Virtual Album Retreat Facebook group page.
All Suites & Suite Products, Buy One, Get One 50% Off
- All available suites and suite products from the 2025–2026 Annual Catalog and Online Exclusives are buy one, get one 50% off.
- When you shop the sale, the 50% off discount will apply to the lower-priced item (for example, if you buy a suite collection and a stamp set from a suite, the suite would be full price, and the stamp set would be 50% off).
- Suite collections are available if all items are in stock; if all items are not in stock, you can still shop the available suite products.
- You don’t have to buy a suite and suite products all from the same suite collection for the discount to apply. You can buy any suite products from any suite.
- The discount will appear in your cart once you’ve added two items within the sale parameters to your cart.
- Products are available only while supplies last.
Last Chance Products
Click here to go straight to the Last Chance Products page on the Stampin’ Up! site!
Two New Stampin’ Up! Kits
Click each graphic below for more information about the kit. These kits can be found in the Online Exclusives part of the Stampin’ Up! website.
Thanks for stopping by today!
by Tracy | Jun 9, 2025 | You Make Me Smile
I made my card using the Happy Hibiscus Bundle (which I didn’t play with until yesterday – why did it take me so long?) and 2024-2026 In Color Flat Pearls. This bundle is an Online Exclusive and it comes with a stamp set and the Happy Hibiscus Hybrid Embossing Folder which comes with eleven dies.
If the links don’t work for you, please try them again!

I started with a piece of Berry Burst cardstock for the base of my card. Then, I embossed a piece of Basic White cardstock using the Happy Hibiscus Hybrid Embossing Folder and I then adhered it to the front of the card.


I cut one hibiscus in Berry Burst cardstock and the other in Petunia Pop cardstock using the Happy Hibiscus Hybrid Embossing Folder and the die that cuts three flowers out (I saved the others for another project).
If you haven’t worked with Hybrid Embossing Folders yet, you need to put the die where the Stampin’ Up! emblem is (you can see the picture below). The die will fit into the groove, then put your paper in and it will cut & emboss your flowers!
I also cut four leaves out of Granny Apple Green cardstock using the leaf die that comes with the Happy Hibiscus Hybrid Embossing Folder.


I decided where I wanted to put the leaves and took away the flowers and then adhered the leaves down. I adhered the Petunia Pop hibiscus to the front of the card and popped the Berry Burst hibiscus with Stampin’ Dimensionals.
I stamped the sentiment onto Basic White cardstock using Berry Burst ink and the Happy Hibiscus stamp set and then cut it out using one of the dies that comes with the Happy Hibiscus Hybrid Embossing Folder, I added Stampin’ Dimensionals to the back and adhered it to the front of my card.

To complete my card I added three 2024-2026 In Color Flat Pearls in Petunia Pop around the front of the card, Then, I added a piece of Basic White cardstock to the inside.
Supply List
Below you’ll find all the Stampin’ Up! supplies I used for today’s card. If you need any stamping supplies, I’d love to be your demonstrator! You can place an order by clicking any of the images below to go to my Stampin’ Up! online store.
The Specialty Plate is used with 3D Embossing Folders and Hybrid Embossing Folders.
Measurements
- Berry Burst cardstock: 4-1/4″ x 11″ score at 5-1/2″
- Berry Burst cardstock: approx. 3″ x 4-1/2″
- Petunia Pop cardstock: approx. 3″ x 4-1/2″
- Granny Apple Green cardstock (four leaves): each piece will be approx. 1-1/4″ x 2″
- Basic White cardstock (embossed and inside card): 4″ x 5-1/4″
- Basic White cardstock (sentiment): approx. 1-1/4″ x 3-1/4″
Month by Month Album Retreat 2025 Kit
Calling all scrapbookers! Simply purchase the Month by Month Album Retreat 2025 Kit, and you can attend the event Stampin’ Up! is putting on. This item is only while supplies last!
- Who: Crafters who love to scrapbook!
- When: July 16–18, 2025, 2:00–10:30 p.m. (MT)
- Where: Private Facebook Group
- Registration: There is no registration for this event! By purchasing the Month by Month Album Retreat 2025 Kit, you’ll get access to an exclusive Facebook group where the live event will stream.
- Price of Month by Month Album Retreat 2025 kit: $250
- Language of Event: This event will be presented in English only.
- After the Event: You can access the recorded event videos on the Virtual Album Retreat Facebook group page.
All Suites & Suite Products, Buy One, Get One 50% Off
- All available suites and suite products from the 2025–2026 Annual Catalog and Online Exclusives are buy one, get one 50% off.
- When you shop the sale, the 50% off discount will apply to the lower-priced item (for example, if you buy a suite collection and a stamp set from a suite, the suite would be full price, and the stamp set would be 50% off).
- Suite collections are available if all items are in stock; if all items are not in stock, you can still shop the available suite products.
- You don’t have to buy a suite and suite products all from the same suite collection for the discount to apply. You can buy any suite products from any suite.
- The discount will appear in your cart once you’ve added two items within the sale parameters to your cart.
- Products are available only while supplies last.
Last Chance Products
Click here to go straight to the Last Chance Products page on the Stampin’ Up! site!
Two New Stampin’ Up! Kits
Click each graphic below for more information about the kit. These kits can be found in the Online Exclusives part of the Stampin’ Up! website.
Full of Charm Paper Pumpkin Kit – This kit will only be available until June 10th.
You can now order subscriptions and manage your Paper Pumpkin subscription on the Stampin’ Up! website! You can cancel your Paper Pumpkin subscription at any time. If you want to skip the next kit, you can do that! You also receive Stampin’ Rewards when you order a single kit or purchase a 3-month, 6-month or 12-month subscription to Paper Pumpkin. If you’d like to subscribe, please click the graphic below.

An additional coordinating add-on is available but only for Paper Pumpkin subscribers. Click the image below for more information.

Thanks for stopping by today!
by Tracy | Jun 6, 2025 | Birthday Card, Special Day
The card I’m sharing with you today was made using the Beautiful Butterflies Bundle (an Online Exclusive), Celebratory Sips Designer Series Paper (an Online Exclusive), Textured Notes Dies (an Online Exclusive), Glass & Gardens Embossing Folders (an Online Exclusive) and Adhesive-Backed Sparkle Gems (an Online Exclusive – these on the Last Chance List and are on sale). You can see another version of this card, here!
If the links don’t work, please try again!


I started with a piece of Blackberry Bliss cardstock for the base of my card. Then I embossed a piece of Blackberry Bliss cardstock using one of the Glass & Gardens Embossing Folders and my Stampin’ Cut & Emboss Machine. I adhered it to a piece of Basic White cardstock. I cut a piece of Celebratory Sips Designer Series Paper and adhered it to the Basic White cardstock. Next, I adhered the Basic White cardstock to the front of the card.


I used the Textured Notes Dies to cut a rectangle out of Basic White cardstock. I stamped the sentiment on the rectangle using Blackberry Bliss ink and the Beautiful Butterflies stamp set. I added Stampin’ Dimensionals to the back and adhered it to the front of the card.


I cut two butterflies out of Celebratory Sips Designer Series Paper using the dies that come with the Beautiful Butterflies Hybrid Embossing Folder. I then attached them to the top of the sentiment using Mini Glue Dots.
I added two small Adhesive-Backed Sparkle Gem to each butterfly and three more to the card front (these gems are on the Last Chance List and they are sale)!
To complete my card, I added a piece of Basic White cardstock to the inside of the card.


Supply List
Below you’ll find all the Stampin’ Up! supplies I used for today’s card. If you need any stamping supplies, I’d love to be your demonstrator! You can place an order by clicking any of the images below to go to my Stampin’ Up! online store.
The Specialty Plate is used with 3D Embossing Folders and Hybrid Embossing Folders. I forgot to add it in, Specialty Plate #154711.
Measurements
- Blackberry Bliss cardstock: 4-1/4″ x 11″ score at 5-1/2″
- Blackberry Bliss cardstock: 2″ x 5″
- Celebratory Sips Designer Series Paper: 2″ x 3-3/4″
- Celebratory Sips Designer Series Paper (two butterflies): scraps
- Basic White cardstock: (2) 4″ x 5-1/4″
- Basic White cardstock (rectangle): approximately 4-1/8″ x 2-5/8″
Month by Month Album Retreat 2025 Kit
Calling all scrapbookers! Simply purchase the Month by Month Album Retreat 2025 Kit, and you can attend the event Stampin’ Up! is putting on. This item is only while supplies last!
- Who: Crafters who love to scrapbook!
- When: July 16–18, 2025, 2:00–10:30 p.m. (MT)
- Where: Private Facebook Group
- Registration: There is no registration for this event! By purchasing the Month by Month Album Retreat 2025 Kit, you’ll get access to an exclusive Facebook group where the live event will stream.
- Price of Month by Month Album Retreat 2025 kit: $250
- Language of Event: This event will be presented in English only.
- After the Event: You can access the recorded event videos on the Virtual Album Retreat Facebook group page.
All Suites & Suite Products, Buy One, Get One 50% Off
- All available suites and suite products from the 2025–2026 Annual Catalog and Online Exclusives are buy one, get one 50% off.
- When you shop the sale, the 50% off discount will apply to the lower-priced item (for example, if you buy a suite collection and a stamp set from a suite, the suite would be full price, and the stamp set would be 50% off).
- Suite collections are available if all items are in stock; if all items are not in stock, you can still shop the available suite products.
- You don’t have to buy a suite and suite products all from the same suite collection for the discount to apply. You can buy any suite products from any suite.
- The discount will appear in your cart once you’ve added two items within the sale parameters to your cart.
- Products are available only while supplies last.
Last Chance Products
Click here to go straight to the Last Chance Products page on the Stampin’ Up! site!
Two New Stampin’ Up! Kits
Click each graphic below for more information about the kit. These kits can be found in the Online Exclusives part of the Stampin’ Up! website.
Full of Charm Paper Pumpkin Kit
You can now order subscriptions and manage your Paper Pumpkin subscription on the Stampin’ Up! website! You can cancel your Paper Pumpkin subscription at any time. If you want to skip the next kit, you can do that! You also receive Stampin’ Rewards when you order a single kit or purchase a 3-month, 6-month or 12-month subscription to Paper Pumpkin. If you’d like to subscribe, please click the graphic below.
An additional coordinating add-on is available but only for Paper Pumpkin subscribers. Click the image below for more information.
Thanks for stopping by today! Enjoy your weekend!