Today is a two post day because I’m just too excited to wait until tomorrow! At On Stage in Salt Lake City a brand new product was demonstrated and this morning all of the details were released and we were given the ok to fill you in on all the details!!! For the past several years, I’ve had the honor of being a part of the group of demonstrators who helped with the development of this new product.
Before I tell you all about this product and how you can purchase one, I want to tell you about my stamping philosophy. I absolutely love to stamp. I love creating pretty cards and 3D projects. Frustration has no part in my stamping. If I find that I’m not having fun because I’m just getting utterly frustrated, I move on to something else. There are many areas in life where this philosophy is absolutely unacceptable but in stamping, it’s OK! It’s supposed to be fun!!! The brand new STAMPARATUS solves so many frustrating problems and that’s why I’m very excited about this product!!
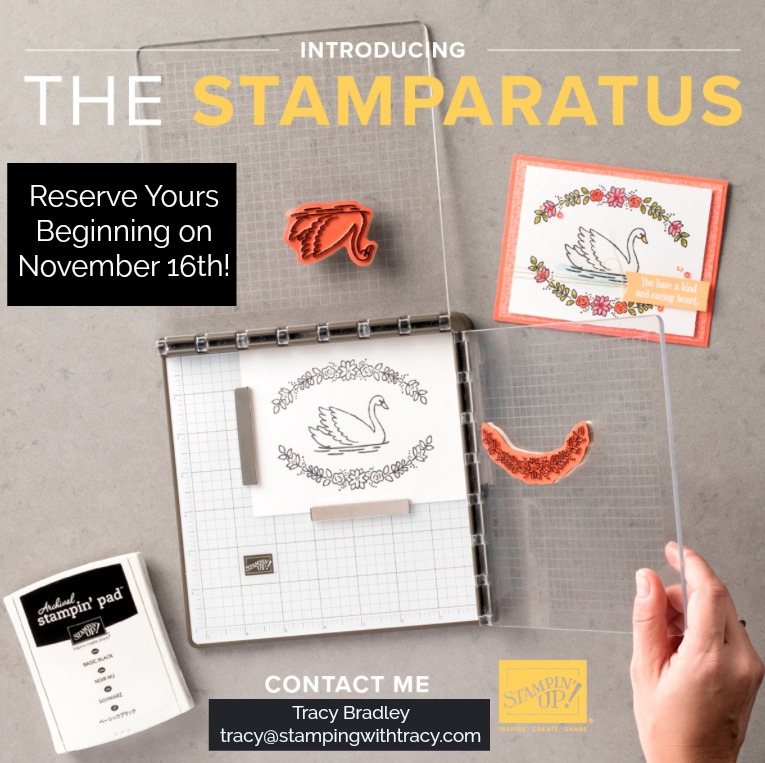
The Stamparatus is a stamp positioning tool that will change the way you stamp with its very unique features. Check out the video below (my favorite feature: the hinges)!
Now that you’ve seen the video, don’t you love it???
You can precisely line up images without worrying about measuring or trying to get them straight.
Didn’t get enough ink on your stamp? No problem. There’s no need to start over, just ink it up again and stamp!
Want to make multiples of a card? This tool makes it so easy!
How to Preorder the Stamparatus $49.00
Stampin’ Up! is trying a brand new PREORDER reservation system for the Stamparatus. You’ll reserve a spot and as soon as it arrives in the Stampin’ Up! warehouse, it will be shipped to you.
There will be three reservation windows but reservations are while supplies last! If you want to be one of the first ones to get your hands on this wonderful new product, be sure to order as soon as possible starting November 16th! I don’t know how many will be available within each reservation window but if you’re as excited as I am, order it immediately! The reservation window will open on November 16th at 2:00 PM Mountain Time.
Reservation Windows
November 16 – 30, 2017 Will ship approximately February 1, 2018
December 5 – 30, 2017 Will ship approximately March 19, 2018
January 15 -30, 2018 Will ship approximately April 15, 2018
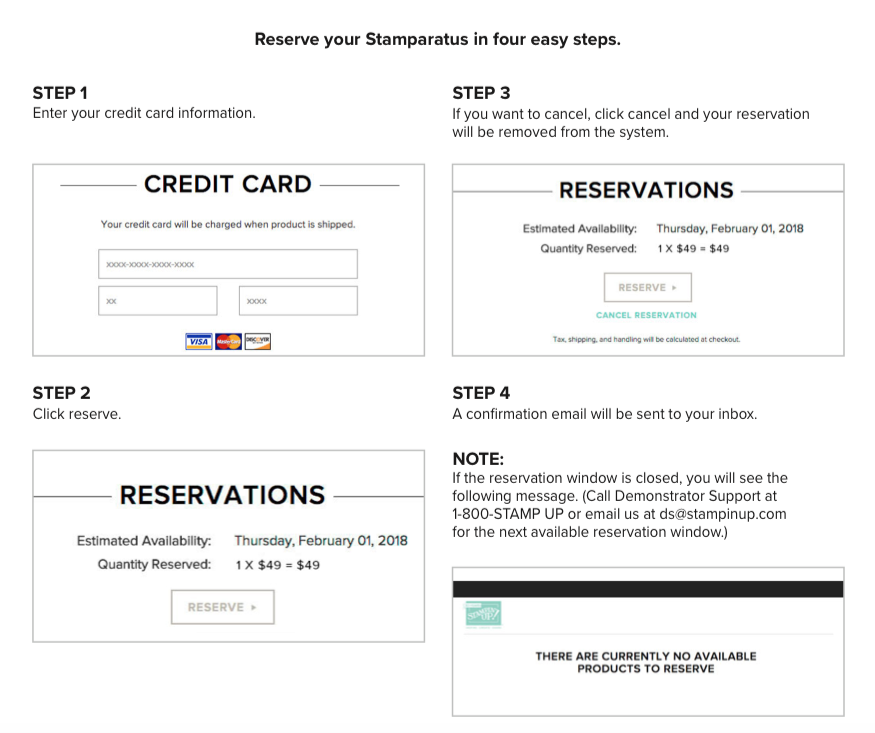
You will be reserving your Stamparatus and your credit card won’t be charged until it’s shipped. You will need a Stampin’ Up! customer account so if you haven’t ordered before, you’ll need to set that up. Create an account by clicking HERE!
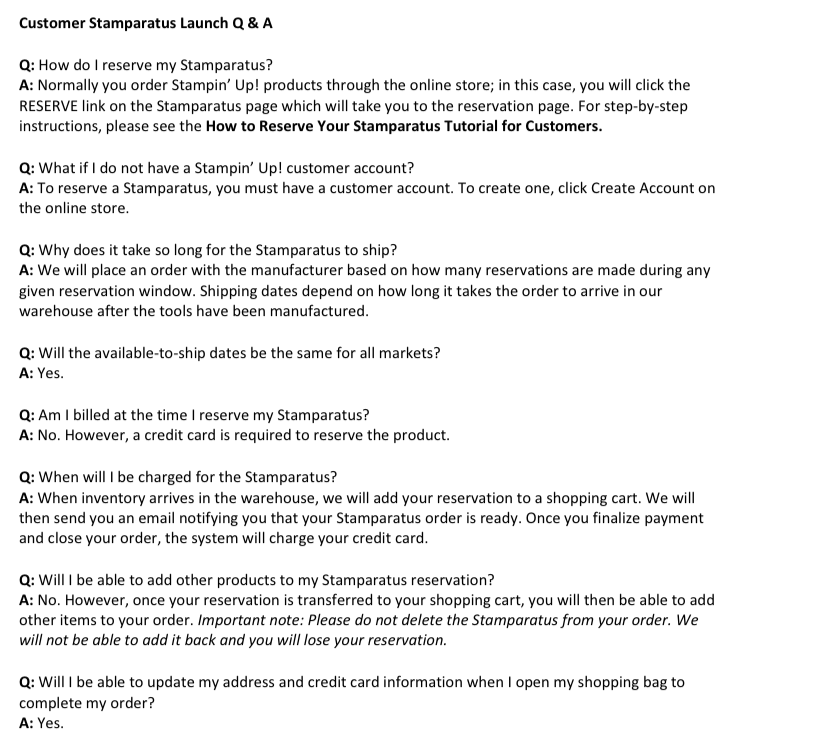
In the Q & A below, the How to Reserve Your Stamparatus Tutorial for Customersis the graphic above.
Please let me know if you have any questions!!
It’s a lot of information and I know it might be a bit confusing!
I returned home yesterday afternoon after spending four days in Salt Lake City attending the Stampin’ Up! event, On Stage. I had such a wonderful time and the days just flew by! I was able to reconnect with old friends and make new ones! It was so fun to be with thousands of woman (and a few men) who love stamping as much as I do!
We were able to see some sneak peeks of new products coming your way in January and that’s always SO exciting and fun!
Weeks before On Stage, I worked on making cards to swap with other demonstrators. It was well worth all the time and effort to make them because I received some beautiful cards in return. I’ll start sharing some of my favorites tomorrow!
The last time I was in Salt Lake City for a Stampin’ Up! event was three years ago when I attended with my good friend, Kristina. Kristina passed away from ALS two years ago this month and being in SLC without her this time was difficult. The picture below was taken during that trip. I crossed the stage for my Stampin’ Up! five year anniversary and it was Kristina’s tenth. Kristina was definitely with me in spirit during my trip last week.
Isn’t this card so stinkin’ adorable??? I received it in the mail from my team leader, Dawn, and I just love it!
Dawn used the Stampin’ Blendsto color the sweet reindeer from the stamp set, Seasonal Chums. It also has matching Framelits (Seasonal Tags Framelits Dies) and if you purchase both the stamp set and the Framelits, you can save 10%. You can purchase them separately or as a bundle, it’s up to you. Each of the options are listed in my product list below.
Dawn used our Whisper White Notecards which are smaller than a regular sized card. There are 20 in a package and the envelopes are included! Love this cute card!
Tracy’s Stampin’ Blends Special Today is the Last Day!!!
The release of the Stampin’ Blends is so exciting and I want to add to that excitement! With a minimum order of $50, you’ll receive a FREE COMBO PACK of Stampin’ Blends from me. Here’s all the important details:
Place a minimum $50 order at my Stampin’ Up! online store between November 1-10 using the host code 3B3Z93NS. If you aren’t sure how to enter a host code when placing your online order, you can read about the host code here.
Once I receive verification of your order, I’ll email you to find out which combo pack of Stampin’ Blends you’d like to receive. If I don’t hear back from you by midnight on the 10th, I reserve the right to choose a color for you so that I can place all of the orders in a timely manner.
On the 10th, I will close the host code and order the pens. Once I receive the pens, I will send yours out to you! (Due to the Cash & Carry Stampin’ Up! policy, I cannot order these pens ahead of time).
This offer is only good through me, Tracy Bradley. You will not receive your free combo pack of Stampin’ Blends in your order from Stampin’ Up!, but from me, once I receive them.
Your combo pack of pens will ship on or before November 20th.
In the unforeseen event that the pens go on backorder before November 10th, there will be a delay in shipping your pens to you.
If your order is over $150, please do not use the host code as you will earn Host Rewards directly from Stampin’ Up! with any order over $150. You will still earn your FREE Combo Pack of Stampin’ Blends from me.
If you have any questions, please contact me!
Click here to download the Stampin’ Blends brochure.
I love the combination of Lemon Lime Twist and Basic Black and if you follow my blog regularly, you also know that I love the Layered Leaves embossing folder. Today’s card was fairly easy to make but between the vellum leaves, the embossed leaves and the beautiful Painted Autumn DSP, it looks like it took a lot longer to make than it actually did!
Having the right tools makes all the difference. After cutting my Designer Series Paper, I popped it into the Banner Triple Punch and just like that, I had a banner. The Lemon Lime Twist top layer went through the Big Shot in the Layering Leaves embossing folder and using the Leaf Punch, I made 2 vellum leaf branches. I love this punch and I’m keeping my fingers crossed that it will carry over into the Annual Catalog! I stamped my sentiment onto Very Vanilla cardstock using the stamp set, All Things Thanks and cut it out with the Layering Circles Framelits. I used these same Framelits for the Basic Black scallop underneath the sentiment.
All of the Measurements
Lemon Lime Twist: 11″ x 4-1/4″ score @ 5-1/2″ 3-3/4″ x 5″ for embossed layer
Basic Black: 5-1/4″ x 4″ scrap for the scallop circle under the sentiment
Designer Series Paper: 2″ x 5″
I hope this easy card has inspired you to pull out some paper and create! All of the products I used are listed below. To make a purchase, simply click any of the pictures in the product list. Only until tomorrow, place a minimum $50 order and I’ll send you a FREE Stampin’ Blends Combo Pack. Read all the details below! I’d love to send a package of these awesome pens to you!
Tracy’s Stampin’ Blends Special Tomorrow Is the Last Day!!!!
The release of the Stampin’ Blends is so exciting and I want to add to that excitement! With a minimum order of $50, you’ll receive a FREE COMBO PACK of Stampin’ Blends from me. Here’s all the important details:
Place a minimum $50 order at my Stampin’ Up! online store between November 1-10 using the host code 3B3Z93NS. If you aren’t sure how to enter a host code when placing your online order, you can read about the host code here.
Once I receive verification of your order, I’ll email you to find out which combo pack of Stampin’ Blends you’d like to receive. If I don’t hear back from you by midnight on the 10th, I reserve the right to choose a color for you so that I can place all of the orders in a timely manner.
On the 10th, I will close the host code and order the pens. Once I receive the pens, I will send yours out to you! (Due to the Cash & Carry Stampin’ Up! policy, I cannot order these pens ahead of time).
This offer is only good through me, Tracy Bradley. You will not receive your free combo pack of Stampin’ Blends in your order from Stampin’ Up!, but from me, once I receive them.
Your combo pack of pens will ship on or before November 20th.
In the unforeseen event that the pens go on backorder before November 10th, there will be a delay in shipping your pens to you.
If your order is over $150, please do not use the host code as you will earn Host Rewards directly from Stampin’ Up! with any order over $150. You will still earn your FREE Combo Pack of Stampin’ Blends from me.
If you have any questions, please contact me!
Click here to download the Stampin’ Blends brochure.
This offer is only valid November 1st – November 10, 2017.
Several weeks ago I shared that you can cut out a variety of materials with the Big Shot. My daughter and I cut seventy felt hearts in rainbow colors with the Big Shot because she had a very special project in mind for them.
Have you ever heard the term Rainbow Baby? I hadn’t heard it used until my daughter had a miscarriage several years ago. It was such a heart wrenching experience for her and I wish I could have done something to ease the pain of her loss. I found this definition of a Rainbow Baby and thought it was a beautiful description. “Rainbow Baby is the understanding that the beauty of a rainbow does not negate the ravages of the storm. When a rainbow appears, it doesn’t mean the storm never happened or that the family is not still dealing with its aftermath. What it means is that something beautiful and full of light has appeared in the midst of the darkness and clouds. Storm clouds may still hover but the rainbow provides a counterbalance of color, energy and hope.”
My grandson is my daughter and son-in-laws beautiful Rainbow Baby. He is absolutely precious and has brought such joy into our lives. I can’t imagine life without this very special little boy.