by Tracy | Jun 26, 2017 | Uncategorized

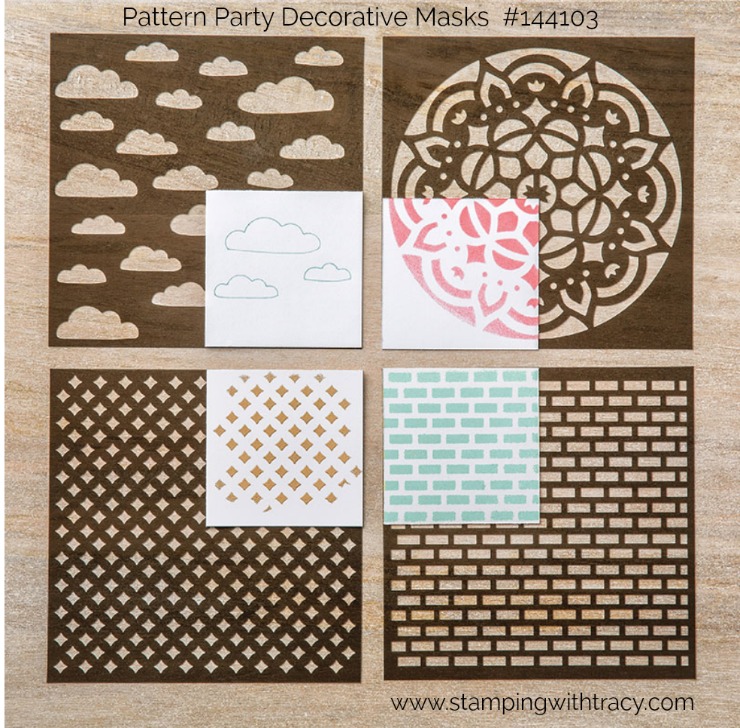
I’m back with another idea for using the new Pattern Party Decorative Masks! Included in this new product are 4 different masks. Using the mask pictured below, I was able to apply Emerald Envy and Dapper Denim inks using a sponge dauber to make a quick and easy card.

The mask is on my grid paper and held down using blue Painters Tape, which can easily be removed after the color has been applied.

The sentiment comes from a new stamp set called Lots of Love (available in clear or wood mount). It was stamped in Emerald Envy and sits on top of a piece of Dapper Denim that was cut out using the Layering Circles Framelits.
I try never to use retired product on a card that you can’t purchase but I accidentally did that on this card with the heart embellishment. Fortunately our new Glitter Enamel Dots do come in Dapper Denim and would be a nice replacement.


All of the products I used to make my card are listed below. Ready to make a purchase? Simply click on any of the pictures below and you’ll be taken to my Stampin’ Up! online store!
Thanks for stopping by! Have a terrific day!
by Tracy | Jun 24, 2017 | Uncategorized

I’m back with another card featuring the versatile Pattern Party Decorative Masks. These masks can be used with sponges, embossing paste, spritzers, etc.
To create today’s design, you need a mask (four come in the set), sponge daubers, and ink. Yesterday’s card also used the same supplies but I used different colors and I masked the inside of the design. You can see that card HERE. To color today’s card I used sponge daubers to color the entire design and then added a sentiment in the middle.
I started in the lower right hand corner using Wisteria Wonder, then blended Perfect Plum into that and finished with Melon Mambo. When the card was completed, I added a final touch by adding some Wink of Stella to the inner half circles. Don’t you love the added sparkle?

I used the brand new stamp set, Beautiful Bouquet, for the sentiment and stamped it in Memento Ink. It was cut out with the Stitched Shapes Framelits. The outer circle was cut out in Elegant Eggplant using the Layering Circles Framelits.
Stamping Supplies: Ready to make this card? Click on any of the items below and you’ll head over to my Stampin’ Up! online store!
Any questions? Please feel free to ask!
by Tracy | Jun 23, 2017 | Uncategorized

If you’re looking for a fun way to create a card, you’ll love our new Pattern Party Decorative Masks. You can make beautiful designs using these masks with embossing paste, sponge daubers, spritzers, etc.
I made my card using sponge daubers and three Stampin’ Up! Stampin’ Pads: Melon Mambo, Tangerine Tango and Crushed Curry. I dabbed the daubers in the stamp pads and then rubbed them over the mask making sure to blend where the colors overlapped. So easy!
I wanted to be able to add a sentiment to the middle of my design so to prepare my paper I cut out a circle from a post it note (I bought the kind that has adhesive on the entire sticky note). After attaching it to the center of my Whisper White paper, I taped down the mask using Painters Tape. The picture below shows after I applied color.

The picture below shows right before I took off the sticky note mask. The last step was to add my sentiment.

Tomorrow I’ll share another card I made using these fun Decorative Masks!
Stamping Supplies – Below you’ll find all the supplies I used to make today’s card. To purchase any of the products, click on one of the pictures and you’ll head over to my Stampin’ Up! online store. If you have any questions, please ask!
Non-Stampin’ Up! supplies: Full Adhesive Sticky Notes, Blue Painters Tape
by Tracy | Jun 21, 2017 | Uncategorized

Don’t you love it when you can create a beautiful card in just a few minutes? Each sheet of paper in the Designer Series Paper pack, Naturally Eclectic, is gorgeous! It’s so pretty that all you need to add is a sentiment!

The beautiful colors that coordinate with this paper are: Berry Burst, Emerald Envy, Fresh Fig, Lemon Lime Twist, Night of Navy, Peekaboo Peach, Soft Sky, and Whisper White. I used Fresh Fig and Lemon Lime Twist.

You’re probably wondering why I’m sharing the stamp set, This Little Piggy. Right? My sentiment actually comes from this set! Each pig in the set has a sentiment attached but I obviously didn’t include a pig on my card. How did I just stamp the sentiment? Easy! I put several post it notes around the sentiment, inked up the stamp, removed the post its and then stamped! It’s a great way to get more mileage out of your stamps.

I punched my sentiment out with a 1″ punch and then layered it on two scallop circles from the Layering Circles Framelits. I finished the card off with a Glitter Enamel Dots. These dots are so much fun to use with their sparkly finish.
If you’d like to purchase what you need to make this card, I’ve included all of the products and prices below. Click any picture below and you’ll head on over to my Stampin’ Up! online store. If you have any questions, please ask!
Stamping Supplies
by Tracy | Jun 19, 2017 | Uncategorized

Can you spot three new products on my card?

#1 The adorable little pig! The stamp set, This Little Piggy, includes four different poses of this cutie pie pig along with sentiments, kisses (I didn’t even notice these until writing this post) and a cloud.
#2 A new embossing folder! This one is called Pinewood Planks and it’s one of the new Dynamic folders. It’s much thicker than our normal embossing folders which means that you only need one cutting plate when running it through the Big Shot. For an even deeper impression, you can lightly spritz your paper with water first.

#3 Powder Pink Cardstock Powder Pink is one of five new In Colors this year! All five colors will be available for two years.
The little pig was easy to color in using an Aqua Painter and Stampin’ Up! ink pads: Powder Pink, Wild Wasabi and Perfect Plum. While the stamp pads were closed, I pushed on the covers so that ink would collect on the lid. When it’s opened, it’s easy to pick up the color with the Aqua Painter.

It can be a bit confusing and overwhelming when trying to decide what products you want to purchase. To help make it easier, I’ve divided the supplies to make my card into three different options.
Option #1 will give you the basics to create the card. You’ll have ink to stamp and color in the pig. If you have colored pencils or pens already in your crafting stash, you can use those to color in the flower and grass.
Option #2 adds the extra ink pads, embossing folder, doilies and linen thread.
Option #3 is for those of you who want it all! This option adds in the two sets of Framelits. (You could very easily just use the Layering Ovals Framelits. The Stitched Shapes Framelits add the extra stitching details.)
Simply click on any of the pictures, and you’ll be taken right to my Stampin’ Up! online store. If you have questions, please feel free to contact me! Please note that I have not included adhesive in any of the options.
#1 Getting Started
#2 Step It Up
#3 I Want It All!


