by Tracy | Jul 20, 2017 | Uncategorized
Just a quick note to let you know that I won’t be posting again until Saturday or Sunday. Normally I post on Fridays and Saturdays but my blog is getting a refresh!! I’ll have a new banner and the blog will have a different feel to it! I’m very excited! I think it will be set to go live sometime Friday or perhaps Saturday. I hope you’ll stop by and see my new look!
by Tracy | Jul 19, 2017 | Uncategorized

How would you like to make three beautiful cards in the comfort of your home with a set of supplies where everything has been cut, scored, punched and embossed for you? All you would need to supply is ink, adhesive and the Hello Friend stamp set (or one from your collection).
If this sounds like something you’d like to receive, place a $50 order at my Stampin’ Up! online store using the Hello Friend To Go Class Host Code ( YYEE33GS) and I’ll send you your supply kit! You’ll also receive a 10 page color PDF with pictures and instructions to make the cards.
Would you like a sneak peek of one of the cards? Here you go!

For all of the details, click here!

Bonus Days are here!
Receive a $5.00 coupon for every $50 you spend!
Redeem the coupon in August!
After you place your order, an email will be sent with the code you’ll need to redeem your $5.00 coupon in August!
There’s no limit to the amount of coupons you can receive or redeem!
by Tracy | Jul 18, 2017 | Uncategorized

Yesterday I posted the Gate Fold Card I made using the new DSP Naturally Eclectic. I made the card specifically so that I could put a gift card inside and I gave it to a male. I’ll admit that most of the cards I make are usually given to a women so I had to go through my stash of paper to pick a sheet of paper that wasn’t too girlie.
I did promise that I’d have a picture tutorial and I’m sorry that I’m posting it late today. My husband and I went away for a few days, just the two of us, and I wasn’t able to get this done once we got home. Fun can be exhausting!
I really think you’ll enjoy making this card. If you give it a try, I’d LOVE it if you’d email me a picture! Let’s get started!
(more…)
by Tracy | Jul 17, 2017 | Uncategorized

Happy Monday! Today I want to share a Double Gate Fold card. My team leader, Dawn Griffith, made one several weeks ago and I knew I wanted to give it a try! It looks complicated but it really isn’t!

It won’t fit inside a regular sized envelope so I made one using the Envelope Punch Board. I actually sent this one off the other day to give to someone for their graduation.
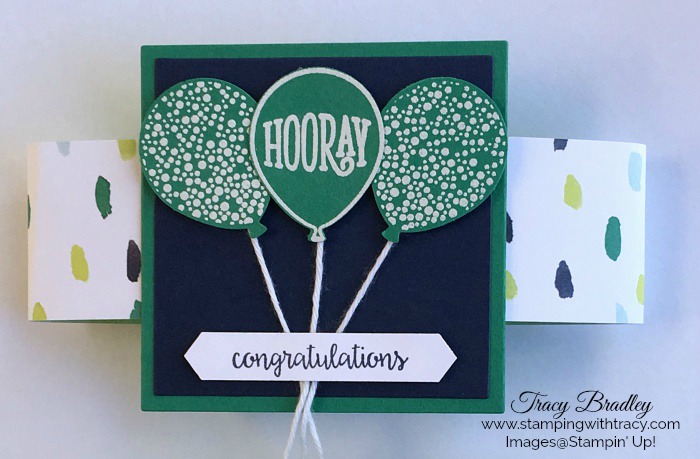
A belly band wraps around the card to hold it together. I included two gift cards inside so it was pretty bulky. It’s important to add your gift cards AND the cardstock inside the card before wrapping the belly band around. That way you can be sure that the belly band will fit!

When you take the belly band off and pull it open, it looks like this. Open it again and it reveals the inside sentiment and in my case, the gift cards too!

I’ll be back tomorrow with a picture tutorial showing you how to make this fun card as well as the supply list.
Have a wonderful day!
by Tracy | Jul 15, 2017 | Uncategorized
Have you ever sat down to make a card and then realized you were just staring into space because you didn’t know where to begin? Or do you have limited time and want to be able to quickly create a card to send or give? If so, my To Go Classes will make it easy to create!
You’ll receive all the supplies you need to create 3 beautiful cards (you’ll just need to supply stamps, ink and adhesive). This is a perfect way to try out new products and see them in person! In the Hello Friend class you’ll see paper embossed with new folders, receive pieces punched out of the Daisy Punch and more!
Here’s How It Works!
Simply place an order of $50 or more (before shipping/tax) at my Stampin’ Up! online store using the TO GO CLASS HOST CODE. Using this code will alert me that you would like the monthly kit. Each time I advertise a new Class To Go, I’ll post a new host code.
The Hello Friend To Go Class Host Code is: YYEE33GS
Please be sure that you’re ordering from me, Tracy Bradley. You’ll see my name in the upper right hand corner on the Stampin’ Up! online ordering page. (Directions on how to enter the host code can be found at the bottom of this post).
BONUS DAYS REMINDER: Don’t forget that for every $50 you spend (before shipping/tax) at my Stampin’ Up! online store during the month of July, you’ll earn a $5.00 coupon to use on an order in August. There’s no limit to how many you can earn or redeem! Immediately after you place your order, you’ll receive an email with a special code. Save the code and put it in a safe place!
What Happens After You Place Your Order?
- Approximately 7 days after your order has been placed, I’ll send you a kit to make 3 cards. Your kit will include: precut paper that’s been scored, punched, die cut and embossed (please note that I cannot send you stamped images per Stampin’ Up! policy). You’ll just need to supply stamps, ink and adhesive.
- Within 24 hours, I’ll send you a color PDF with instructions, pictures, and a list of supplies needed to complete the cards (your PDF will be sent to the email address you used when you placed your order). Print out the PDF and add it to a binder so that you can refer to it over and over again.
- Within 24-48 hours, I’ll send you an invitation to join my exclusive VIP Facebook group. Click here to see all the benefits of becoming a VIP!
Are There Any Perks When Ordering a To Go Class?
- Yes!! Every time you participate in my To Go Classes, you’ll receive a point. Once you’ve earned 4 points, you can choose a stamp set of your choice valued at $17.00 or less (host sets are not valid with this offer). I will contact you after your fourth order is placed to find out which stamp set you’d like me to send to you (and shipping is on me)!
- You’ll automatically become one of my VIPs! Click here to read all about my VIP Program!
Where Do I Enter the Host Code?
Entering the host code is easy! When you add an item to your Shopping Bag, a window will pop up. Choose “View Shopping Bag” and the picture below will appear. Type the host code in the bottom left corner and click APPLY. Check that my name is in the top, upper right corner ( if you’d like to enlarge this picture, simply click it).

What Will I Need to Complete The Projects This Month?
Everything will be included in your kit except stamps, ink and adhesive. The featured stamp set is Hello Friend. If you don’t already own it, you can substitute it with another set in your collection or add it to your order to qualify for the kit. You’ll also need ink and adhesive. I recommend using Fast Fuse when adhering embossed pieces but Snail will also work.
Supplies Needed to Complete Your Kit – Click on any of the products below to purchase them at my Stampin’ Up! online store.
The Hello Friend To Go Class Host Code is: YYEE33GS
If you have any questions, please don’t hesitate to contact me!
Click here to place an order!


