My granddaughter turned three on Friday and we had a family get together on Saturday to celebrate! My mom and sister drove down on Wednesday and left yesterday. We had fun being together and we were busy every day! It is always so sad when family leaves. My daughter sent this to me and it sure does put the sadness into perspective.
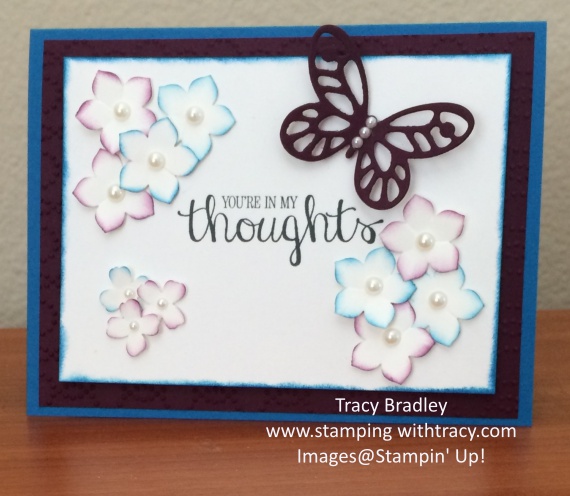
I haven’t been in my craft room for days but today I have a card that I made several weeks ago for a friend. It’s hard to tell in the picture but I used Rich Razzleberry and Pacific Point for the layers and I sponged the flowers with both of these colors as well. The butterfly is also made from Rich Razzleberry using the Bold Butterfly Framelits. I used one of our new embossing folders in the annual catalog called Elegant Dots.
I used the Petite Petals punch and the Itty Bitty Accents Punch Pack. Sponge Daubers were used to add ink to the edges of the flowers and I finished them off with a pearl in each center (I used two different sizes).
My sentiment is from the host set Best Thoughts.
Thanks so much for stopping by today!
Product List – Click on any product below for more information or to make a purchase at my Stampin’ Up! online store
Several days ago I showed these Pillow Boxes and today I have a video showing how to make one! You can see that post here and it will include the supply list.
The Weekly Deals are here! These prices are good until Monday, September 28th or while supplies last. Click on any product for more information or to place an order.
I LOVE the new Square Pillow Box Thinlits Dies in the Holiday Catalog. I’m keeping my fingers crossed that this will be a product that carries over into the Annual Catalog. It is so easy to make this pillow box and it’s very roomy inside.
I didn’t decorate the front too much as I feel the paper is the star of the show (English Garden Designer Series Paper). It is a little hard to tell in the pictures above but when they are side by side you can see that they look a little bit different in size. The ribbon on the blue one doesn’t hold the box shut, you can open the ends and leave the ribbon on. The ribbon goes around the ends on the pink one and would need to be removed to open the box. I might do this if I was worried that the box might open.
Stay tuned in the next few days and I’ll have a video showing you how I created my pillow box. Here’s a PDF that includes a picture of the project and all of the supplies needed for both boxes that you can print or save for future reference: Happy Birthday Pillow Box Card Recipe
Product List – Click on any product below for more information or to place an order
September Ordering Incentive- Receive the three completed projects below with a minimum $35 order along with a PDF for each project listing ordering supplies and measurements and a video showing some tips and tricks for creating the projects. Click here for more details.
Today I have another Quick Tip Video. I talk about how I organize my sponges and daubers. I also share a tip on how to save tape when printing using a Brother label maker!