Thank you so much to everyone who left a comment on my blog during the blog hop. I can’t begin to tell you how much I appreciate every comment that I receive. Thank you!
And now on to the winner of the stamp set Best Day Ever and the Lucky Stars embossing folder. I put all your names into a bag and had my husband pull out the lucky name: The winner is:
Lynn Gauthier
Lynn said, “All your projects and cards are awesome. I really enjoyed learning the dahlia fold. I love flowers and I am going to try this technique this weekend. Your post it notes are awesome too!
Thanks so much for sharing with us!!!!”
Lynn, please email me (tracy@stampingwithtracy.com) your mailing address and I’ll mail your goodies off on Monday. Lynn will also receive the Dahlia card I posted!
Have a wonderful weekend! I hope you’ll stop by on Monday!
The other day I saw a pretty card by Mary Fish using the Butterfly Framelits so I decided to try my own version! The paper underneath my butterfly is the Irresistibly Yours Specialty Designer Series Paper which is free with a $50 purchase! This paper comes with a glossy white pattern that is revealed when you apply color to it! I sponged Soft Sky ink over the leafy pattern. (You can watch the video below to see the different ways to color the paper).
Using my Big Shot and Butterfly Thinlit, I cut my butterfly out of Whisper White cardstock. I used that same piece to place over my Irresistibly Yours paper once I sponged color on it. I could have left it plain but I wanted to emboss it. I added Stampin’ Dimensionals down the center of my butterfly to adhere it the open space. It really was a very easy card to make!
Irresistibly Yours is free with a $50 purchase!
Product List – Click on any item below and you will be taken to my online store. If you have any questions, please just ask!
I received My Paper Pumpkin in the mail yesterday! Again, I wasn’t disappointed by the contents!! Watch the video below to see what’s in the kit and what you can create!
If you would like to sign up for Paper Pumpkin, Stampin’ Up! is offering $5.00 off on the prepaid 3 month subscription and you would be eligible to receive a Sale-a-bration free gift! Of course, you can always go month to month. Click hereto see the details on my Stampin’ Up! online store.
There are some great Weekly Deals this week!! These prices are good until Monday, February 23rd or while supplies last. Click on the pictures below to be taken to my online store!
Welcome to the last day of the Glitter Queens Blog Hop! We’re so glad that you are joining us today! If you happened to visit my blog yesterday, you might have been unable to access it. I apologize for that. I had a few problems with my server but all is well now!
On to my project – a paper covered notepad. I found these 3 x 5 notepads on Amazon and thought they would be so cute covered with Stampin’ Up! cardstock and DSP! Who wouldn’t enjoy receiving one of these??
The cover of the notepad is a piece of Blackberry Bliss cardstock that extends up and over the notepad to about 1-1/2″ on the back. My sentiment is from the Sale-a-bration stamp set, You Brighten My Day. Did you know that with a $50 purchase (before shipping/tax), you can receive this set absolutely FREE? Sale-a-bration is still in full swing and with every $50 purchase, you can pick a free product. Place a $100 order and you choose 2 products. Click HERE to see the Sale-a-bration catalog.
I used the Note Tag punch for the sentiment and the Glimmer paper. I finished it up with flowers using the Itty Bitty Accents Punch Pack and a pearl in the center of each one.
Here’s one more! So quick and easy! The paper is so beautiful all by itself that you don’t need to add much by way of embellishments! All of the products I used for both notepads can be found at the end of the post.
Blog Candy!!!
I haven’t participated in a blog hop in quite some time so I would like to celebrate! Leave a comment telling me which of my projects over the last three days was your favorite and your name will be entered to win the Sale-a-bration stamp set Best Day Ever and the Lucky Stars embossing folder (click on the picture to enlarge it). I will also send the winner the project that was their favorite! You have until Friday, February 20th at noon Pacific Time to leave a comment. I will announce the winner on Saturday! The winner will have 24 hours to email me their address. Good luck!
Thanks again for joining all of us! It is time to move on so please click HEREto continue to Kris Miller’s blog or click the Next button below.
Here’s the list of Glitter Queens participating in the blog hop!
Welcome back to Day 2 of the Glitter Queens Blog Hop! We are so glad you are joining us!
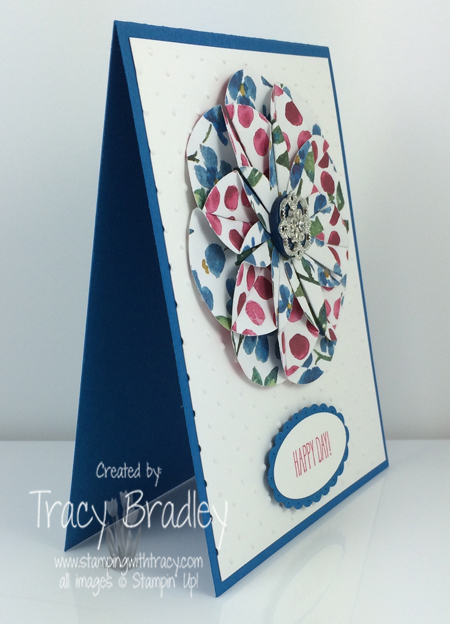
Today I have a card using the Dahlia Fold Technique. When I love paper, such as the sheets in the Painted Blooms Designer Series Paper Pack, I am always itching to make flowers with the Dahlia Fold.
Here’s a picture tutorial showing you how to assemble the flower. Once you make each fold, use your bone folder. It will be much easier to put your flower together if you have nice creases.
Step 1: Punch eight circles of DSP using your 1-3/4″ Circle punch and one circle of cardstock with the 2-1/2 inch punch for the base (use a color that matches your paper). You can use smaller circles but for me, if they are any smaller, I have difficulties folding.
Step 2: Fold each DSP circle into fourths. I am using cardstock so you can see this step easier but this would be the printed paper you are using.
Step 3: I drew lines on the paper so you can see exactly how I folded the paper.
Step 4: Turn your paper OVER and bring the entire piece to your center line. It may be hard to understand this but once you are actually doing it, it will be clear.
Step 5: Do the same thing to the opposite side. This is what it will look like when finished. You’ve just made your first petal! Do the same thing 7 more times. When you assemble your flower, all of the pieces will be glued right next to each other.
Step 6: Once you have all of your pieces made, mark the center on your 2-1/2 inch circle with a pencil (I folded my paper into fourths so I could easily see where the center was). I used Tombow multipurpose liquid glue on my circle. I like the option of being able to move my petals around to exactly the right spot which you can do with this glue as opposed to Snail or Sticky Strip. Put each petal point on the pencil mark you made in the center and butt each petal right up to the next one.
To finish the flower off, I used glue dots to adhere a Pacific Point button in the middle of my flower. Then, using glue dots again, I attached one of the Something Borrowed Embellishments (found in the Occasions Catalog) to the button. I used both the button and embellishment because I felt that it needed a pop of color in the middle. My sentiment comes from the set Cheerful Critters, which is also in the Occasions catalog. You’ll find a list of all the products I used at the end of the post.
If you haven’t tried this paper folding technique before, I hope you feel inspired to give it a try! See you tomorrow! I just might have some Blog candy for the last day of the blog hop!
Click HEREto move on to Kris Miller’s blog or click the Next button below.
Here’s the list of Glitter Queens participating in the blog hop!