by Tracy | Jan 1, 2014 | Uncategorized
Happy New Year! Can you believe that it is already 2014! My husband is out of town so I had a very quiet New Year’s Eve. He was on the other side of the world but still Skyped me (am I saying that correctly?) so that we were able to wish each other Happy New Year at midnight, my time. What a sweetie!
I’ve been very busy working on creating an Online Stamp Club!! I’ve wanted to do this for some time now and am excited that it is almost ready! I hope to be able to announce it on my blog later today so be sure to stop by later!
HAPPY NEW YEAR! I hope 2014 is your best year ever!!!!
by Tracy | Dec 30, 2013 | Uncategorized
 The Scallop Square Duo Bigz Die is another item on the Clearance Rack that I love and used all the time before it retired. Below are four different cards that were previously on my blog and were made using this die. Please note that many of the products on these cards have retired.


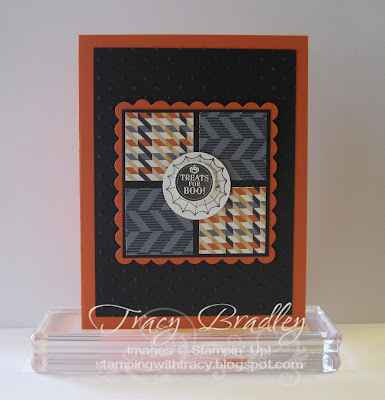 You can visit my online store and the Clearance Rack HERE. Thank you for stopping by!
by Tracy | Dec 29, 2013 | Uncategorized
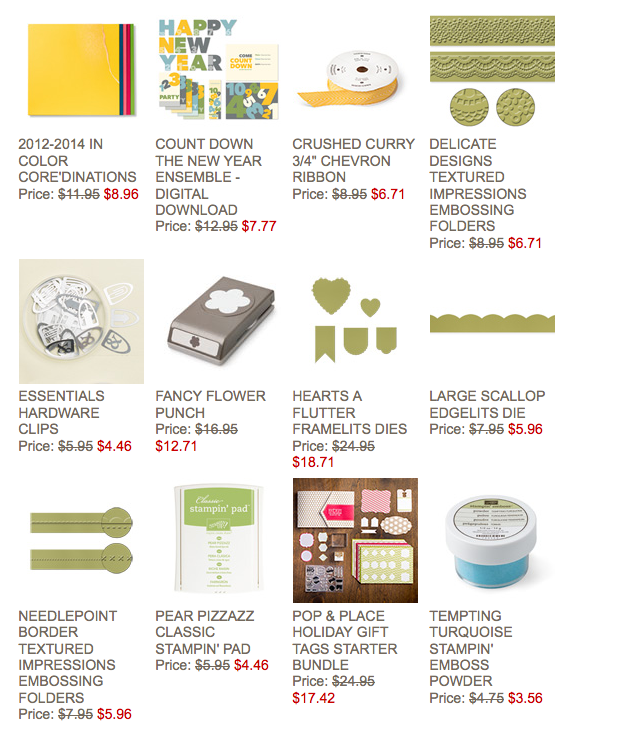
Have you seen the Weekly Deals for this week? You can purchase all of these items at these reduced prices but only until Monday night or while supplies last!
 If you would like to visit my online store, click here! Thanks for stopping by!
by Tracy | Dec 28, 2013 | Uncategorized

I was asked for directions to the card I posted today. I originally posted this card last year and did not post the directions so I quickly took some pictures today to show how to put the front part of the card together. It is called a Tri-Fold Pocket card. As I mentioned in my earlier post, this product uses retired product such as the stamp set, Vintage Vogue, which can now be found in the Clearance Rack (many new items were added TODAY). The scallop square base has also retired but the scallop square from the Squares Collection Framelits would be a great substitution! Here are the steps for the piece that goes on top of the base.

Use a 4×12 piece of Designer Series Paper. Score it at 4 inches on both ends.

Fold on the score lines. Take the top left corner and bring it down to the opposite corner using the score line as your guide.

Do the same thing to the opposite side but bring the lower right hand corner up to the opposite corner again using the score line as your guide. Use snail to adhere these pieces that you just folded.

Add sticky strip as shown in the picture and fold this piece over to the center to create your pocket. (Please note that my pocket is on the opposite side in the directions. I hope this isn’t too confusing).
 Next, attach this piece to your base. If you don’t have the Square Framelits, you could mount it on any size square.
Two inside pieces that can be used to write a personal note:
3 1/4 x 3 1/4 (purple)
3 x 3 (Whisper White)
On the outside, my pieces are
2 x 3 (purple)
1 3/4 x 2 3/4 (Whisper White)
When adhering the pieces for the outside, be sure to only put adhesive on half of the outer square so that you will be able to open your card! I hope this helps! If you would like to see some of the new items added to the Clearance Rack, you can visit my ONLINE STORE.
by Tracy | Dec 28, 2013 | Uncategorized
This card uses another item in the Clearance Rack, the stamp set, Vintage Vogue. I love this stamp set and again, I was so disappointed when it retired. If you love it too and want to pick it up at this discounted price, be sure to do it quickly before it sells out! Thanks so much for stopping by!


