by Tracy | Jun 30, 2017 | Uncategorized

Today I’d like to share a fun card using the Polished Stone Technique! But first, I want to mention the Paper Pumpkin Flash sale! It started last night and will continue until tonight at 11:59, Mountain Time.

Paper Pumpkin by Stampin’ Up! is a crafting subscription kit that delivers creativity to your door every month. Every kit includes an exclusive stamp set, ink spot, and embellishments to create a predesigned project. The monthly subscription is $19.95 per month but you can try one month for just $5.00! It’s an incredible way to try Paper Pumpkin but this price only lasts until tonight!
If you’d like to give Paper Pumpkin a try, click HERE and you’ll be able to easily sign up! If you love it, you’ll continue to receive a box of creativity each month. If not, simply cancel. Be sure to use the PROMO CODE: ONEDAY0717.

Onto my card! The Polished Stone technique is quite fun and very addicting! You need just a few supplies: reinkers (pictured below), rubbing alcohol, cotton balls and glossy cardstock, a new item in the catalog!

Next, add rubbing alcohol to a cotton ball. Add drops of reinker onto the cotton ball, I added four drops of each color (Bermuda Bay and Lemon Lime Twist).

Next, take the cotton ball and pounce it all over the surface of the glossy cardstock. Once you’ve done this all over the paper, take a clean cotton ball and dab over where you see puddles. OR you can forget this step. It depends on the look you want but I did do this step. Once it dries, you’ll have a beautiful, one of a kind, masterpiece!

It’s really fun and once you start, you’ll want to experiment with different colors!
The Card Layers
Bermuda Bay: 11″ x 4-1/4″ Scored @ 5-1/2″
Basic Black: 4″ x 5-1/4″
Glossy Cardstock: 3-3/4″ x 5″
Below you’ll find a list of the Stampin’ Up! supplies I used. If you give this technique a try, I’d love to see what you’ve created!
Click on any picture and you’ll head over to my Stampin’ Up! online store. From there, it’s easy to add an item to your shopping cart!
by Tracy | Jun 29, 2017 | Uncategorized
Paper Pumpkin is on sale tomorrow for just $5! This sale is for ONE DAY only and only open to new subscribers! Be sure to use the code ONEDAY0717 to get your first kit at this reduced price!! It’s a great time to give it a try!
Each month you’ll receive a stamp set, an ink spot (some kits come with two) and all the supplies to make either cards or 3D projects. Click HERE to sign up for Paper Pumpkin and don’t forget to use the promo code ONEDAY0717
The sale starts tonight, June 29th at 11:59 PM (Mountain Time) and ends on June 30th at 11:59 PM (Mountain Time). If you decide that you want to continue after you receive your first kit, do nothing, and your next kit will arrive the following month. If you decide you don’t want to continue it’s very easy to stop your subscription!
What have you got to lose? 
by Tracy | Jun 28, 2017 | Uncategorized
The Daisy punch has been unavailable but it’s now in stock! That means that the Daisy Delight Bundle is also available!


The Daisy Delight Bundle includes the Daisy Delight stamp set (16 photopolymer stamps) AND the Daisy punch with a 10% savings. You can purchase these items separately but who doesn’t like saving 10%?!

Ready to purchase any of these fun products? Simply click on the pictures below and you’ll head over to my Stampin’ Up! online store!
by Tracy | Jun 26, 2017 | Uncategorized

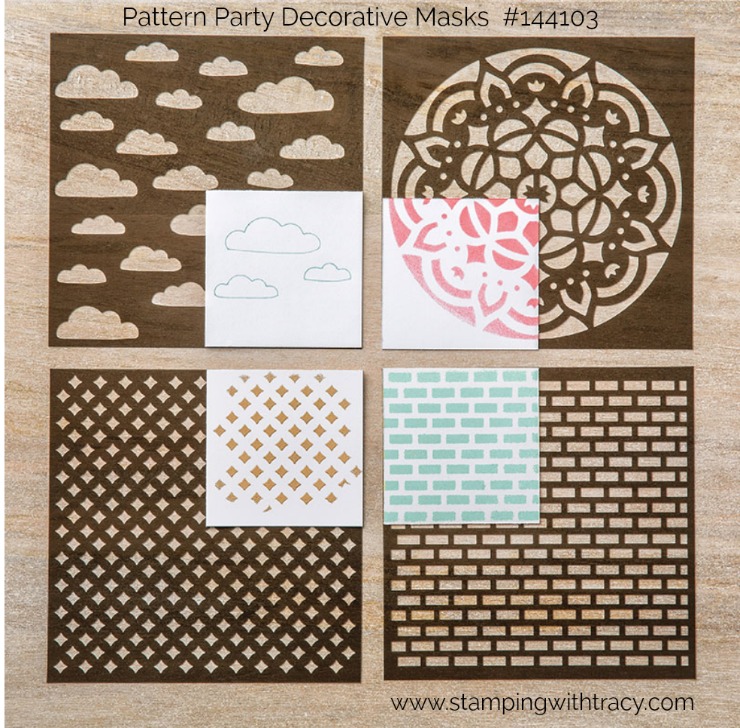
I’m back with another idea for using the new Pattern Party Decorative Masks! Included in this new product are 4 different masks. Using the mask pictured below, I was able to apply Emerald Envy and Dapper Denim inks using a sponge dauber to make a quick and easy card.

The mask is on my grid paper and held down using blue Painters Tape, which can easily be removed after the color has been applied.

The sentiment comes from a new stamp set called Lots of Love (available in clear or wood mount). It was stamped in Emerald Envy and sits on top of a piece of Dapper Denim that was cut out using the Layering Circles Framelits.
I try never to use retired product on a card that you can’t purchase but I accidentally did that on this card with the heart embellishment. Fortunately our new Glitter Enamel Dots do come in Dapper Denim and would be a nice replacement.


All of the products I used to make my card are listed below. Ready to make a purchase? Simply click on any of the pictures below and you’ll be taken to my Stampin’ Up! online store!
Thanks for stopping by! Have a terrific day!
by Tracy | Jun 24, 2017 | Uncategorized

I’m back with another card featuring the versatile Pattern Party Decorative Masks. These masks can be used with sponges, embossing paste, spritzers, etc.
To create today’s design, you need a mask (four come in the set), sponge daubers, and ink. Yesterday’s card also used the same supplies but I used different colors and I masked the inside of the design. You can see that card HERE. To color today’s card I used sponge daubers to color the entire design and then added a sentiment in the middle.
I started in the lower right hand corner using Wisteria Wonder, then blended Perfect Plum into that and finished with Melon Mambo. When the card was completed, I added a final touch by adding some Wink of Stella to the inner half circles. Don’t you love the added sparkle?

I used the brand new stamp set, Beautiful Bouquet, for the sentiment and stamped it in Memento Ink. It was cut out with the Stitched Shapes Framelits. The outer circle was cut out in Elegant Eggplant using the Layering Circles Framelits.
Stamping Supplies: Ready to make this card? Click on any of the items below and you’ll head over to my Stampin’ Up! online store!
Any questions? Please feel free to ask!
by Tracy | Jun 23, 2017 | Uncategorized

If you’re looking for a fun way to create a card, you’ll love our new Pattern Party Decorative Masks. You can make beautiful designs using these masks with embossing paste, sponge daubers, spritzers, etc.
I made my card using sponge daubers and three Stampin’ Up! Stampin’ Pads: Melon Mambo, Tangerine Tango and Crushed Curry. I dabbed the daubers in the stamp pads and then rubbed them over the mask making sure to blend where the colors overlapped. So easy!
I wanted to be able to add a sentiment to the middle of my design so to prepare my paper I cut out a circle from a post it note (I bought the kind that has adhesive on the entire sticky note). After attaching it to the center of my Whisper White paper, I taped down the mask using Painters Tape. The picture below shows after I applied color.

The picture below shows right before I took off the sticky note mask. The last step was to add my sentiment.

Tomorrow I’ll share another card I made using these fun Decorative Masks!
Stamping Supplies – Below you’ll find all the supplies I used to make today’s card. To purchase any of the products, click on one of the pictures and you’ll head over to my Stampin’ Up! online store. If you have any questions, please ask!
Non-Stampin’ Up! supplies: Full Adhesive Sticky Notes, Blue Painters Tape


