by Tracy | Jun 29, 2017 | Uncategorized
Paper Pumpkin is on sale tomorrow for just $5! This sale is for ONE DAY only and only open to new subscribers! Be sure to use the code ONEDAY0717 to get your first kit at this reduced price!! It’s a great time to give it a try!

Each month you’ll receive a stamp set, an ink spot (some kits come with two) and all the supplies to make either cards or 3D projects. Click HERE to sign up for Paper Pumpkin and don’t forget to use the promo code ONEDAY0717
The sale starts tonight, June 29th at 11:59 PM (Mountain Time) and ends on June 30th at 11:59 PM (Mountain Time). If you decide that you want to continue after you receive your first kit, do nothing, and your next kit will arrive the following month. If you decide you don’t want to continue it’s very easy to stop your subscription!
What have you got to lose? 
by Tracy | Jun 28, 2017 | Uncategorized
The Daisy punch has been unavailable but it’s now in stock! That means that the Daisy Delight Bundle is also available!


The Daisy Delight Bundle includes the Daisy Delight stamp set (16 photopolymer stamps) AND the Daisy punch with a 10% savings. You can purchase these items separately but who doesn’t like saving 10%?!

Ready to purchase any of these fun products? Simply click on the pictures below and you’ll head over to my Stampin’ Up! online store!
by Tracy | Jun 26, 2017 | Uncategorized

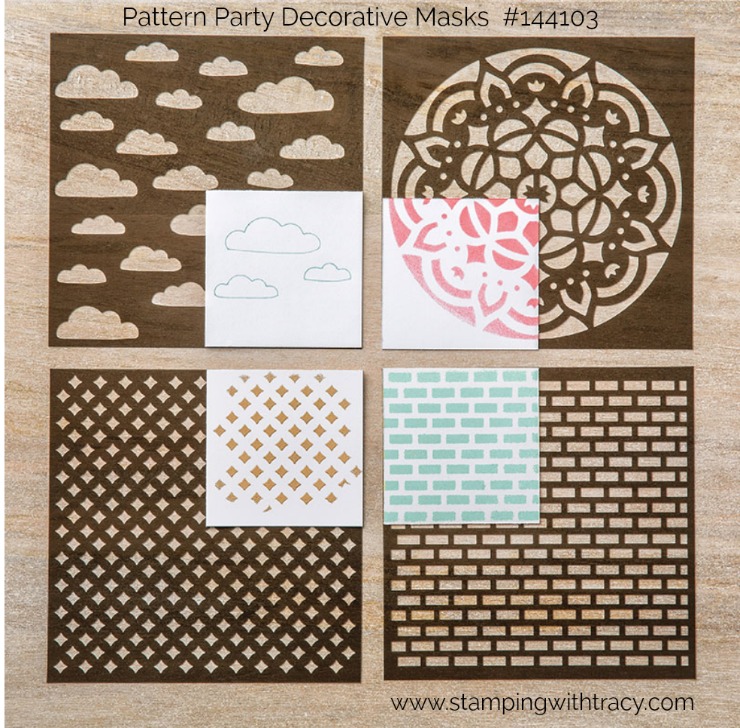
I’m back with another idea for using the new Pattern Party Decorative Masks! Included in this new product are 4 different masks. Using the mask pictured below, I was able to apply Emerald Envy and Dapper Denim inks using a sponge dauber to make a quick and easy card.

The mask is on my grid paper and held down using blue Painters Tape, which can easily be removed after the color has been applied.

The sentiment comes from a new stamp set called Lots of Love (available in clear or wood mount). It was stamped in Emerald Envy and sits on top of a piece of Dapper Denim that was cut out using the Layering Circles Framelits.
I try never to use retired product on a card that you can’t purchase but I accidentally did that on this card with the heart embellishment. Fortunately our new Glitter Enamel Dots do come in Dapper Denim and would be a nice replacement.


All of the products I used to make my card are listed below. Ready to make a purchase? Simply click on any of the pictures below and you’ll be taken to my Stampin’ Up! online store!
Thanks for stopping by! Have a terrific day!
by Tracy | Jun 24, 2017 | Uncategorized

I’m back with another card featuring the versatile Pattern Party Decorative Masks. These masks can be used with sponges, embossing paste, spritzers, etc.
To create today’s design, you need a mask (four come in the set), sponge daubers, and ink. Yesterday’s card also used the same supplies but I used different colors and I masked the inside of the design. You can see that card HERE. To color today’s card I used sponge daubers to color the entire design and then added a sentiment in the middle.
I started in the lower right hand corner using Wisteria Wonder, then blended Perfect Plum into that and finished with Melon Mambo. When the card was completed, I added a final touch by adding some Wink of Stella to the inner half circles. Don’t you love the added sparkle?

I used the brand new stamp set, Beautiful Bouquet, for the sentiment and stamped it in Memento Ink. It was cut out with the Stitched Shapes Framelits. The outer circle was cut out in Elegant Eggplant using the Layering Circles Framelits.
Stamping Supplies: Ready to make this card? Click on any of the items below and you’ll head over to my Stampin’ Up! online store!
Any questions? Please feel free to ask!
by Tracy | Jun 23, 2017 | Uncategorized

If you’re looking for a fun way to create a card, you’ll love our new Pattern Party Decorative Masks. You can make beautiful designs using these masks with embossing paste, sponge daubers, spritzers, etc.
I made my card using sponge daubers and three Stampin’ Up! Stampin’ Pads: Melon Mambo, Tangerine Tango and Crushed Curry. I dabbed the daubers in the stamp pads and then rubbed them over the mask making sure to blend where the colors overlapped. So easy!
I wanted to be able to add a sentiment to the middle of my design so to prepare my paper I cut out a circle from a post it note (I bought the kind that has adhesive on the entire sticky note). After attaching it to the center of my Whisper White paper, I taped down the mask using Painters Tape. The picture below shows after I applied color.

The picture below shows right before I took off the sticky note mask. The last step was to add my sentiment.

Tomorrow I’ll share another card I made using these fun Decorative Masks!
Stamping Supplies – Below you’ll find all the supplies I used to make today’s card. To purchase any of the products, click on one of the pictures and you’ll head over to my Stampin’ Up! online store. If you have any questions, please ask!
Non-Stampin’ Up! supplies: Full Adhesive Sticky Notes, Blue Painters Tape
by Tracy | Jun 21, 2017 | Uncategorized

Don’t you love it when you can create a beautiful card in just a few minutes? Each sheet of paper in the Designer Series Paper pack, Naturally Eclectic, is gorgeous! It’s so pretty that all you need to add is a sentiment!

The beautiful colors that coordinate with this paper are: Berry Burst, Emerald Envy, Fresh Fig, Lemon Lime Twist, Night of Navy, Peekaboo Peach, Soft Sky, and Whisper White. I used Fresh Fig and Lemon Lime Twist.

You’re probably wondering why I’m sharing the stamp set, This Little Piggy. Right? My sentiment actually comes from this set! Each pig in the set has a sentiment attached but I obviously didn’t include a pig on my card. How did I just stamp the sentiment? Easy! I put several post it notes around the sentiment, inked up the stamp, removed the post its and then stamped! It’s a great way to get more mileage out of your stamps.

I punched my sentiment out with a 1″ punch and then layered it on two scallop circles from the Layering Circles Framelits. I finished the card off with a Glitter Enamel Dots. These dots are so much fun to use with their sparkly finish.
If you’d like to purchase what you need to make this card, I’ve included all of the products and prices below. Click any picture below and you’ll head on over to my Stampin’ Up! online store. If you have any questions, please ask!
Stamping Supplies
by Tracy | Jun 19, 2017 | Uncategorized

Can you spot three new products on my card?

#1 The adorable little pig! The stamp set, This Little Piggy, includes four different poses of this cutie pie pig along with sentiments, kisses (I didn’t even notice these until writing this post) and a cloud.
#2 A new embossing folder! This one is called Pinewood Planks and it’s one of the new Dynamic folders. It’s much thicker than our normal embossing folders which means that you only need one cutting plate when running it through the Big Shot. For an even deeper impression, you can lightly spritz your paper with water first.

#3 Powder Pink Cardstock Powder Pink is one of five new In Colors this year! All five colors will be available for two years.
The little pig was easy to color in using an Aqua Painter and Stampin’ Up! ink pads: Powder Pink, Wild Wasabi and Perfect Plum. While the stamp pads were closed, I pushed on the covers so that ink would collect on the lid. When it’s opened, it’s easy to pick up the color with the Aqua Painter.

It can be a bit confusing and overwhelming when trying to decide what products you want to purchase. To help make it easier, I’ve divided the supplies to make my card into three different options.
Option #1 will give you the basics to create the card. You’ll have ink to stamp and color in the pig. If you have colored pencils or pens already in your crafting stash, you can use those to color in the flower and grass.
Option #2 adds the extra ink pads, embossing folder, doilies and linen thread.
Option #3 is for those of you who want it all! This option adds in the two sets of Framelits. (You could very easily just use the Layering Ovals Framelits. The Stitched Shapes Framelits add the extra stitching details.)
Simply click on any of the pictures, and you’ll be taken right to my Stampin’ Up! online store. If you have questions, please feel free to contact me! Please note that I have not included adhesive in any of the options.
#1 Getting Started
#2 Step It Up
#3 I Want It All!

by Tracy | Jun 17, 2017 | Uncategorized

Today’s card combines stamping, sponging and heat embossing. Heat embossing never fails to delight me as the embossing powder melts. Pure magic!
The stamps used on my card come from two brand new sets. The daisy is from Daisy Delight and the sentiment is in a very versatile set called Tabs for Everything which includes 53 photopolymer stamps!
Both of these stamp sets can be purchased as a bundle which means that another product is paired with it and you save 10%. You can see the Tabs for Everything bundle here. The Daisy Delight Bundle includes the stamp set with the Daisy Punch, which is currently on backorder, but should be available at the end of the month. Because of its unavailability, the bundle will not show up in the online store but you can see it in the catalog on page 127.
View the Stampin’ Up! Annual Catalog HERE.
Here are the easy steps to recreate the base of my card:
1. Rub the embossing buddy all over your paper to prevent small bits of embossing powder from sticking to your paper.
2. Stamp your images using Versamark ink.
3. Sprinkle white embossing powder over your images. Tip: I find it easier to stamp an image and sprinkle it with the powder AND then move to the next one rather than stamping all of the images at one time. The problem is that you can’t see where you’ve stamped with the Versamark yet once the powder is on the image, you can easily see it.
4. Heat the embossing powder with your heat tool.
5. Sponge ink over your piece, blending the colors together. Tip: After each color, use a cloth or paper towel and wipe over the embossed area. The color shouldn’t stick to the embossing but I find that sometimes it does. By wiping the area, your stamped image will be nice and white.

All of the supplies I used to create my card are listed below. Clicking an item will take you to my Stampin’ Up! online store where you can purchase any of the products. If you have any questions, don’t hesitate to ask!

Stamping Supplies
Have a terrific weekend and thanks for stopping by!
by Tracy | Jun 16, 2017 | Uncategorized

If you enjoy coloring, then the Floral Statements stamp set is one that you’ll like! Two stamps are included in the set and I love that one is a big HELLO! Sometimes you want to send a card for no other reason than to say hi!

Because I was planning to use water, I used Shimmery White paper and stamped the image with Staz-On (you could also use watercolor paper). Stampin’ Up! no longer carries Staz-On but a product you can also use is our Archival Basic Black ink. Both are permanent ink and work well when using water on your project.
I colored the leaves and flowers two different ways. To color in the flowers, I used two Stampin’ Up! watercolor pencils, Rich Razzleberry and Melon Mambo. Using water with these pencils creates a deeper, more vibrant shade so after coloring I used an Aqua Painter to go over the Rich Razzleberry and Melon Mambo. Normally you would fill the barrel with water and squeeze it to allow the water to flow but instead I chose to dip the tip in water as you would a paint brush. Sometimes I feel as though I have no control over the amount of water coming out and I didn’t want to have too much in the small area I was coloring.
To color the leaves, I used a Wild Wasabi stamp pad. While the stamp pad was closed, I pushed down on the lid. This makes the lid come into contact with the pad and when you open it, you now have ink you can pick up with the Aqua Painter (or a blender pen). The tip of the Aqua Painter should be damp. After coloring the leaves, I let it dry and then added more color.
All of the supplies to make my card are listed below. Click on any of the pictures and you’ll be taken to my Stampin’ Up! online store. From there it’s easy to add an item to your shopping cart! If you have any questions, please don’t hesitate to ask!
by Tracy | Jun 14, 2017 | Uncategorized
 A new product line in the 2017-2018 Annual Catalog is Memories & More. It’s a system of coordinating card packs that can be used for cardmaking and memory keeping. I hope you’ll click on the video above to learn all about Memories & more!
Memories & more Card Packs – Click on the card packs below for more information!
by Tracy | Jun 12, 2017 | Uncategorized

Happy Monday! I hope your week has started off well!
Today I have a card that’s been embossed with the Colorful Seasons stamp set and sponged with Lemom Lime Twist ink. I love the sentiment which is from the Hello Friend stamp set
I used the new 3/8″ Metallic Edge Ribbon in silver. It’s so pretty in person!! You can also purchase this ribbon with a gold trim and it will definitely be on my next order


Stampin’ Supplies
Below are the supplies I used to make my card. Click on any picture and you’ll head over to my Stampin’ Up! online store. From there it’s easy to add an item to your shopping cart!
by Tracy | Jun 10, 2017 | Uncategorized

Happy Saturday! For today’s card I used stamps from the brand new stamp set, Oh So Eclectic. Using Daffodil Delight, Melon Mambo, Peekaboo Peach and Pink Pirouette, I sponged color all over the surface of my Whisper White paper. I find it very relaxing!
But first, I prepared my paper for embossing by rubbing the Embossing Buddy over the surface. This really, really helps embossing powder from sticking to your project and I highly recommend doing this step! Then I stamped images from the Oh So Eclectic stamp set on my paper using Versamark ink. It’s really difficult to see what you’re doing so I stamped one to two stamps at a time, covered them with embossing powder and then continued to stamp. This will make it easy to see where you’ve already stamped on the paper.
Once my stamping was done, I grabbed the Heat Tool and melted the embossing powder. It’s magic! Time to add color! Using a blending tool, I sponged color all over the surface of my paper blending each color into one another. After I added one color, I took a lint free rag and went over the surface of each embossed shape. The color will come right off of the embossing but I have found that if I wait until I’m completely finished, it seems to stain somewhat.
Once I was happy with the color I had applied, I stamped the sentiment (also from the Oh So Eclectic stamp set) onto Basic Black paper using Versamark Ink (don’t forget to use the embossing buddy first). I heat set it and then cut it out with a 1″ punch. I used two Glitter Enamel Dots on the sentiment. These dots are SO PRETTY and I think they are much prettier in person! Unfortunately they are currently on back order but should be back in stock on June 12th.

I prefer to use a blending tool that Stampin’ Up! does not carry in the catalog. The one I use has a wooden handle and I just find it easier to achieve the look I want. You can also use Stampin’ Sponges or Sponge Daubers as many demonstrators are quite successful with these tools.

Below you’ll find the list of supplies I used to make my card. To purchase any of these items, click on any of the pictures below and you’ll be directed to my Stampin’ Up! online store. If you have any questions, don’t hesitate to ask!


