by Tracy | Jul 18, 2017 | Uncategorized

Yesterday I posted the Gate Fold Card I made using the new DSP Naturally Eclectic. I made the card specifically so that I could put a gift card inside and I gave it to a male. I’ll admit that most of the cards I make are usually given to a women so I had to go through my stash of paper to pick a sheet of paper that wasn’t too girlie.
I did promise that I’d have a picture tutorial and I’m sorry that I’m posting it late today. My husband and I went away for a few days, just the two of us, and I wasn’t able to get this done once we got home. Fun can be exhausting!
I really think you’ll enjoy making this card. If you give it a try, I’d LOVE it if you’d email me a picture! Let’s get started!
(more…)
by Tracy | Jul 17, 2017 | Uncategorized

Happy Monday! Today I want to share a Double Gate Fold card. My team leader, Dawn Griffith, made one several weeks ago and I knew I wanted to give it a try! It looks complicated but it really isn’t!

It won’t fit inside a regular sized envelope so I made one using the Envelope Punch Board. I actually sent this one off the other day to give to someone for their graduation.
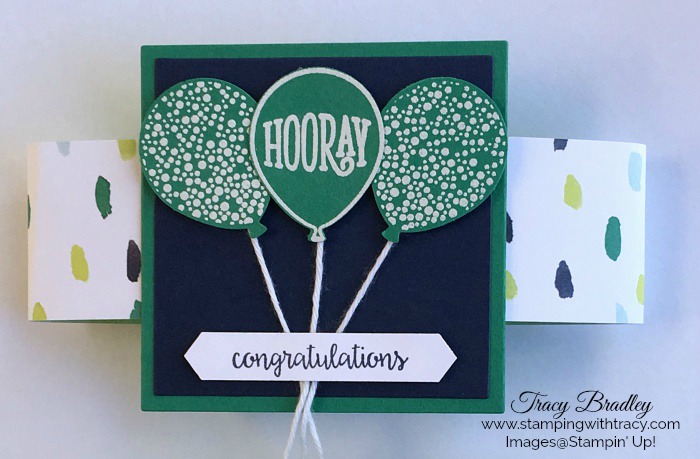
A belly band wraps around the card to hold it together. I included two gift cards inside so it was pretty bulky. It’s important to add your gift cards AND the cardstock inside the card before wrapping the belly band around. That way you can be sure that the belly band will fit!

When you take the belly band off and pull it open, it looks like this. Open it again and it reveals the inside sentiment and in my case, the gift cards too!

I’ll be back tomorrow with a picture tutorial showing you how to make this fun card as well as the supply list.
Have a wonderful day!
by Tracy | Jul 15, 2017 | Uncategorized

Have you ever sat down to make a card and then realized you were just staring into space because you didn’t know where to begin? Or do you have limited time and want to be able to quickly create a card to send or give? If so, my To Go Classes will make it easy to create!
You’ll receive all the supplies you need to create 3 beautiful cards (you’ll just need to supply stamps, ink and adhesive). This is a perfect way to try out new products and see them in person! In the Hello Friend class you’ll see paper embossed with new folders, receive pieces punched out of the Daisy Punch and more!
Here’s How It Works!
Simply place an order of $50 or more (before shipping/tax) at my Stampin’ Up! online store using the TO GO CLASS HOST CODE. Using this code will alert me that you would like the monthly kit. Each time I advertise a new Class To Go, I’ll post a new host code.
The Hello Friend To Go Class Host Code is: YYEE33GS
Please be sure that you’re ordering from me, Tracy Bradley. You’ll see my name in the upper right hand corner on the Stampin’ Up! online ordering page. (Directions on how to enter the host code can be found at the bottom of this post).
BONUS DAYS REMINDER: Don’t forget that for every $50 you spend (before shipping/tax) at my Stampin’ Up! online store during the month of July, you’ll earn a $5.00 coupon to use on an order in August. There’s no limit to how many you can earn or redeem! Immediately after you place your order, you’ll receive an email with a special code. Save the code and put it in a safe place!
What Happens After You Place Your Order?
- Approximately 7 days after your order has been placed, I’ll send you a kit to make 3 cards. Your kit will include: precut paper that’s been scored, punched, die cut and embossed (please note that I cannot send you stamped images per Stampin’ Up! policy). You’ll just need to supply stamps, ink and adhesive.
- Within 24 hours, I’ll send you a color PDF with instructions, pictures, and a list of supplies needed to complete the cards (your PDF will be sent to the email address you used when you placed your order). Print out the PDF and add it to a binder so that you can refer to it over and over again.
- Within 24-48 hours, I’ll send you an invitation to join my exclusive VIP Facebook group. Click here to see all the benefits of becoming a VIP!
Are There Any Perks When Ordering a To Go Class?
- Yes!! Every time you participate in my To Go Classes, you’ll receive a point. Once you’ve earned 4 points, you can choose a stamp set of your choice valued at $17.00 or less (host sets are not valid with this offer). I will contact you after your fourth order is placed to find out which stamp set you’d like me to send to you (and shipping is on me)!
- You’ll automatically become one of my VIPs! Click here to read all about my VIP Program!
Where Do I Enter the Host Code?
Entering the host code is easy! When you add an item to your Shopping Bag, a window will pop up. Choose “View Shopping Bag” and the picture below will appear. Type the host code in the bottom left corner and click APPLY. Check that my name is in the top, upper right corner ( if you’d like to enlarge this picture, simply click it).

What Will I Need to Complete The Projects This Month?
Everything will be included in your kit except stamps, ink and adhesive. The featured stamp set is Hello Friend. If you don’t already own it, you can substitute it with another set in your collection or add it to your order to qualify for the kit. You’ll also need ink and adhesive. I recommend using Fast Fuse when adhering embossed pieces but Snail will also work.
Supplies Needed to Complete Your Kit – Click on any of the products below to purchase them at my Stampin’ Up! online store.
The Hello Friend To Go Class Host Code is: YYEE33GS
If you have any questions, please don’t hesitate to contact me!
Click here to place an order!
by Tracy | Jul 14, 2017 | Uncategorized

I am very appreciative of every order placed through me! To show my appreciation, I’ve created perks just for my customers. Here’s what it means to be a Stamping with Tracy VIP!
- You’ll receive an exclusive invitation to join my Facebook VIP Group. You’ll want to join because:
- You’ll have a chance to win prizes! At least twice a month, we’ll have Prize Patrol where random members will win a prize.
- I’ll post at least two Card Recipe PDFs each month. Each Card Recipe will include a picture of a project, directions, measurements and a supply list. Add them to a binder so you can refer to them again and again. Card Recipes on the Facebook group will not be posted anywhere else.
- You can ask questions about Stampin’ Up! products you’ve purchased or that you’re thinking about purchasing. I’ll always give you honest feedback. If I don’t care for a product, I’ll tell you and explain why.
- This will be a place where you can share YOUR beautiful projects.
- You’ll be part of a community of crafters, the best kind of people!
- Receive a FREE Annual Catalog. When the new catalog comes out, if you’ve placed an order within the last six months, I’ll automatically send one to you. If you haven’t recently ordered but would like a catalog, email me to request one.
- Receive FREE Seasonal Catalogs. When the new catalogs come out, if you’ve placed an order within the last six months, I’ll automatically send one to you. If you haven’t recently ordered but would like a catalog, email me to request one.
- Be the first to shop my retired products when they become available.
Please allow 24-48 hours after you’ve placed your order to receive your exclusive Facebook VIP invitation. This is a closed group and only those who have ordered from me will be invited.
Let me spoil you!
by Tracy | Jul 12, 2017 | Uncategorized
If you’re a coffee lover, you’re going to love the new Coffee Cafe Bundle! The bundle includes the Coffee Cafe stamp set and the Coffee Cups Framelits Dies. You can purchase these items separately but you save 10% with the bundle.
These two products are part of the Coffee Break Suite which also includes Designer Series Paper with a matching pack of cardstock and Corrugated Elements (corrugated paper in oval, tag and heart designs). I’ve included all of these products in the Stamping Supplies at the end of the post.

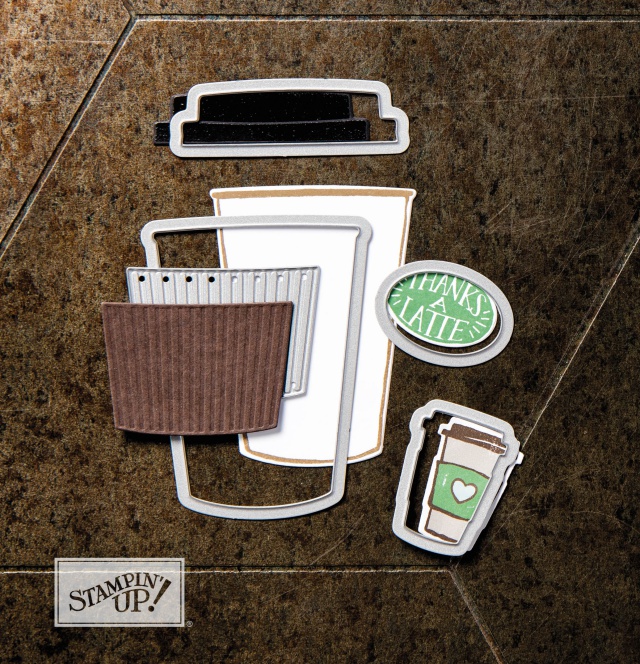
The stamp set, Coffee Cafe, comes in photopolymer and includes 16 stamps. The Coffee Cups Framelits Dies includes 13 dies. If this sounds like a set you’re considering, I’ve got a video from Stampin’ Up! for you! Just scroll down, click it and you’ll head over to the Stampin’ Up! YouTube channel (my blog is experiencing some quirks right now and videos won’t play which is why you’ll head over to YouTube).

Don’t forget that with the Bonus Days special, you’ll receive a $5.00 coupon for every $50 you spend, before shipping/tax. Right after you place your order, you’ll be emailed a code that you can then apply to an order in August!

Here’s the video! Enjoy!

Stamping Supplies – Click on any item below for more information or to place an order!
Ready to place an order? Click here!
by Tracy | Jul 10, 2017 | Uncategorized

Happy Monday! I hope you had a nice weekend! It was extremely hot in my neck of the woods. Thank goodness for air conditioning!
Today’s card is one that I almost didn’t post. I made it about a month ago and several times I thought about sharing it and then changed my mind at the last minute. After completing it I wished I had blended the colors more so I put it away. But I’ve learned that just because I don’t care for something, it doesn’t mean that it won’t appeal to someone else!
I placed color down on Shimmery White cardstock using the Bermuda Bay and Old Olive Watercolor pencils and then went over it all with the Aqua Painter. I cut Happy Birthday out in Bermuda Bay, three times, and layered them on top of each other for dimension. I gave it a finishing touch with several sparkly rhinestones.
The Stampin’ Up! products I used to create my card are listed below for easy shopping. If you have any questions, please don’t hesitate to ask!
Stamping Supplies
Bonus Days are here during the month on July! For every $50 in product you spend, before shipping/ tax, Stampin’ Up! will email you a Bonus Days $5.00 coupon that you can redeem in August. There’s no limit to the amount of coupons you can earn! Ready to place an order? Click here to head over to my Stampin’ Up! online store!
by Tracy | Jul 8, 2017 | Uncategorized

Were you able to visit all of the blogs in the First Fridays Blog Hop yesterday? If not, click HERE to see all of the projects made with bundles in the catalog. Bundles always save you 10%!
Today’s card is another watercolor card made with Stampin’ Up! watercolor pencils (you can see the one I shared earlier in the week HERE). Although the technique is the same, no two cards will look exactly the same. That’s kind of fun, don’t you think?
The sentiment is from a new stamp set called Lots of Love. I love the nice bold words, especially on a beautiful watercolor background.

If you have any questions about today’s card, please don’t hesitate to ask! Have a terrific weekend!
Stamping Supplies: If you’d like to create today’s card, below you’ll find the supplies you’ll need. Click on any of them and you’ll be directed to my Stampin’ Up! online store.
by Tracy | Jul 7, 2017 | Uncategorized


I’m so glad you’re here today because it’s time for the First Fridays Blog Hop! This month we’re each featuring a bundle, two products bundled together for a savings of 10%, and we’ll each have two projects for you! The bundle I’m featuring is Happy Birthday Gorgeous. This bundle features the stamp set Happy Birthday Gorgeous along with the Happy Birthday Thinlits Dies.
For quite some time now I’ve wanted Stampin’ Up! to carry a Happy Birthday Thinlit so I was pretty excited when these came out in the new catalog! They really are very fun to work with! To give the words lots of dimension (and because it’s pretty difficult to add dimensionals to the back) I layer them. Adding 2-5 layers really gives it great dimension (the first card has two layers).

The inspiration for this card came from one I saw on Laura Bassen’s blog. I did my own take on it using Stampin’ Up! products. Using my Big Shot and Layering Circles Framelits, I cut a circle in the middle of a piece of Whisper White. I wanted enough room on all sides of the circle so that when I sponged I wouldn’t get stray ink on my finished piece. Let’s just say that I learned this trick the hard way. The Stampin’ Up! colors I used were: Pacific Point, Bermuda Bay, Tempting Turquoise and Lemon Lime Twist. I simply moved my circle around and sponged color, overlapping colors as I went.

To finish the card I applied the layered Happy Birthday and some Iridescent Sequins. The inside of the card has the simple sentiment, Make a Wish, from the stamp set Happy Birthday Gorgeous!

My second card went in a completely different direction from what I had originally planned and the finished card happened quite by accident! Originally Happy Birthday was going to be layered onto a die cut in Whisper White but I wasn’t happy with the results. After I cut Happy Birthday out of our beautiful Foil Frenzy Speciality Designer Series Paper and layered it with four more in Crumb Cake, I set it down onto the card base and went, hmmmm, I think I like that!!

The sentiment “to you” is also from the set Happy Birthday Gorgeous as well as the one I used on the inside.

Our new mini Stampin’ Dimensionals were just PERFECT for the greeting on the Classic Label punch!

Thanks so much for stopping by and I hope you’ll continue on the blog hop! Davette is up next!

Dawn Griffith
Michelle Veller
Tracy Bradley – You are HERE!
Davette Strange Miller
Carla Perea
Dee Slater
Stamping Supplies – Here’s a list of all the supplies I used to make both cards. Simply click on a product and you’ll head over to my Stampin’ Up! online store!
by Tracy | Jul 5, 2017 | Uncategorized

If you love the look of watercoloring and beautiful vibrant color, this is the card for you. And the best part? It’s SUPER easy to create!
Using my Stampin’ Up! watercolor pencils, I scribbled Melon Mambo, Pumpkin Pie, Daffodil Delight and Bermuda Bay across my Shimmery White paper (don’t use Whisper White as it will pill when you apply water). Next, I applied water to each color using an Aqua Painter and I tried to blend the colors that were right next to each other. The colors come alive when you add water!
I used my Misti (a non Stampin’ Up! tool) to stamp my hell0 because I wanted to be able to get a nice dark impression with my Memento black ink. Both stamps (hello and friend) come from the stamp set Hello Friend which is a brand new stamp set! (In the next week I’ll be offering a To Go class using this set).
I finished it off with our Enamel Glitter Dots for a little bit of sparkle.

I hope you give this a try and if you do, I’d LOVE for you to email me your creation! Or ask to join my Facebook group and post it over there! I’d love for you to join even if you don’t have a card to share. Click here to join my Stamping with Tracy Facebook group!
All of the Stampin’ Up! products I used are listed below. To place an order, simply click on any of the pictures and you’ll head over to my Stampin’ Up! online store! Any questions? Please just ask!
Enjoy your day!
Stamping Supplies To Make Today’s Card
by Tracy | Jul 3, 2017 | Uncategorized

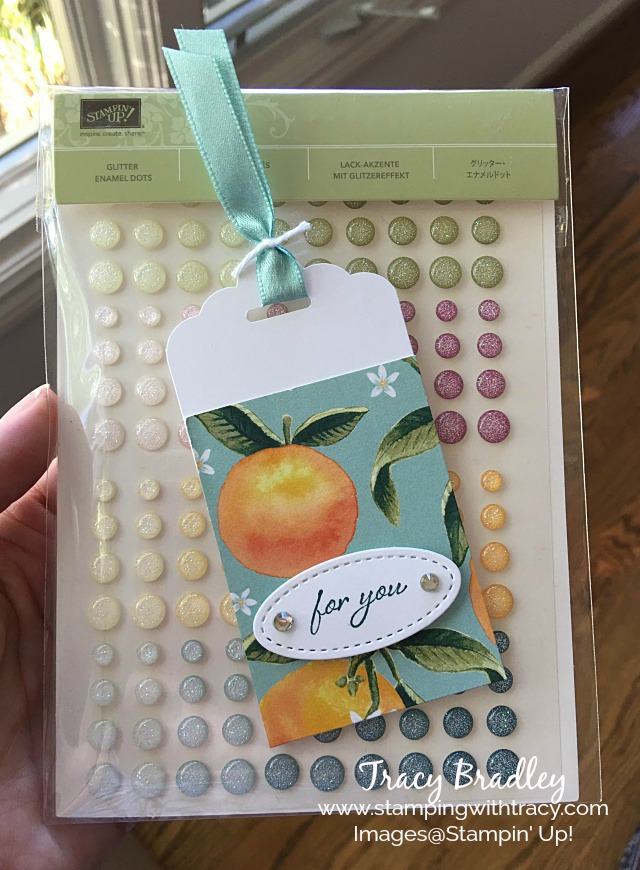
Need a quick tag? You’d be surprised how quick these are to make! You can attach them to a gift with Baker’s Twine or use a glue dot to adhere them directly to a gift as I’ve done below.
The Scalloped Tag Topper Punch is what makes this tag so quick and easy to make! To begin, you want to start with a 2″ x 4″ piece of Whisper White cardstock which you’ll then insert into the punch. Push down and you already have a tag!
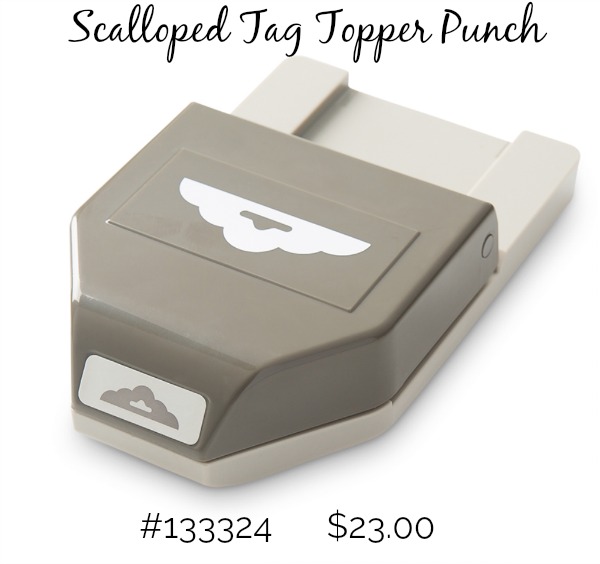
If you have trouble inserting the paper into the punch, trim the 2″ side, just a tad and it should slide in easily.
Attach a piece of Designer Series Paper that measures 2″ x 2-3/4″. I used Whole Lot of Lovely Designer Series Paper for all of my tags.
The sweet sentiment comes from the stamp set Grateful Garden and I used a variety of inks: Memento Ink (black), Pool Party and Tranquil Tide. I used what I felt matched the paper best but I used Memento Ink for the majority of the tags. I cut them out with the Stitched Shapes Framelits. I love the faux stitching around the edges. I added some rhinestones for a little bling!

I finished the tags off by threading ribbon at the top and tying it off with Whisper White Baker’s Twine. I used Pool Party Shimmer Ribbon and Silver Metallic Edge Ribbon and again, used the one that I felt matched the paper the best.
I am sending the Glitter Enamel Dots to several people. I hope they enjoy the dots AND the tags!
Stamping Supplies: Below are all the Stampin’ Up! supplies I used to create my card. To place an order, click on any item and you’ll head over to my Stampin’ Up! online store!
If you have any questions, don’t hesitate to ask!
by Tracy | Jul 1, 2017 | Uncategorized
Today’s the day to start earning Bonus Days coupons!
During the month of July, you can earn a $5.00 coupon for every $50 purchase you make (before tax and shipping). You can earn unlimited coupons and then redeem them in August!
After your online purchase, you’ll receive an email from Stampin’ Up! with a special code. Save your code so that whenever you place an order in August, you can apply it to your order!
It starts today so if you’re ready to start shopping, click here!
Have a great day! I’m off to do some shopping myself!

Click here to see what’s inside the catalog!
by Tracy | Jun 30, 2017 | Uncategorized

Today I’d like to share a fun card using the Polished Stone Technique! But first, I want to mention the Paper Pumpkin Flash sale! It started last night and will continue until tonight at 11:59, Mountain Time.

Paper Pumpkin by Stampin’ Up! is a crafting subscription kit that delivers creativity to your door every month. Every kit includes an exclusive stamp set, ink spot, and embellishments to create a predesigned project. The monthly subscription is $19.95 per month but you can try one month for just $5.00! It’s an incredible way to try Paper Pumpkin but this price only lasts until tonight!
If you’d like to give Paper Pumpkin a try, click HERE and you’ll be able to easily sign up! If you love it, you’ll continue to receive a box of creativity each month. If not, simply cancel. Be sure to use the PROMO CODE: ONEDAY0717.

Onto my card! The Polished Stone technique is quite fun and very addicting! You need just a few supplies: reinkers (pictured below), rubbing alcohol, cotton balls and glossy cardstock, a new item in the catalog!

Next, add rubbing alcohol to a cotton ball. Add drops of reinker onto the cotton ball, I added four drops of each color (Bermuda Bay and Lemon Lime Twist).

Next, take the cotton ball and pounce it all over the surface of the glossy cardstock. Once you’ve done this all over the paper, take a clean cotton ball and dab over where you see puddles. OR you can forget this step. It depends on the look you want but I did do this step. Once it dries, you’ll have a beautiful, one of a kind, masterpiece!

It’s really fun and once you start, you’ll want to experiment with different colors!
The Card Layers
Bermuda Bay: 11″ x 4-1/4″ Scored @ 5-1/2″
Basic Black: 4″ x 5-1/4″
Glossy Cardstock: 3-3/4″ x 5″
Below you’ll find a list of the Stampin’ Up! supplies I used. If you give this technique a try, I’d love to see what you’ve created!
Click on any picture and you’ll head over to my Stampin’ Up! online store. From there, it’s easy to add an item to your shopping cart!


