This week my husband and I celebrated our 37th wedding anniversary. For the first time in a long time, we went out of town to celebrate. When I taught elementary school for years, school started at the end of July, so going away in early August was never an option. But this year nothing was stopping us and we headed to Las Vegas. We had a great time!
My husband doesn’t care for Las Vegas but I convinced him we’d have a good time at the Wynn and we did! My daughter, Jenny, and I have gone there before and loved it and I knew Mark would too. The hotel is so nice and so big that you could just stay there without venturing out onto the Las Vegas strip. We relaxed by the pool, had a few drinks, went to a show and ate (we especially enjoyed our Eggs Benedict)!
I like to play on the slot machines but Mark doesn’t so he worked out while I walked the casino from machine to machine. That’s still a workout, right? That’s what my Fitbit said! 🙂
Getting back to real life is always difficult especially figuring out what to have for dinner the day you get back. But that makes these trips even more special.
Where have you gone recently (or would like to go) to relax, unwind, or celebrate a special event?
Today I have another card using the beautiful Naturally Eclectic Designer Series Paper. If you visited my blog yesterday, the card design will look very familiar. This time I used two different designs (also in the Naturally Eclectic Paper) and did a little something different with the sentiment.
Card Info
The Banner Triple punch was used to create the banners.
The sentiment was stamped in Soft Sky ink with the Eastern Beauty stamp set. It was cut out with the Layering Circles Framelits.
The base of the card is Lemon Lime Twist and the layer on top is Soft Sky cardstock.
The pretty little accents are Glitter Enamel Dots
Stamping Supplies – Ready to place an order? Just click on any of the products below!
Welcome to the First Fridays Blog Hop! We hop on the first Friday of the month and our theme this month is Designer Series Paper! There are so many beautiful packages of paper in the new catalog and we are each choosing one to showcase today! The paper I chose is Naturally Eclectic where you can find some of my favorite papers in the catalog.
The colors that coordinate with this package of paper are: Berry Burst, Emerald Envy, Fresh Fig, Lemon Lime Twist, Night of Navy, Peekaboo Peach, Soft Sky and Whisper White. On my card, I used Soft Sky and Night of Navy.
I used the Banner Triple punch for the two banners and the new Starburst punch for my sentiment. The sentiment comes from the stamp set, Eastern Beauty and the cute heart accent comes from the Regals Enamel Shapes. The texture on the Soft Sky card stock was achieved by running the paper through the Softly Falling embossing folder.
This is card that can be made really quickly which is nice when you’re short on time! Need a quick gift? Make 4-6 cards and place them, with envelopes, inside a box, that you made yourself, using the same beautiful paper!
I used Berry Burst cardstock for the base of my box. I could have used DSP but the box is much sturdier with cardstock. I wrapped it up with Whisper White Baker’s Twine. The sentiment comes from the stamp set, You’re So Sweet. I didn’t want to use the entire stamp that has this sentiment, so I went over “Just For You” with a Berry Burst Stampin’ Write marker.
All of the supplies I used to create my projects can be found down at the bottom of the post.
Are you ready for some more ideas using Stampin’ Up! Designer Series Paper? The next stop on the hop is Michelle Veller!
Here’s the list of everyone in the hop! I hope you’ll make it around to everyone!
Stamping Supplies – Below you’ll find a list of all the supplies you’ll need to create today’s projects! Click on any product and you’ll head over to my Stampin’ Up! online store.
I don’t have a project today but instead wanted to tell you my story and why I love Stampin’ Up! products.
When I was a kid, I dreaded Art class. Dreaded it. I remember being in class and while everyone was busy painting or drawing, and ENJOYING IT, I was sick to my stomach because I felt that anything I created was awful. What a horrible thing for a child to feel. I’m surprised that not one of my teachers picked up on it and tried to encourage me. Or perhaps they did but I was too stubborn to take their words to heart.
You see, I felt and believed for a long time, that I was not creative. It wasn’t until I started using Stampin’ Up! products that I began to feel inside that I was creative and that I actually could create something beautiful.
My philosophy is that stamping should be fun, never stressful. One of the first products that made me do the happy dance were punches. I didn’t have to even stamp straight! What I stamped could be as crooked as can be but after punching it out, it didn’t matter! The same thing can be said for the Big Shot dies, especially when I use the Magnetic Platform. I truly love my Big Shot. I can create an embossed background that makes a card pop or a 3D project that’s as cute as can be.
I stink at matching colors together. Stampin’ Up! takes all the guesswork out of that for me. On all the packages of Designer Series paper, the colors that match are listed. Cardstock that matches all of their paper! I can grab and accent or ribbon in the same color and I’m good to go!
Thanks to the internet, a world of ideas are just a click away. I gather inspiration from stampers every single day. It’s a wonderful community of people!
I hope that in some small way, I can inspire you. If you don’t think you have a creative bone in your body, stamps, ink, paper, punches and a Big Shot will change your life! Now that’s a bit dramatic, but oh so true!
Happy Crafting!
P.S. The First Fridays Blog Hop is this Friday! I hope you’ll join us!
In what feels like another lifetime, I taught elementary school. For 22 years I shopped all the back to school sales to buy folders, pencil boxes, extra pencils and all kinds of prizes for “my kids.” For the past week I’ve seen Facebook posts from my teacher friends as they’ve been preparing for the first day of school which happens to be today! This is the 6th year that I haven’t been a part of that world. I miss it but I’m also very happy with my life right now! If any of my teacher friends are reading this, I hope you have a wonderful, fun first day!
Instead of preparing for a classroom full of second graders last week, I was able to spend time in my craft room and play with all of my crafting supplies! I created a card using a watercolor wash and I made a video, YES, I finally made a video, showing this technique! It had been so long since I’d last made a video that it took me some time to remember how to edit it! I had several people ask me to create a video showing this technique and I’m so sorry that it took so long!
The amazing thing about creating a watercolor wash is that you’ll never create the exact same background. Each piece is one of a kind! Using Tempting Turquoise, Pacific Point and Bermuda Bay I created the background you see below. I love these colors together! I decided not to use this piece as a focal point but instead used it in a way that the colors would peek through. I was very happy with the results!
As you’ll see in the video below, creating a wash is easy and fun! On a piece of Whisper White, I cut out three butterflies using the Move Me Thinlits. I added a sentiment using Tempting Turquoise ink and the stamp set from the Oh Happy Day Card Kit. I then attached the background to the Whisper White using Fast Fuse. I added Stampin’ Dimensionals to the back and attached it to my base of Tempting Turquoise cardstock. To finish the card, I added a sprinkling of rhinestones.
I hope the video below is helpful and that you’ll give this technique a try! If you’re reading this in an email, please click here for the video!
Stamping Supplies– Below you’ll find all the supplies I used to create my card. To purchase any of these items, simply click on any of the pictures and you’ll be taken to my Stampin’ Up! online store.
Have you had your eye on a Big Shot but felt that it was more money that you wanted to spend? Or that you could pick it up with a coupon somewhere else? With the many promotions from Stampin’ Up! currently going on, there’s never been a more perfect time to have a Big Shot in your craft room!
There are three different ways to own the best crafting tool, EVER! Don’t delay because these offers are only available until Tuesday, July 31, 2017!
#1 Purchase the Big Shot and receive:
2 Bonus Days Coupons – Earn $10 that you can use in August on any order
FREE Embossing Folder of your choice valued up to $10 – this offer is only available through me
ME as your coach – If you have any questions at all about how to use the Big Shot , contact me and I’ll help you out!
Getting Started with Your Big Shot PDF – this offer is only available through me
FOUR Bradley Points – read all about Bradley Points here
#2 Purchase the Big Shot and add $40 more to your order (such as the Layering Circle Framelits and a package of Rhinestones) to receive:
3 Bonus Days Coupons – Earn $15 that you can use in August on any order
$15 in FREE product from Stampin’ Up! (Host Rewards)
FREE Embossing Folder of your choice valued up to $10 – this offer is only available through me
ME as your coach – If you have any questions at all about how to use the Big Shot , contact me and I’ll help you out!
Getting Started with Your Big Shot PDF – this offer is only available through me
SIX Bradley Points – read all about Bradley Points here
#3 Purchase the Starter Kit for $99 and Join My Team
Choose $125 worth of product for $99 (It can be a Big Shot or any other products you’d like)
Receive the FREE Essentials Pack with a value of $72
Receive a FREE Embossing Folder of your choice valued up to $10 – this offer is only available through me
Receive FREE Shipping on the Starter Kit
ME as your coach – If you have any questions at all about how to use the Big Shot , contact me and I’ll help you out!
Getting Started with Your Big Shot PDF – this offer is only available through me
Are you ready to take the plunge and purchase a Big Shot, a machine that will change the way you craft?
Option #1
Click here to purchase the Big Shot (make sure that you see my name in the upper right hand corner).
Use the HOST CODE NWPUZN62 and you’ll receive a gift from me (2 sheets of Stampin’ Dimensionals and 2 sheets of Mini Stampin’ Dimensionals)
Option #2
Click here to purchase the Big Shot and at least $40 more in Stampin’ Up! product (make sure my name is in the upper right hand corner).
Don’t use the Host Code because you’ll receive Host Rewards – at least $15 in free product. You’ll still receive the Host Code gift from me!
If you still have questions, email me and I’d be happy to help you out! tracy@stampingwithtracy.com
More Details About the Starter Kit
You’ll receive the FREE Essentials Pack
There’s absolutely no obligation when purchasing the kit
You’ll save at least 20% on your future purchases
You’ll be able to preorder from the Holiday Catalog beginning on August 1st.
If you want to continue to enjoy the perks of becoming a demonstrator (discount on crafting supplies, quarterly Stampin’ Up! publication and more), you will need to have a minimum of $300 in personal purchases and/or customer orders by December 31st. If you don’t, no one will hassle you and you’ll simply be dropped.
I love my Big Shot and can’t imagine crafting without it! If you’d like more information about this great tool, enjoy the video below from Stampin’ Up! If you’re reading this in an email, please click here! If you have any questions, please let me know!
These offers are only available until July 31, 2017 and only open to U.S. Residents
Using colorful, beautiful paper as the focal point makes for a quick and easy card!
The paper I’ve used for my card comes from the Petal Garden Designer Series stack which is part of the Petal Garden Suite. It comes with 48 sheets of double-sided 6″ x 6″ paper. The coordinating Stampin’ Up! colors are Calypso Coral, Old Olive, Pool Party, Rich Razzleberry, Sweet Sugarplum and Whisper White. Stampin’ Up! makes it so easy to know which colors to use with any of their Designer Series Paper. This is really important to me when I’m creating a card because I don’t want to waste my time wondering what colors go with a particular paper.
I used Old Olive as the base of my card with a layer of Pool Party on top.
The sentiment was stamped in Calypso Coral using the stamp set, You’re So Sweet and cut out with the Layering Circles Framelits. The scalloped circle is also cut out using these Framelits.
The sentiment sits on top of Pool Party card stock cut out with the Stitched Shapes Framelits. I love how these Framelits coordinate so well with the all of the Layering Framelits!
The leaf on the circle was stamped in Old Olive using the stamp set, Oh So Eclectic. I really, really like the watercolor look of this stamp.
The card is finished off with the Glitter Enamel Dots which I’m happy to say are back in stock!
I love hearing from YOU! If you have a question or want to share your thoughts about today’s card, please leave a comment!
Below you’ll find all of the supplies I used to create today’s card. Click on any of the products and you’ll head over to my Stampin’ Up! online store. For every $50 purchase before shipping/tax, you’ll receive a $5 coupon from Stampin’ Up! that you can use in August! Woo hoo!!! Use the July host code NWPUZN62 and you’ll receive a gift from me!
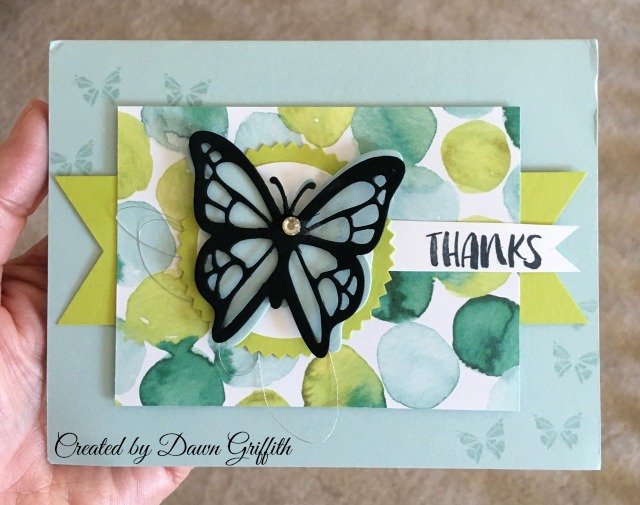
Several weeks ago I received this beautiful card from my Team Leader, Dawn. I love all the colors she used and her choice to add a black butterfly. It really stands out! Dawn also used silver metallic thread behind the Starburst Punch (new!), a technique I really like! Dawn loves glitter and if you look closely at the picture below, you can see that she added glitter to the butterflies, using the Wink of Stella Glitter Brush. Such a fun touch!
Dawn used:
the beautiful Naturally Eclectic Designer Series Paper along with Lemon Lime Twist and Soft Sky cardstock.
Move Me Thinlits and Basic Black cardstock to create the butterfly and Soft Sky for the “base” of the butterfly
Starburst punch and 1-3/4″ Circle Punch behind the butterfly
Lemon Lime Twist cardstock cut at both ends with the Triple Banner Punch
Silver Metallic Thread underneath the Lemon Lime Twist starburst
Fabulous Flamingo stamp set to stamp the small butterflies with Soft Sky ink and then some Wink of Stella for a sparkly finish to the butterflies
Below you’ll find all of these products with a link to my Stampin’ Up! online store if you’d like to purchase any of these supplies!
Just a few more days to receive a $5 coupon for every $50 in product you purchase (before tax/shipping). You’ll be able to redeem the coupon in August!
Yesterday I shared a card I made using the Move Me Thinlits Dies. These thinlits were not on my original “want to have” list but after seeing numerous cards using the butterfly die, I was hooked!
This is not your ordinary set of dies! Using the die in the upper right hand corner will create an interactive card with a stamped image that appears to flutter. Yes, flutter! (You can see it in action in the video below!)
Welcome to my new and improved blog! For many months now my blog, behind the scenes, just hasn’t been working correctly. When I found someone who could help me, I decided to refresh my banner and the overall look and feel of my blog. I couldn’t be happier! Christina Celona did a wonderful job and was so easy to work with!
Onto today’s card! The star of this card is the gorgeous Foil Frenzy Designer Series Paper. You have to see this paper in person as pictures just don’t do it justice! It’s really heavy too so it would be great for creating boxes or bags.
The butterfly on my card was made using a new set of Framelits for the Big Shot called Move Me. I’m a sucker for anything with butterflies.
My sentiment is from the stamp set Awesomely Artistic. I heat embossed “Friend” onto a piece of Basic Black and then cut it out with one of the dies in the Bunch of Banners Framelits. The small die worked perfectly for this word!
The brand new Mini Stampin’ Dimensionals were just the right size for the back of the butterfly.
This really is an easy card to create and the Foil Frenzy DSP is stunning! If you’d like to purchase any of the products I used to make today’s card, click on any of the items below and you’ll be taken to my Stampin’ Up! online store!
Just a few days left to receive a $5.00 coupon for every $50 that you spend. Shop this month and use your coupon next month! There’s no limit to how many coupons you can earn in July or redeem in the month of August!
Just a quick note to let you know that I won’t be posting again until Saturday or Sunday. Normally I post on Fridays and Saturdays but my blog is getting a refresh!! I’ll have a new banner and the blog will have a different feel to it! I’m very excited! I think it will be set to go live sometime Friday or perhaps Saturday. I hope you’ll stop by and see my new look!
How would you like to make three beautiful cards in the comfort of your home with a set of supplies where everything has been cut, scored, punched and embossed for you? All you would need to supply is ink, adhesive and the Hello Friend stamp set (or one from your collection).
If this sounds like something you’d like to receive, place a $50 order at my Stampin’ Up! online store using the Hello Friend To Go Class Host Code ( YYEE33GS) and I’ll send you your supply kit! You’ll also receive a 10 page color PDF with pictures and instructions to make the cards.
Would you like a sneak peek of one of the cards? Here you go!