by Tracy | Mar 19, 2015 | Uncategorized
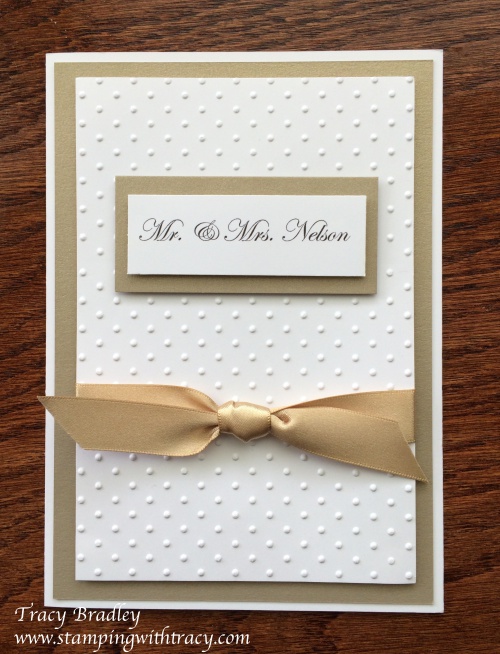
On Monday I shared the invitation I made for my sister’s wedding. For the day of their wedding I wanted to make them a card. I thought it would be fun to give them the same card as their invitation except change out their first names to their official married name! I hope they liked it!
Thanks for stopping by today!
Product List – Click on any of the items below to visit my Stampin’ Up! online store.
by Tracy | Mar 16, 2015 | Uncategorized

On Saturday I attended my sister’s wedding! Lisa is now Mrs. Nelson which is funny because Nelson is our maiden name! Both my mom and my sister are Mrs. Nelson! That doesn’t happen often! It was a lovely ceremony and my sister looked beautiful. We are very happy to have Dan in our family!
My dad passed away six years ago and he was greatly missed at this family gathering. My mom did a wonderful job walking my sister down the aisle. My daughter, son-in-law and granddaughter (Erin, Tyler and Audrey) were unable to attend the wedding as they live out of town and Erin is pregnant, due next month. They were very missed!!
When Lisa and Dad became engaged, she asked me if I would make their wedding invitations. It took many months to decide what design we wanted and which colors to use. Dan always gives Lisa beautiful flowers so we tried to make a photograph of a rose he had given her as the focal point of the invitation but we just couldn’t make it work.
We then went in a different direction and Lisa decided that she would like to use gold paper. So, I checked the Stampin’ Up! catalog and found beautiful gold satin ribbon and gold paper. This was a shock to me as I have gone through our catalog from cover to cover (more times than I can tell you) and had no idea we had these two products! The Brushed Gold Cardstock is tucked away in the catalog on page 193 in the far bottom right corner, if you want to take a look (along with several other specialty papers)!
I made several prototypes for Lisa and she chose the one you see above. It is much prettier in person as you can see the flecks of color in the gold paper and the shiny ribbon. The finished card measures 5″ x 7″. I printed their names for the front on my printer using Whisper White cardstock. I did this on the inside as well with the invitation information.
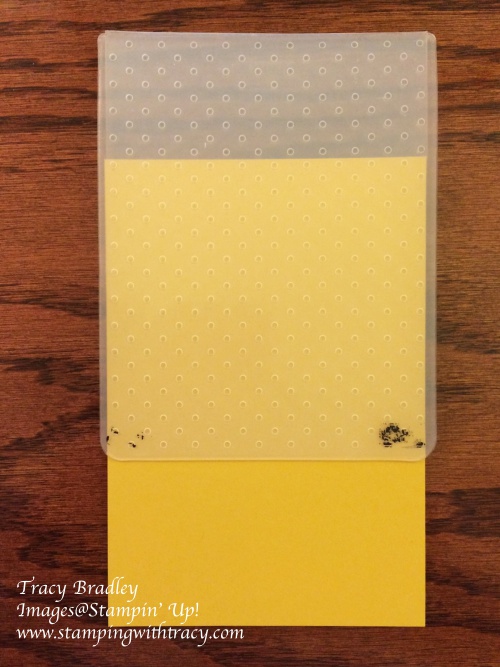
My Whisper White embossed piece measures 4-1/4″ x 6-1/4″. The one “problem” that I had to figure out with the card was how I was going to emboss this piece since our embossing folders are much smaller. Here’s a picture tutorial to show you how I did it. I’m using a piece of Hello Honey so that it’s easier to see.
1. First I placed a pencil mark where I knew my ribbon would be (you can see it in the far right corner at the bottom of the embossing folder). I then placed my paper inside the folder with the last row of dots aligning with my mark.
2. I turned the paper around and inserted it back into the embossing folder with the piece already embossed sticking out. If you look closely, you can see my pencil mark (it is still on the right hand side).
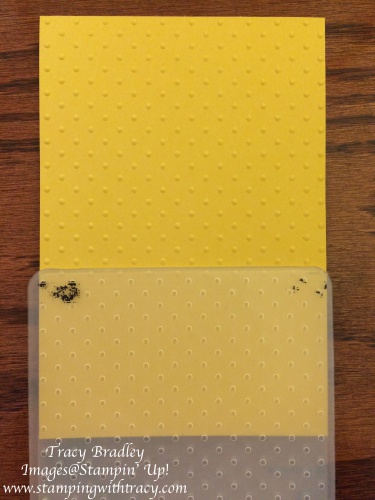
3. The next step is to run it through the Big Shot with the end not yet embossed, going through the Big Shot. The part already embossed WILL NOT be run through again or else it will be flattened! Roll it through and once you see that you’ve embossed the new part, run it backwards and out again.

4. Here’s the finished piece. You can still see my pencil mark. It is flattened a bit in this area but this is where the ribbon will go and it will be completely hidden. I did this 40 times on Whisper White and after doing it so many times, I was able to do it in such a way that I couldn’t even detect a line. I made the invitations in January so I am out of practice.

If you give this a try, let me know how it goes!
Product List – Click on each item to view at my Stampin’ Up! online store


