by Tracy | Jul 30, 2025 | Thank You Card
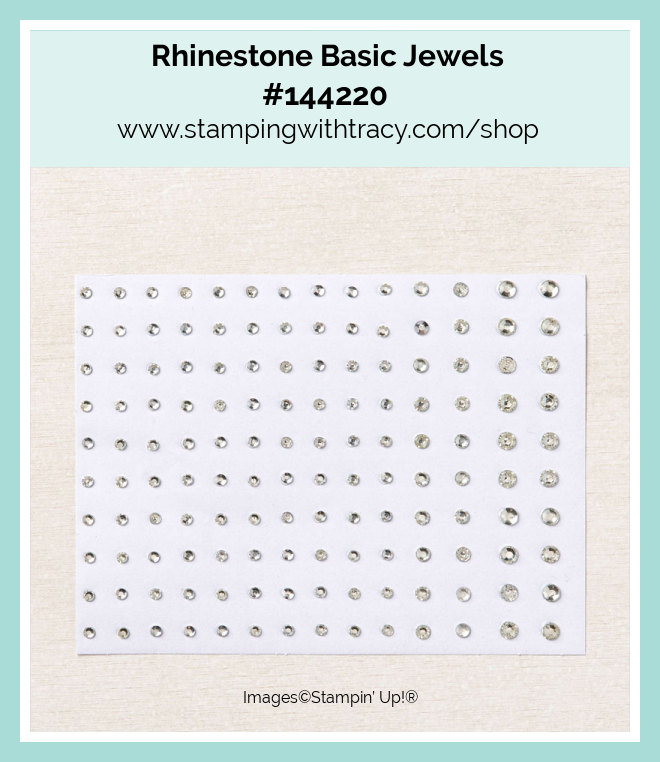
The card I’m sharing with you today was made using the same layout as Monday’s card. I used many of the same products that I used on Monday’s card, the only difference is I used Celebratory Sips Designer Series Paper. I also used the Pattern of Friendship Stamp Set, Sentimental Framing Dies, Eyelet 3D Embossing Folder, and Rhinestone Basic Jewels.

I started with a piece of Thick Basic White cardstock (an Online Exclusive) and then, embossed a piece of Bubble Bath cardstock using the Eyelet 3D Embossing Folder and my Stampin’ Cut & Emboss Machine. Next, I adhered the embossed cardstock to the front of the card.
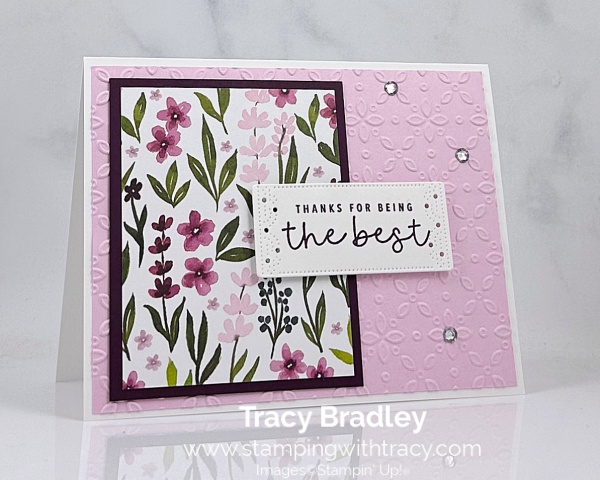

I layered a piece of Blackberry Bliss with Celebratory Sips Designer Series Paper and then adhered it to the front of the card.


I stamped the sentiment onto a piece of Basic White cardstock using the Pattern of Friendship stamp set in Blackberry Bliss ink. Then, cut it out using the Sentimental Framing Dies. I added Stampin’ Dimensionals to the back (being careful not to place the Dimensionals on either end of the sentiment). I then, adhered the sentiment to the front of the card. To complete my card, I added three rhinestones in the center of the “flowers.”

Supply List
Below you’ll find all the Stampin’ Up! supplies I used for today’s card. If you need any stamping supplies, I’d love to be your demonstrator! You can place an order by clicking any of the images below to go to my Stampin’ Up! online store.
The Specialty Plate is used with 3D Embossing Folders and Hybrid Embossing Folders.
Bundle Alert: The Sentimental Framing Bundle is available with a 10% discount rather than buying the products separately.

Measurements
- Thick Basic White cardstock: 5-1/2″ x 8-1/2″
- Bubble Bath cardstock (embossed): 4″ x 5-1/4″
- Blackberry Bliss cardstock: 3″ x 3-3/4″
- Celebratory Sips Designer Series Paper: 2-3/4″ x 3-1/2″
- Basic White cardstock (sentiment): approximately 1-1/2″ x 2-3/4″
BACK-TO-SCHOOL SALES TAX HOLIDAY
The 2025 back-to-school sales tax holiday season begins this weekend and there are thirteen states and Puerto Rico offering a sales tax holiday for school supplies during the months of July and August. Products that are eligible according to the statute include “items normally used by students in a standard classroom for educational purposes.” To see the names of participating states, products exempted from tax, and sales tax holiday dates, click here.
Please note: you must place your order with Stampin’ Up! during the tax holiday period to receive these items tax-free (which is midnight on the first day to midnight on the last day of the tax holiday). Also, keep in mind that this is a state sales tax holiday; the state statute may not apply to county, city, and special jurisdiction taxes.
Please note that Georgia, Illinois, Louisiana, New Jersey, and Wisconsin have suspended the sales tax holiday this year.
Last Chance Products

Click here to go straight to the Last Chance Products page on the Stampin’ Up! site! Some products are discounted!
Two New Stampin’ Up! Kits
Click each graphic below for more information about the kit. These kits can be found in the Online Exclusives part of the Stampin’ Up! website.


Farmhouse Florals Paper Pumpkin Kit – Last Day to Order: August 10th
You can now order subscriptions and manage your Paper Pumpkin subscription on the Stampin’ Up! website! You can cancel your Paper Pumpkin subscription at any time. If you want to skip the next kit, you can do that! You also receive Stampin’ Rewards when you order a single kit or purchase a 3-month, 6-month or 12-month subscription to Paper Pumpkin. If you’d like to subscribe, please click the graphic below.

An additional coordinating add-on is available but only for Paper Pumpkin subscribers. Click the image below for more information.

Thanks for stopping by today!
by Tracy | Jul 28, 2025 | Thank You Card
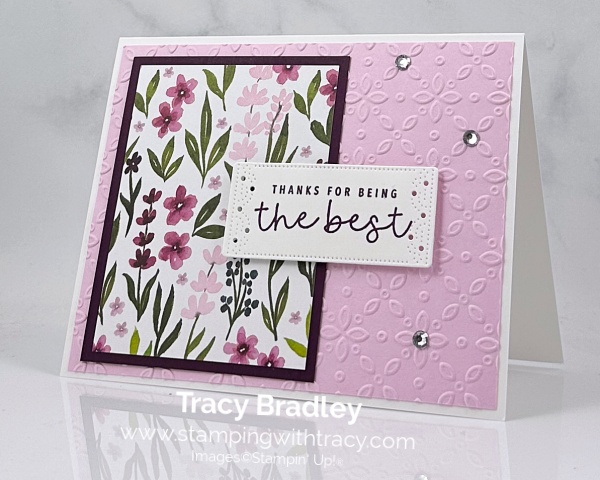
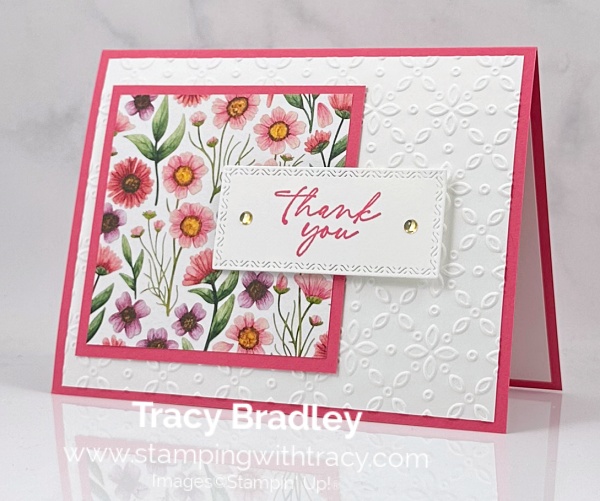
The card I’m sharing with you today was made using the Pattern of Friendship Stamp Set (an Online Exclusive), Florals in Bloom Designer Series Paper, Sentimental Framing Dies (an Online Exclusive), Eyelet 3D Embossing Folder and Rhinestone Basic Jewels.

I started with a piece of Thick Basic White cardstock for the base of my card (an Online Exclusive). I cut a piece of Bubble Bath cardstock and embossed it using the Eyelet 3D Embossing Folder and my Stampin’ Cut & Emboss Machine. Next, I adhered it to the front of my card.


I layered a piece of Blackberry Bliss cardstock with Florals in Bloom Designer Series Paper and adhered it to the front of the card. I stamped the sentiment onto Basic White cardstock using the Pattern of Friendship stamp set in Blackberry Bliss ink. I cut it out using the Sentimental Framing Dies, added Stampin’ Dimensionals to the back and adhered it to the front of the card. I was careful at both ends to not add Stampin’ Dimensional at each end.

To complete my card, I added three large rhinestones in the center of the flowers.

Supply List
Below you’ll find all the Stampin’ Up! supplies I used for today’s card. If you need any stamping supplies, I’d love to be your demonstrator! You can place an order by clicking any of the images below to go to my Stampin’ Up! online store.
The Specialty Plate is used with 3D Embossing Folders and Hybrid Embossing Folders.
Bundle Alert: The Sentimental Framing Bundle is available with a 10% discount rather than buying the products separately.
Measurements
- Thick Basic White cardstock: 5-1/2″ x 8-1/2″
- Bubble Bath cardstock (embossed): 4″ x 5-1/4″
- Blackberry Bliss cardstock: 3″ x 3-3/4″
- Florals in Bloom Designer Series Paper: 2-3/4″ x 3-1/2″
- Basic White cardstock (sentiment): approximately 1-1/2″ x 2-3/4″
BACK-TO-SCHOOL SALES TAX HOLIDAY
The 2025 back-to-school sales tax holiday season begins this weekend and there are thirteen states and Puerto Rico offering a sales tax holiday for school supplies during the months of July and August. Products that are eligible according to the statute include “items normally used by students in a standard classroom for educational purposes.” To see the names of participating states, products exempted from tax, and sales tax holiday dates, click here.
Please note: you must place your order with Stampin’ Up! during the tax holiday period to receive these items tax-free (which is midnight on the first day to midnight on the last day of the tax holiday). Also, keep in mind that this is a state sales tax holiday; the state statute may not apply to county, city, and special jurisdiction taxes.
Please note that Georgia, Illinois, Louisiana, New Jersey, and Wisconsin have suspended the sales tax holiday this year.
Last Chance Products
Click here to go straight to the Last Chance Products page on the Stampin’ Up! site! Some products are discounted!
Two New Stampin’ Up! Kits
Click each graphic below for more information about the kit. These kits can be found in the Online Exclusives part of the Stampin’ Up! website.
Farmhouse Florals Paper Pumpkin Kit – Last Day to Order: August 10th
You can now order subscriptions and manage your Paper Pumpkin subscription on the Stampin’ Up! website! You can cancel your Paper Pumpkin subscription at any time. If you want to skip the next kit, you can do that! You also receive Stampin’ Rewards when you order a single kit or purchase a 3-month, 6-month or 12-month subscription to Paper Pumpkin. If you’d like to subscribe, please click the graphic below.
An additional coordinating add-on is available but only for Paper Pumpkin subscribers. Click the image below for more information.
Thanks for stopping by today!
by Tracy | Jul 19, 2025 | Thank You Card
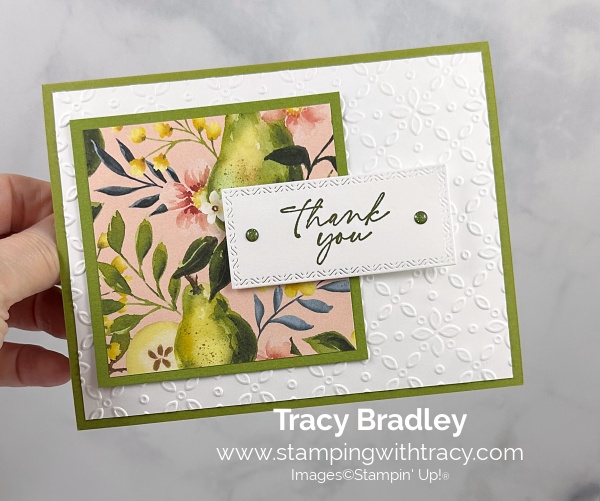
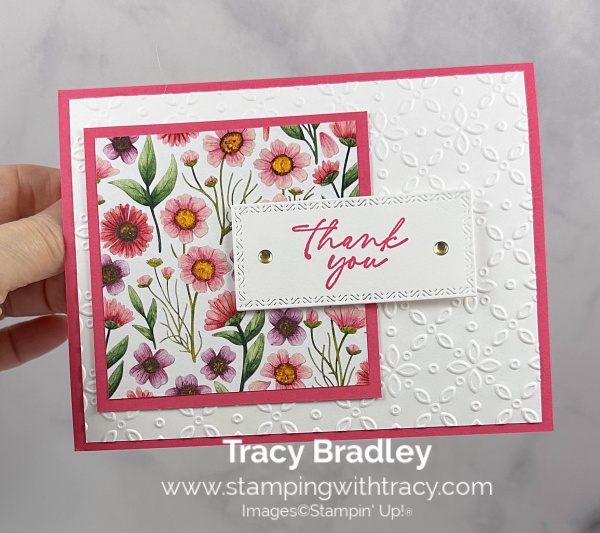
I’m sharing two cards today that use the same layout as my card on Tuesday. You can see Tuesday’s card, here. I changed the Designer Series Paper and the embossing folder. On the first card, I used Painterly Pears Designer Series Paper (an Online Exclusive) and Low Profile Sparkle Dots (an Online Exclusive). On the second card I used Floral Impressions Designer Series Paper (an Online Exclusive) and Low Profile Dots (an Online Exclusive). With both of the cards I used the Textured Notes Bundle (an Online Exclusive) and the Eyelet 3D Embossing Folder.

I started off with a piece of Old Olive cardstock for the base of my card. Then, I embossed a piece of Basic White cardstock using the Eyelet 3D Embossing Folder and my Stampin’ Cut & Emboss Machine. Next, I layered a piece of Painterly Pears DSP to a piece of Old Olive cardstock and adhered it to the front of the card.
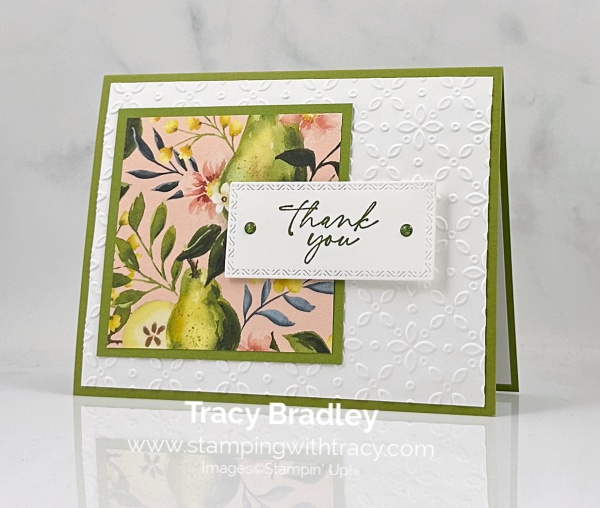
I stamped the sentiment in Old Olive ink onto Basic White cardstock and then cut it out using the Textured Notes Dies. I added Stampin’ Dimensionals to the back of the sentiment, only the part that would be on the DSP/Old Olive layer.
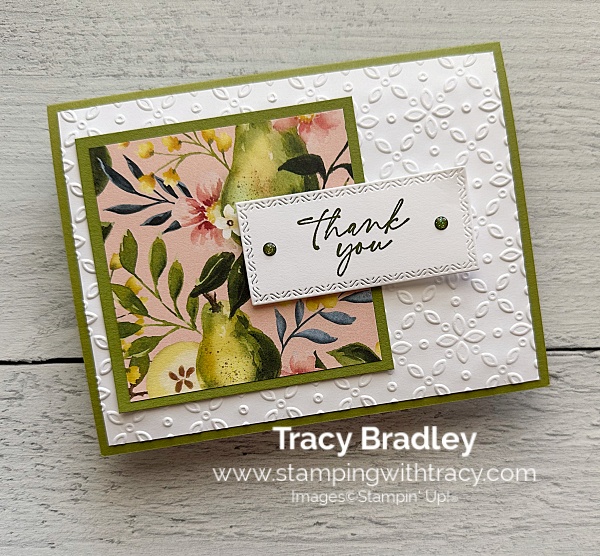

To complete my card, I added two Low Profile Sparkle Dots in Mossy Meadow to each end of the sentiment and added a piece of Basic White to the inside of the card.

For this next card, I used Floral Impressions Designer Series Paper and Low Profile Dots in gold. I also used Strawberry Slush cardstock and Strawberry Slush ink.


Supply List
Below you’ll find all the Stampin’ Up! supplies I used for today’s card. If you need any stamping supplies, I’d love to be your demonstrator! You can place an order by clicking any of the images below to go to my Stampin’ Up! online store.
The Specialty Plate is used with 3D Embossing Folders and Hybrid Embossing Folders.
Measurements
- Old Olive or Strawberry Slush cardstock: 5-1/2″ x 8-1/2″ score at 4-1/4″
- Old Olive or Strawberry Slush cardstock (square): 3-1/4″ x 3-1/4″
- Painterly Pears or Floral Impressions Designer Series Paper: 3″ x 3″
- Basic White cardstock (embossed and inside card): (2) 4″ x 5-1/4″
- Basic White cardstock (sentiment): approximately 3″ x 1-1/2″
(US ONLY) BACK-TO-SCHOOL SALES TAX HOLIDAY
The 2025 back-to-school sales tax holiday season begins this weekend and there are thirteen states and Puerto Rico offering a sales tax holiday for school supplies during the months of July and August. Products that are eligible according to the statute include “items normally used by students in a standard classroom for educational purposes.” To see the names of participating states, products exempted from tax, and sales tax holiday dates, click here.
Please note: you must place your order with Stampin’ Up! during the tax holiday period to receive these items tax-free (which is midnight on the first day to midnight on the last day of the tax holiday). Also, keep in mind that this is a state sales tax holiday; the state statute may not apply to county, city, and special jurisdiction taxes.
Please note that Georgia, Illinois, Louisiana, New Jersey, and Wisconsin have suspended the sales tax holiday this year.
Last Chance Products
Click here to go straight to the Last Chance Products page on the Stampin’ Up! site! Some products are discounted!
Two New Stampin’ Up! Kits
Click each graphic below for more information about the kit. These kits can be found in the Online Exclusives part of the Stampin’ Up! website.
Farmhouse Florals Paper Pumpkin Kit – Ends on August 10th
You can now order subscriptions and manage your Paper Pumpkin subscription on the Stampin’ Up! website! You can cancel your Paper Pumpkin subscription at any time. If you want to skip the next kit, you can do that! You also receive Stampin’ Rewards when you order a single kit or purchase a 3-month, 6-month or 12-month subscription to Paper Pumpkin. If you’d like to subscribe, please click the graphic below.
An additional coordinating add-on is available but only for Paper Pumpkin subscribers. Click the image below for more information.
Thanks for stopping by today! Have a great weekend!
by Tracy | May 28, 2025 | Thank You Card
Calling all scrapbookers! Simply purchase the Month by Month Album Retreat 2025 Kit, and you can attend the event on July 16-18, 2025 in a private Facebook group! The kits go on sale today, May 28th, but only while supplies last!
- Who: Crafters who love to scrapbook! The kit is available today, May 28th, but only while supplies last!
- When: July 16–18, 2025, 2:00–10:30 p.m. (MT)
- Where: Private Facebook Group
- Registration: There is no registration for this event! By purchasing the Month by Month Album Retreat 2025 Kit, you’ll get access to an exclusive Facebook group where the live event will stream.
- Price of Month by Month Album Retreat 2025 kit: $250
- Language of Event: This event will be presented in English only.
- After the Event: You can access the recorded event videos on the Virtual Album Retreat Facebook group page.
You will get all this:
- Exclusive stamp sets
- Precut designer pieces and embellishments
- Supplies for 12 two page layouts
- Access to a private Facebook group with all live sessions plus recordings
The picture below shows all you will get in the Month by Month Album Retreat 2025 Kit!


The card I’m sharing with you today was made using Floral Impressions Designer Series Paper, the Textured Notes Bundle, the Eyelet 3D Embossing Folder, White Woven 1/2″ Woven Ribbon and Drusy Adhesive Backed Embellishments.

I started with Darling Duckling cardstock (a new In Color) for the base of my card. Then, I embossed a piece of Basic White cardstock using the Eyelet 3D Embossing Folder and my Stampin’ Cut & Emboss Machine. Next, I adhered the embossed cardstock to the front of the card.

I cut a piece of Darling Duckling cardstock and layered it with a piece of Floral Impressions Designer Series Paper. Next, I wrapped a piece of White 1/2″ Woven Ribbon around the layered piece and tied a knot. I trimmed off the ends and made sure to slide the ribbon over to the far left. I added Stampin’ Dimensionals to the back and adhered it to the front of the card.

I stamped the sentiment onto a piece of Basic White cardstock using Garden Green ink and the stamp set, Textured Notes. I then cut it out using the Textured Notes Dies. I added Stampin’ Dimensionals to the back and adhered it over the ribbon.
To complete my card, I added two Drusy Adhesive-Backed Embellishments to each end of the sentiment and added a piece of Basic White cardstock to the inside of the card.


Supply List
Below you’ll find all the Stampin’ Up! supplies I used for today’s card. If you need any stamping supplies, I’d love to be your demonstrator! You can place an order by clicking any of the images below to go to my Stampin’ Up! online store. The Specialty Plate is used with 3D Embossing Folders and Hybrid Embossing Folders.
Measurements
- Darling Duckling cardstock: 8-1/2″ x 5-1/2″ score at 4-1/4″
- Darling Duckling cardstock: 4-1/4″ x 3-1/4″
- Basic White cardstock (embossed & inside card): (2) 5-1/4″ x 4
- Basic White cardstock (sentiment): approx. 3″ x 1-1/2″
- Floral Impressions Designer Series Paper: 4″ x 3″
Starter Kit Special – This Special Ends on May 31st!

Starting May 6 and ending on May 31st, you can purchase the Starter Kit for $99. You will receive $165 in Stampin’ Up! product! That’s $66 more in product! You choose products you want! The Starter Kit ships free and you’ll receive a 20% discount on the products you purchase. You’ll also receive a Paper Pumpkin Kit, too!
Commonly Asked Questions
- If I purchase the Starter Kit, do I have to sell Stampin’ Up! products to my family and friends? No, you are under NO obligation to sell. You can be your only customer. Of course once your friends see the cute cards you’re making, they’ll want to buy their stamping supplies from you.
- Will I receive a discount on any products I buy? Yes!! This is the best part! You’ll receive at least a 20% discount on all your purchases.
- Do I have to buy/sell a certain amount of product? The quarterly minimum is $300 in product (which is only $240 after your discount!) that can be from personal orders, online orders or ones from family and friends. The quarters are January – March, April – June, July – September, October – December. Once you join, your quarterly minimum begins during your first FULL quarter.
- What if I can’t make the quarterly minimum? You’ll simply be dropped. No one will hassle you. No one will bother you. It truly is risk free to purchase the Starter Kit!
Are there other perks to purchasing the Starter Kit? Yes! Here are just a few:
- The Starter Kit ships FREE!
- Approximately a month before new products are released, you’ll be able to participate in a preorder and purchase brand new products ahead of the public
- Attend Stampin’ Up! events like OnStage
- Personal purchases of $20 are eligible to receive Stampin’ Rewards. Yes, demonstrators can also receive Stampin’ Rewards!
- Complimentary copy of each current catalog from Stampin’ Up! Once the preorder begins, a complimentary copy will be included in your order. If no preorder is made, the catalog will be included in the first order placed during the catalog sales period.
- Free access to my Card Sampler PDF tutorials
If you have more questions, please reach out to me sending an email to me (you can send me an email on the sidebar of my blog)
Last Chance Products
Click here to go straight to the Last Chance Products page on the Stampin’ Up! site!
Two New Stampin’ Up! Kits
Click each graphic below for more information about the kit. These kits can be found in the Online Exclusives part of the Stampin’ Up! website.


Full of Charm Paper Pumpkin Kit
You can now order subscriptions and manage your Paper Pumpkin subscription on the Stampin’ Up! website! You can cancel your Paper Pumpkin subscription at any time. If you want to skip the next kit, you can do that! You also receive Stampin’ Rewards when you order a single kit or purchase a 3-month, 6-month or 12-month subscription to Paper Pumpkin. If you’d like to subscribe, please click the graphic below.

An additional coordinating add-on is available but only for Paper Pumpkin subscribers. Click the image below for more information.

Thanks for stopping by today!
by Tracy | May 2, 2025 | Thank You Card

Before sharing my card with you today, I want to let you know that Stampin’ Up! is offering 2X Stampin’ Rewards starting today and ending tomorrow in honor of National Scrapbooking Day on May 3rd.
- The threshold to receive rewards is $20
- To participate, you must have a Stampin’ Up! account and be opted in to receive rewards.
- This offer applies to ALL products (excluding Paper Pumpkin subscriptions). However any new subscriptions or prepaid subscriptions offered during the offer will earn double points.

On to my card! I used two new products on my card today, Floral Impressions Designer Series Paper #165603 and the Floral Impressions Stamp Set # 165605 (both of these products will be available on May 6th and are both Online Exclusives). I also used the Eyelet 3D Embossing Folder and the Mixed Labels Dies.

I started with a piece of Misty Moonlight cardstock for the base of my card. Then, I embossed a piece of Basic White cardstock using the Eyelet 3D Embossing Folder and my Stampin’ Cut & Emboss Machine. I adhered the embossed Basic White cardstock to the front of the card. You can find all the measurement I used below the Supply List.


I cut two pieces of Misty Moonlight cardstock and layered them using Floral Impressions Designer Series Paper (available May 6th). I love this Designer Series Paper!!!
I adhered the horizontal piece using Multipurpose Glue and on the square piece I added Stampin’ Dimensionals to the back and then adhered it to the front of the card.

I stamped the sentiment onto Basic White cardstock using Misty Moonlight ink and the Impressions Abloom Stamp Set (available May 6th). I cut the sentiment out using the Mixed Labels Dies. These dies are a staple in my craft room.
To complete my card, I added a piece of Basic White cardstock to the inside of the card.

Supply List
Below you’ll find all the Stampin’ Up! supplies I used for today’s card. If you need any stamping supplies, I’d love to be your demonstrator! You can place an order by clicking any of the images below to go to my Stampin’ Up! online store. The Specialty Plate is used with 3D Embossing Folders and Hybrid Embossing Folders.
I also used Floral Impressions Designer Series Paper #165603 and the Floral Impressions Stamp Set # 165605 (both of these products will be available on May 6th and are both Online Exclusives).
Bundle Alert: The Mixed Labels Bundle is available with a 10% discount rather than buying the products separately

Measurements
- Misty Moonlight cardstock: 5-1/2″ x 8-1/2″ score at 4-1/4″
- Misty Moonlight cardstock (horizontal piece): 4-3/4″ x 2-1/2″
- Misty Moonlight cardstock (square): 3-1/2″ x 3-1/2″
- Floral Impressions Designer Series Paper (horizontal piece): 4-1/2″ x 2-1/4″
- Floral Impressions Designer Series Paper (square): 3-1/4″ x 3-1/4″
- Basic White cardstock (embossed and inside card): (2) 5-1/4″ x 4″
- Basic White cardstock (sentiment); scrap
The New Stampin’ Rewards Program

The New Stampin’ Rewards Program was rolled out on April 15th. You will receive 10% in rewards when your order is $20 or more but you have to opt in to get the rewards. The more you shop, the more you earn!
Last Chance Products
Click here to go straight to the Last Chance Products page on the Stampin’ Up! site!
Three New Stampin’ Up! Kits
Click each graphic below for more information about the kit.


Mountain Majesties Paper Pumpkin Kit
Did you know that Paper Pumpkin has moved to the Stampin’ Up! website? You can now order subscriptions and manage your subscription on the Stampin’ Up! website! If you’d like to subscribe, please click the graphic below.

An additional coordinating add-on is available but only for Paper Pumpkin subscribers. Click the image below for more information.
Thanks for stopping by today! Enjoy your weekend!


