Yesterday I shared this card and today I have a video that will show you how I easily placed the tulips on my paper. As I mentioned yesterday, I used Memento Ink but if you are going to watercolor, I suggest Staz-On (I’ve listed both in my product list). I know my videos will get better as I keep doing them. Please be patient with me. 🙂 If you have any questions about the video, don’t hesitate to ask!
Product List – Click on any product below to be taken to my Stampin’ Up! online store.
I’m always excited for Spring. I love the warming weather and the beautiful flowers that start popping up. My husband is an airline pilot and has traveled all over the world. About ten years ago, on a trip to Amsterdam, he brought home some tulip bulbs that we planted in a flower bed. Every year about this time they pop out of the ground and we thoroughly love it when they make their appearance. They don’t last long but we look forward to seeing beautiful tulips each Spring.
Now that Spring is officially here, I thought it would be a perfect time to use my Love is Kindness stamp! You’ll have to look below in the Product List to see the full stamp as I’ve only used a small portion of it on my card. I inked up the tulips with Memento ink but I would recommend Staz-On if you are going to do any kind of watercoloring. I accidentally used Memento ink and my card turned out ok but there’s always the risk of the black ink smearing. You CAN use Whisper White instead of watercolor paper when watercoloring, which I did, but you need to be very, very careful that you use a light touch or else the paper will start pilling. I colored with my stamp pads by tapping the color onto one of my clear blocks and then picking up the color with the Aqua Painter. I didn’t want excess water on my card so I was careful not to squeeze the Aqua Painter. (I could have emptied it but I didn’t want to waste the water while we are in the middle of a drought here in California). I tried using a blender pen but the Aqua Painter glided so nicely over my paper.
I punched out three flowers from the Itty Bitty Accents punch pack and then used my sponge dauber and Rose Red ink pad to add some color around the edges. I used Candy Dots in the center of each one.
Tomorrow I’ll have a video showing you how I was able to place my tulips exactly where I wanted them plus there will be new Weekly Deals!
Have a great day!
Sale-a-bration is winding down! Now’s the time to stock up on those items that you grab for all the time such as Whisper White and Very Vanilla cardstock and adhesive, so that you can receive free product! Click here if you would like to head over to my SU! online store!
Product List- Click on any item and you’ll be taken to my Stampin’ Up! online store
Is it just me or is it hard to believe that Easter is almost here??!! Time is just flying by!
When my daughters were growing up, they LOVED Cadbury eggs. I can’t pass them in the grocery store without thinking about my girls!
I was doing some Spring Cleaning the other day and came across a cello bag with Halloween candy (yes, the candy was still in there) and a cute topper. Since I haven’t made a topper in a while, I thought it would be perfect for the Cadbury eggs with a few Hershey eggs thrown in.
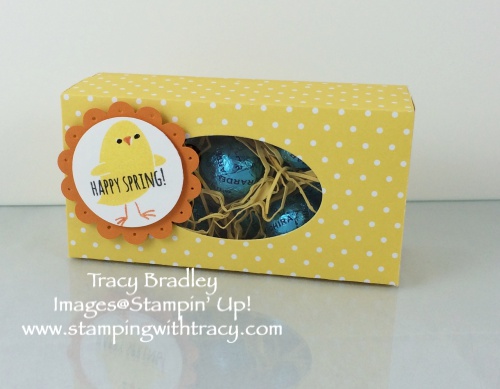
I used one of the cute little chicks from the set For Peeps’ Sake. The stamp has a row of three chicks but I only wanted the middle one, so I put some tape over the other two before I inked up the stamp. It’s very important to remove the tape before you stamp onto your Whisper White card stock (ask me how I know). My sentiment comes from this same set. I punched out my chick with the 2-3/8″ Scallop Circle punch and then used my Stamp-a-ma-jig to place the sentiment exactly where I wanted it. If you aren’t sure what a Stamp-a-ma-jig is or how to use it, you can watch a video I made two years ago by clicking here. I think this was my very first video. I’m a bit ( a lot) embarrassed by it but what the heck, gotta start somewhere, right?
Using my dauber, I sponged around the scallop circle and the flowers with Daffodil Delight. I think the topper would have been cute had it been embossed but I ALWAYS do that so I decided to just leave it plain. I have to admit, I love an embossed piece of paper.
Click here to place a Stampin’ Up! order. Every $50 (before shipping/tax) purchase entitles you to a free Sale-a-bration product. $100 = 2 Free products . . . . .
As I was walking through the grocery store the other day, I saw a new product, Ghirardelli Milk Chocolate Eggs. I quickly knew I had to make a project with them! I am from the San Francisco Bay Area where they make Ghirardelli chocolate so I have an immense fondness for their candy. I’m a an expert on chocolate and it is delicious! 🙂
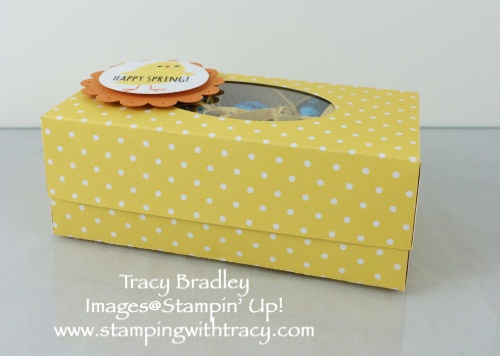
I thought that Daffodil Delight would look nice next to the blue foil eggs so I used the Brights Designer Series Paper Pack which includes Daffodil Delight. Here are the box dimensions that I came up with:
Bottom of the box: 5″ x 7″ Score each side at 1-1/2″
Top of the box: 4-1/8″ x 6- 1/8″ Score each side at 1″
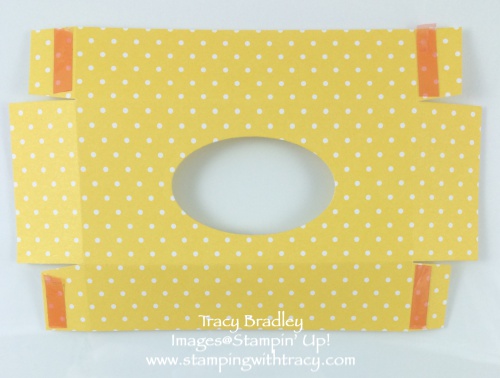
Once your paper has been scored, there’s some cutting and trimming to be done. It is hard to see the score lines in my picture below, but I have cut on a score line, up to a score line. If you are making this while reading, you will understand what I mean. Then cut about half of each tab off (it does not need to be exact) and cut a very small notch. These two steps will help as you assemble the box.
I decided to add a window to the top of my box, so I used the smallest oval in the Oval Framelits and then covered it with a small piece of a Window Sheet. I used glue dots to attach it to the box.
The next step is to add Sticky Strip to each of the places I’ve shown. Be sure it is right next to the score line. If you have Fast Fuse, that will work too!
The last step is to peel the Sticky Strip off and assemble your box. I finished it off by adding a cute little chick from the set For Peeps’ Sake. I masked off the chicks legs as I stamped him in Daffodil Delight. I took the tape off and colored his legs with a Pumpkin Pie Stampin’ Write marker, huffed on the stamp to reactivate the Daffodil Delight and stamped him onto Whisper White cardstock. My sentiment comes from the set From the Garden which I just stamped across the chick with Memento Ink. I colored his eyes and beak with Stampin’ Write markers. Not all of the Stampin’ Write Markers can be purchased individually, but the Basic Black and Pumpkin Pie are available this way.
As I mentioned, I used Designer Series Paper. The eggs are a bit heavy so I added a 2″ x 4″ piece of Daffodil Delight cardstock to place at the bottom of the box for a little more stability. Next time, I think I would make the bottom of the box using cardstock and DSP for the top.
This really is a pretty easy box to make. Give it a try and you’ll see what I mean!
Thanks for stopping by!
Product List- Click any item to be taken to my Stampin’ Up! online store