by Tracy | Mar 22, 2024 | Hello Card
Stampin’ Up! will be raising prices in the new Annual Catalog. It might be a good time to stock up on the essentials! Prices will go up on May 1st but some products may become unavailable before that. Here’s a few of the products that will see a price increase:
- All cardstock
- Ink Refills
- Staz-On & Memento inks & refills
- Stampin’ Blends
- Multipurpose Liquid Glue
- Glue Dots
- Stampin’ Cut & Emboss Machine & Plates
- Punches
- Watercolor Pencils
- Blender Pens
- Embossing Paste
- Basic White envelopes
- Heat Tool
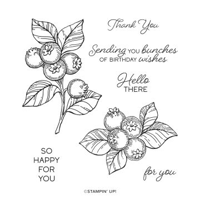
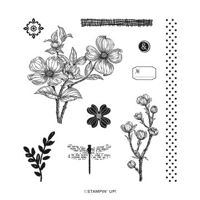
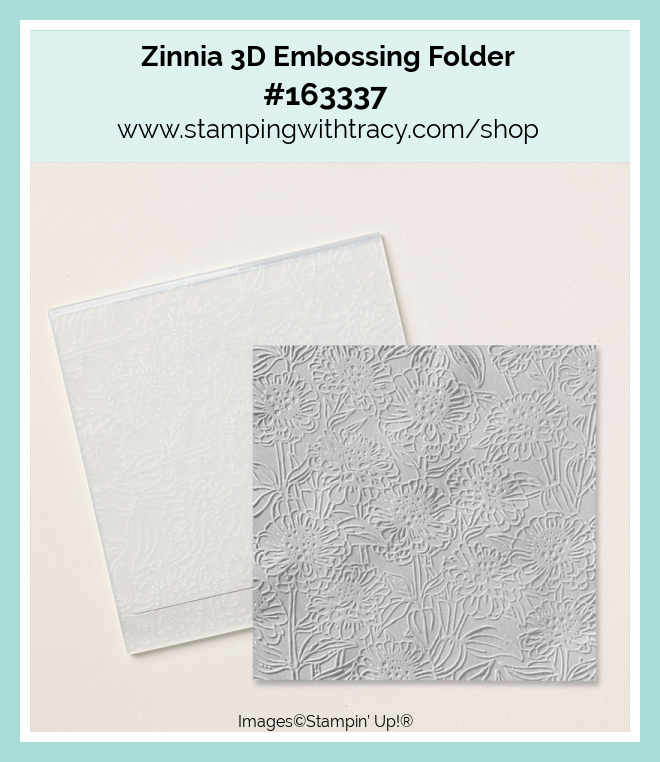
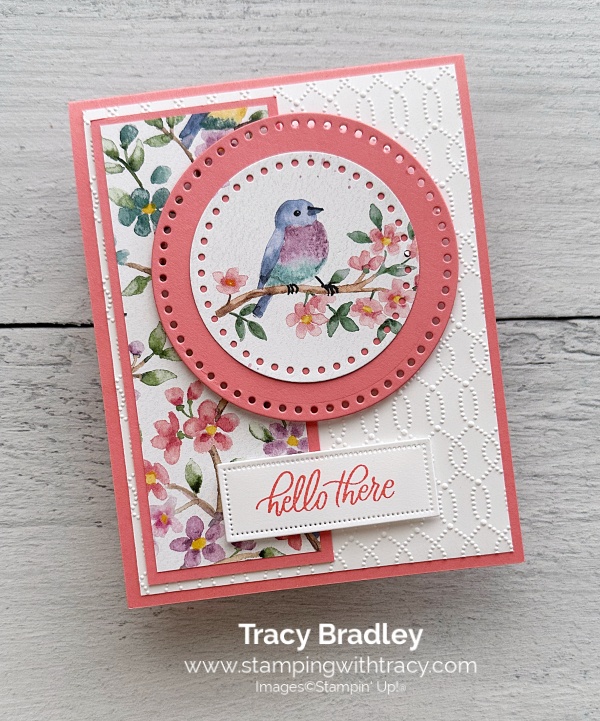
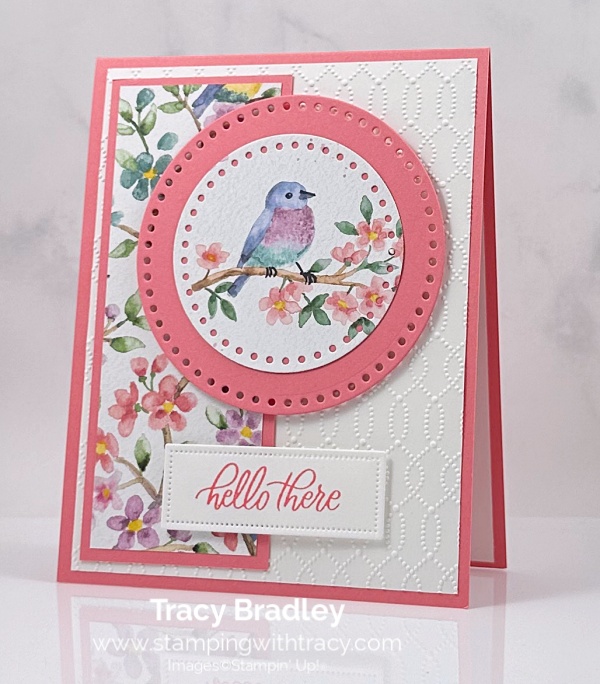
The card I’m sharing with you today is another take on the card I posted last Friday using Stampin’ Up! Flowering Zinnias Designer Series Paper, the Blueberry Bunches stamp set, Zinnia 3D Embossing Folder, Nested Essentials Dies and Stylish Shapes Dies.


I started with a piece of Thick Basic White cardstock for the base of my card. Then, I layered a piece of Berry Burst cardstock and Flowering Zinnias Designer Series Paper (DSP) and then adhered it to the front of my card. You can find the measurements I used below the Supply List.


Next, I added another layer of Berry Burst cardstock and Flowering Zinnias DSP and adhered that to the front of the card. I used the Nested Essentials Dies to cut a banner out of Berry Burst cardstock and Basic White cardstock.
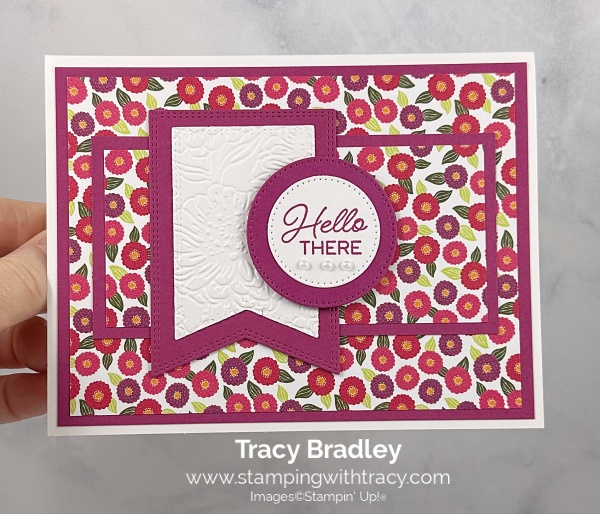
The Basic White cardstock banner was placed in the Zinnia 3D Embossing Folder and run through the Stampin’ Cut & Emboss Machine. Then I adhered it to the Berry Burst banner and adhered it to the front of the card.
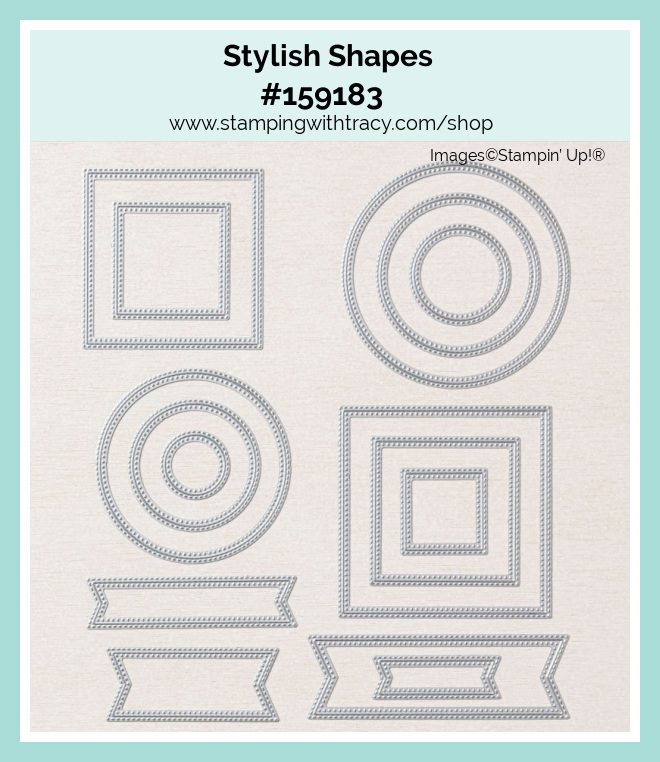
I stamped the sentiment onto Basic White cardstock in Berry Burst ink using the stamp set, Blueberry Bunches. I cut the sentiment out using the Stylish Shapes Dies and then cut the next larger circle out of Berry Burst cardstock. I layered the sentiment onto the Berry Burst circle, added Stampin’ Dimensionals only to the back on the right side and then adhered it to the banner. I added three Iridescent Pearl Basic Jewels under the sentiment.


Supply List
Below you’ll find all the Stampin’ Up! supplies I used for today’s card. If you need any stamping supplies, I’d love to be your demonstrator! You can place an order by clicking any of the images below to go to my Stampin’ Up! online store.
The Specialty Plate is used with 3D Embossing Folders.
Measurements
- Thick Basic White cardstock: 8-1/2″ x 5-1/2″ scored at 4-1/4″
- Berry Burst cardstock: 5-1/4″ x 4″
- Berry Burst cardstock: 4-1/2″ x 2-1/4″
- Berry Burst cardstock (banner): approx. 3-1/2″ x 2-3/4″
- Berry Burst cardstock (under sentiment): approx. 2″ x 2″
- Flowering Zinnias Designer Series Paper: 5″ x 3-3/4″
- Flowering Zinnias Designer Series Paper: 4-1/4″ x 2″
- Basic White cardstock (embossed banner): approx. 3″ x 2″
- Basic White cardstock (sentiment): approx. 1-3/4″ x 1-3/4″
- Basic White cardstock (optional for inside card): 5-1/4″ x 4″
2024-2025 Stampin’ Up! Annual Catalog
The new 2024-2025 Annual Catalog will debut on May 1, 2024. I send complimentary catalogs to my customers so, if you are a current customer of mine (have ordered with me in the past six months), please fill out this form to request an Annual Catalog. Due to rising costs to purchase the catalogs and mail them, I won’t send a catalog unless you request that I send one to you, so please fill out the form. The deadline to fill out the form is March 30, 2024.
If you aren’t a current customer of mine, place an order choosing me as your demonstrator and then come back and fill out this form. I will have the link to the form on every blog post until March 30th. You can place an order with me here.
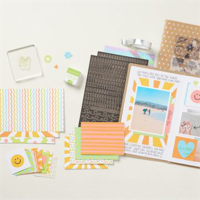
Delicate Wings Paper Pumpkin Kit

Purchase the coordinating Thanks & Beyond Dies (only available to active Paper Pumpkin subscribers).
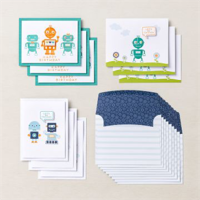
Two New Kits by Stampin’ Up!


Click here to shop the new Online Exclusives
Thank you for stopping by today!
by Tracy | Mar 18, 2024 | Hello Card
Before sharing my card with you today . . . . .
2024-2025 Stampin’ Up! Annual Catalog
The new 2024-2025 Annual Catalog will debut on May 1, 2024. I send complimentary catalogs to my customers so, if you are a current customer of mine (have ordered with me in the past six months), please fill out this form to request an Annual Catalog. Due to rising costs to purchase the catalogs and mail them, I won’t send a catalog unless you request that I send one to you, so please fill out the form. The deadline to fill out the form is March 30, 2024.
If you aren’t a current customer of mine, place an order choosing me as your demonstrator and then come back and fill out this form. I will have the link to the form on every blog post until March 30th. You can place an order with me here.
Quick Note: Today the retirement list will be posted to make room for 2024-2025 new products. I will post the retirement list here on my blog later today. If you get blog post notifications whenever I post to my blog, you won’t get the notification until tomorrow.

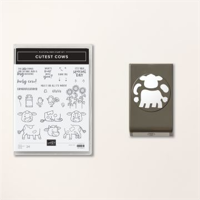
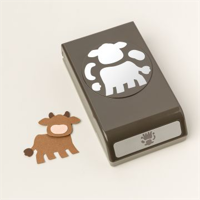
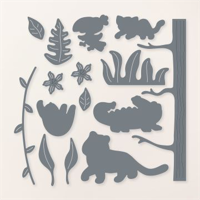
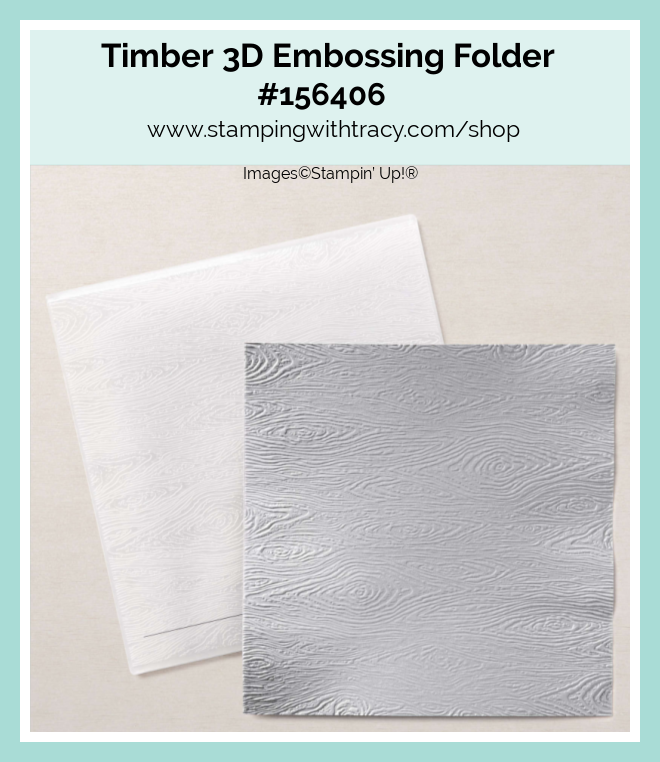
My card today was made using the Cutest Cows Bundle which includes the Cutest Cows stamp set and Cutest Cows Builder Punch. I also used the Nested Essentials Dies, Zoo Crew Designer Series Paper (DSP), and the Timber 3D Embossing Folder.

I started with a piece of Basic Black cardstock for the base of my card. Then I cut two pieces of Basic White cardstock and adhered one to the inside of the card. With the other one, I placed it inside the Timber 3D Embossing Folder and ran it through my Stampin’ Cut & Emboss Machine and then adhered it to the front of the card.


I layered a piece of Basic Black cardstock and Zoo Crew DSP and adhered it to the card front. Then, I stamped the cute cow in Memento Ink and then colored him with my Smoky Slate Stampin’ Blends. I punched him out using the Cutest Cows Builder Punch.

I used the Nested Essentials Dies to cut a rounded rectangle out of Basic Black cardstock and the next smaller size out of Basic White cardstock. I checked first to see where my cow would go before I stamped the sentiment in Memento Ink using the Cutest Cows stamp set. I attached the body of the cow to the Basic White cardstock using Glue Dots and then added two Dimensionals to his head and adhered both pieces to the front of the card.

Supply List
Below you’ll find all the Stampin’ Up! supplies I used for today’s card. If you need any stamping supplies, I’d love to be your demonstrator! You can place an order by clicking any of the images below to go to my Stampin’ Up! online store.
The Specialty Plate is used with 3D Embossing Folders.
Measurements
- Basic Black cardstock: 11″ x 4-1/4″ scored at 5-1/2″ OR 8-1/2″ x 5-1/2″ scored at 4-1/4″
- Basic Black cardstock: 5″ x 2″
- Basic Black cardstock: approx. 3-3/4″ x 3″
- Basic White cardstock: (2) 5-1/4″ x 4″
- Basic White cardstock: approx. 3″ x 2-1/2″
- Basic White cardstock: scraps for cow
- Zoo Crew Designer Series Paper: 4-3/4″ x 1-3/4″
Delicate Wings Paper Pumpkin Kit
Purchase the coordinating Thanks & Beyond Dies (only available to active Paper Pumpkin subscribers).
Two New Kits by Stampin’ Up!
Click here to shop the new Online Exclusives
Thank you for stopping by today!
by Tracy | Mar 15, 2024 | Hello Card
Today I’m sharing a card that I made using Stampin’ Up! Flowering Zinnias Designer Series Paper (an online exclusive product), the Blueberry Bunches stamp set, Zinnia 3D Embossing Folder (another online exclusive product), Nested Essentials Dies and Stylish Shapes Dies.

I started with a piece of Thick Basic White cardstock for the base of my card. Then, I added a layer of Highland Heather cardstock and Flowering Zinnias Designer Series Paper (DSP) to the front of the card. Next, I added another layer of Highland Heather cardstock and a different design of Flowering Zinnias DSP.
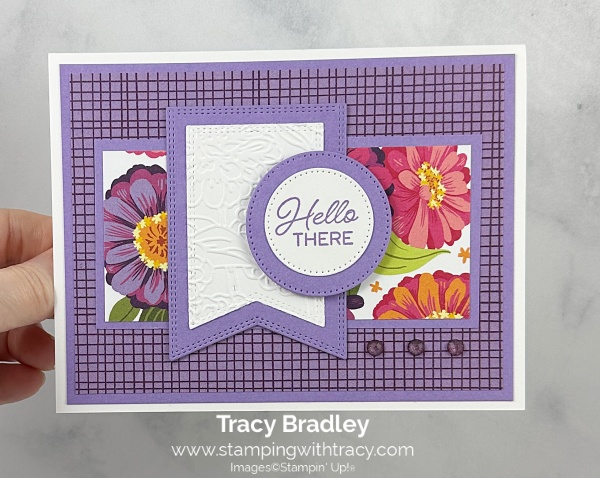
I used the Nested Essentials Dies to cut a banner out of Highland Heather cardstock and a smaller one out of Basic White cardstock. I embossed the Basic White banner using the Zinnia 3D Embossing Folder and my Stampin’ Cut & Emboss Machine. I layered the two banners together and then adhered it to the front of the card.

I stamped the sentiment onto Basic White cardstock in Highland Heather ink using the stamp set, Blueberry Bunches. I cut it out using the Stylish Shapes Dies and then cut another larger circle out of Highland Heather cardstock. I adhered the sentiment to the front of the Highland Heather circle and then on the back I added Stampin’ Dimensionals to the right side only and adhered it to the banner.

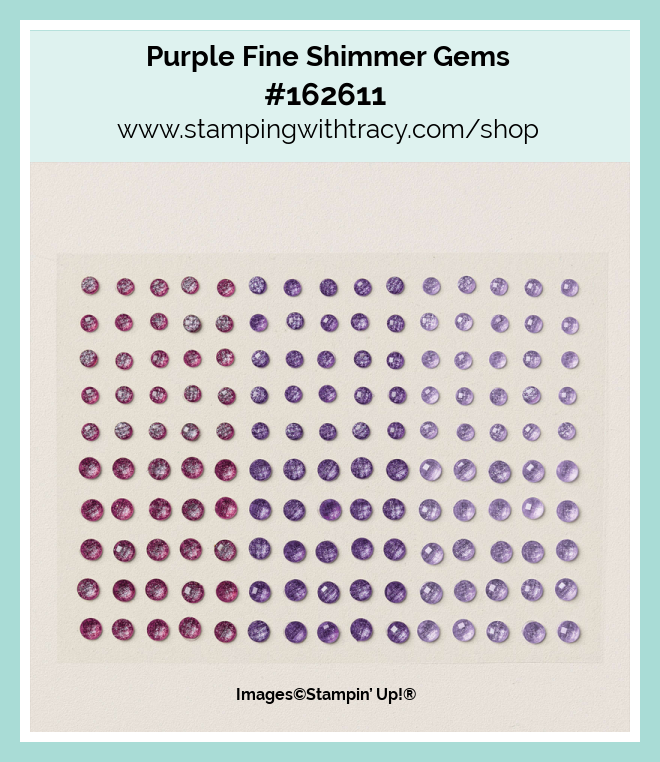
To complete my card, I added three Purple Fine Shimmer Gems to the front of the card.
Supply List
Below you’ll find all the Stampin’ Up! supplies I used for today’s card. If you need any stamping supplies, I’d love to be your demonstrator! You can place an order by clicking any of the images below to go to my Stampin’ Up! online store.
The Specialty Plate is used with 3D Embossing Folders.
Measurements
- Thick Basic White cardstock: 8-1/2″ x 5-1/2″ scored at 4-1/4″
- Highland Heather cardstock: 5-1/4″ x 4″
- Highland Heather cardstock: 4-1/2″ x 2-1/4″
- Highland Heather cardstock (banner): approx. 3-1/2″ x 2-3/4″
- Highland Heather cardstock (under sentiment): approx. 2″ x 2″
- Flowering Zinnias Designer Series Paper: 5″ x 3-3/4″
- Flowering Zinnias Designer Series Paper: 4-1/4″ x 2″
- Basic White cardstock (embossed banner): approx. 3″ x 2″
- Basic White cardstock (sentiment): approx. 1-3/4″ x 1-3/4″
- Basic White cardstock (optional for inside card): 5-1/4″ x 4″
2024-2025 Stampin’ Up! Annual Catalog – Please Read
The new 2024-2025 Annual Catalog will debut on May 1, 2024. I send complimentary catalogs to my customers so, if you are a current customer of mine (have ordered with me in the past six months), please fill out this form to request an Annual Catalog. Due to rising costs to purchase the catalogs and mail them, I won’t send a catalog unless the form has been filled out. The deadline to fill out the form is March 30, 2024.
If you aren’t a current customer of mine, place an order choosing me as your demonstrator and then come back and fill out this form. I will have the link to the form on every blog post until March 30th. You can place an order with me here.
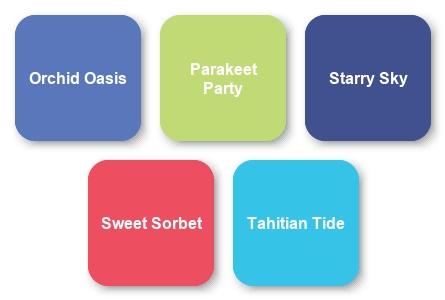
Outgoing In Colors
Orchid Oasis, Parakeet Party, Starry Sky, Sweet Sorbet and Tahitian Tide will be retiring very soon! If any of these colors are one of your favorites, I encourage you to purchase any cardstock, ink refills, ink pads, Stampin’ Blends and any embellishments with these colors before the retiring list comes out. I’m definitely going to miss using most of these colors.
Delicate Wings Paper Pumpkin Kit
Purchase the coordinating Thanks & Beyond Dies (only available to active Paper Pumpkin subscribers).
Two New Kits by Stampin’ Up!
Click here to shop the new Online Exclusives
Thank you for stopping by today!
by Tracy | Mar 14, 2024 | Hello Card
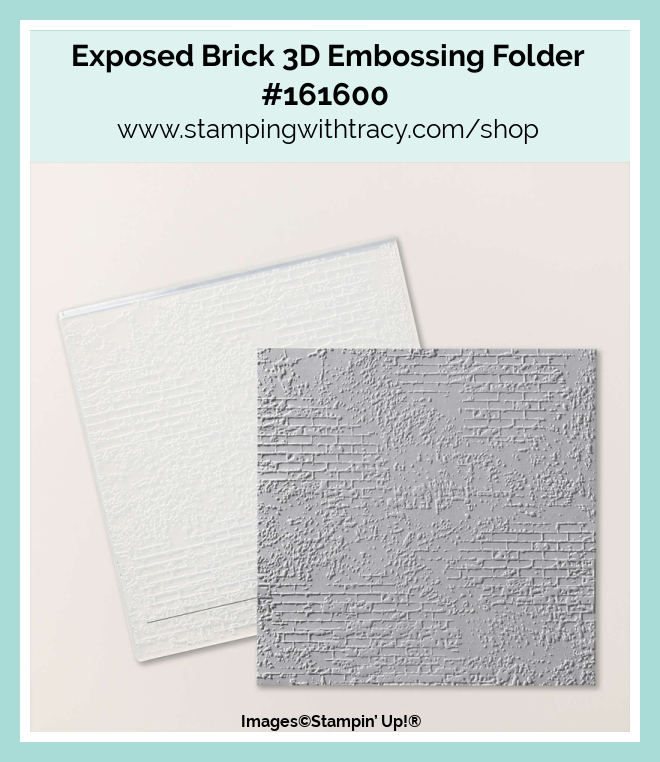
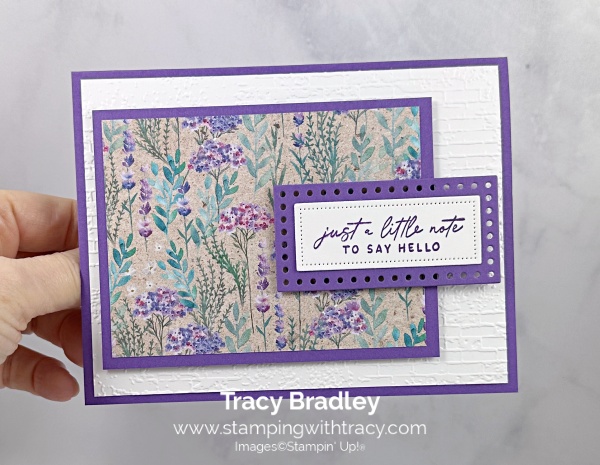
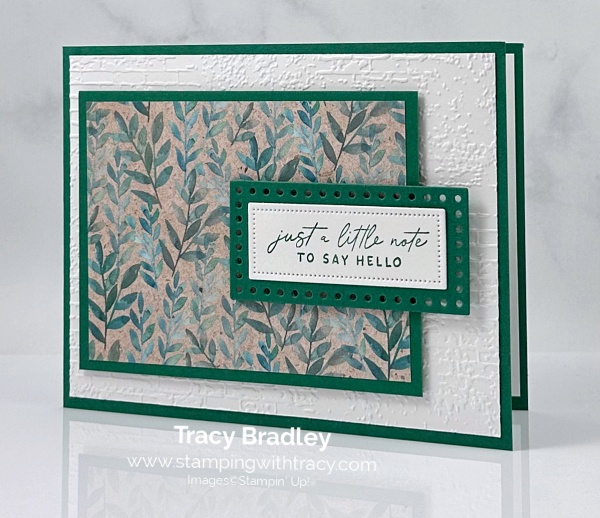
I have three cards to share with you today using Perennial Lavender Designer Series Paper (DSP), the Notes of Nature stamp set, Everyday Details Dies (these dies are currently unavailable but are expected to be back in stock the week of March 25th), and the Exposed Brick 3D Embossing Folder.
I send thank you cards with each order and I’ve been using the same design because I don’t want to send a card that someone has already received, so I change the card up a bit. You can see other varieties of this card here and here.


I started with a piece of Gorgeous Grape cardstock for the base of my card. Then, I embossed a piece of Basic White cardstock using the Exposed Brick 3D Embossing Folder and adhered it to the card front.

Next, I layered a piece of Gorgeous Grape cardstock with a piece of Perennial Lavender DSP, added Stampin’ Dimensionals to the back and adhered it to the front of the card.


I stamped the sentiment in Gorgeous Grape ink using the stamp set, Notes of Nature onto Basic White cardstock and then cut it out using the Everyday Details Dies. Using Gorgeous Grape cardstock, I cut a larger rectangle using the Everyday Details Dies. I adhered the sentiment to the Gorgeous Grape rectangle and then added Stampin’ Dimensionals only to the part that wouldn’t hang off the DSP rectangle and adhered it to the front of the card. To complete my card, I added a piece of Basic White cardstock to the inside.
Here’s another version using all the same products.

Here’s one more using Shaded Spruce cardstock and Shaded Spruce ink.

Supply List
Below you’ll find all the Stampin’ Up! supplies I used for today’s card. If you need any stamping supplies, I’d love to be your demonstrator! You can place an order by clicking any of the images below to go to my Stampin’ Up! online store.
The Specialty Plate is used with 3D Embossing Folders.
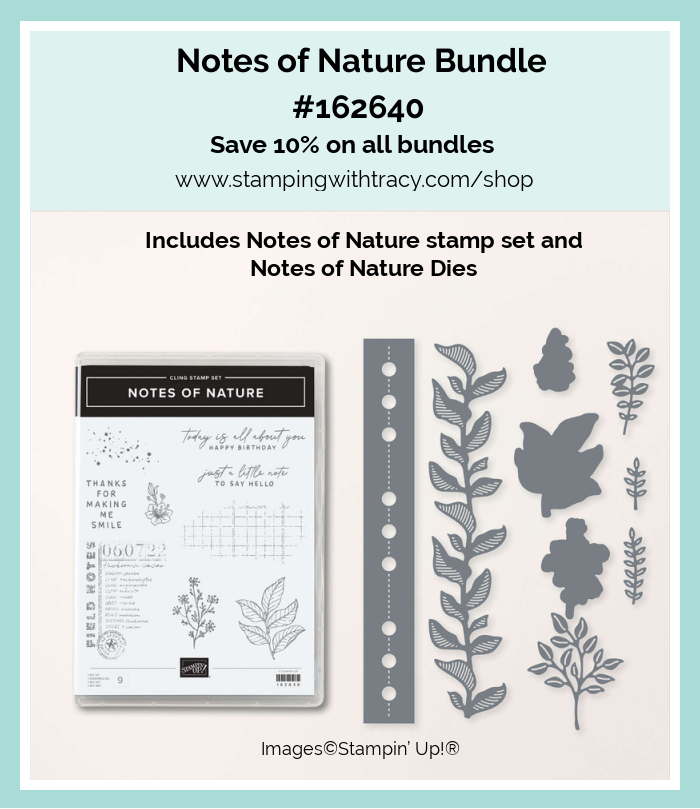
Bundle Alert: The Notes of Nature Bundle includes the Notes of Nature stamp set and the Notes of Nature Dies.
Measurements
- Gorgeous Grape or Shaded Spruce cardstock: 11″ x 4-1/4″ scored at 5-1/2″ OR 8-1/2″ x 5-1/2″ scored at 4-1/4″
- Gorgeous Grape or Shaded Spruce cardstock: 4-1/4″ x 3-1/4″
- Gorgeous Grape or Shaded Spruce cardstock (under sentiment): approx. 3-1/4″ x 1-3/4″
- Basic White cardstock (embossed): 5-1/4″ x 4″
- Basic White cardstock (inside): 5-1/4″ x 4″
- Basic White cardstock (sentiment): approx. 2-3/4″ x 1-1/8″
- Perennial Lavender DSP: 4″ x 3″
Delicate Wings Paper Pumpkin Kit
Purchase the coordinating Thanks & Beyond Dies (only available to active Paper Pumpkin subscribers).
Two New Kits by Stampin’ Up!
Click here to shop the new Online Exclusives
Thank you for stopping by today!
by Tracy | Feb 29, 2024 | Hello Card
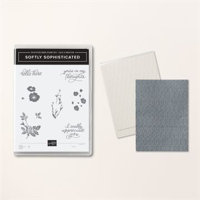
It’s been a wonderful two months of earning free product during Sale-a-Bration, hasn’t it? In honor of Sale-a-Bration ending today, I’m sharing one more card using two of my favorite Sale-a-Bration products which are the Softly Sophisticated Bundle (which includes a stamp set and an embossing folder) and Flight & Airy Designer Series Paper. I also used the Everyday Details Dies.


I started with a piece of Flirty Flamingo cardstock for the base of my card. Next, I embossed a piece of Basic White cardstock using the Softly Sophisticated embossing folder in the Softly Sophisticated Bundle (this product is free with a $100 purchase during Sale-a-Bration which ends today) and then adhered it to the front of my card.

Then, I cut piece of Flirty Flamingo cardstock and a piece of Flight & Airy Designer Series Paper (free with a $50 order) and adhered them together before adhering them to the front of my card. I cut another piece of Flight & Airy Designer Series Paper using the Everyday Details Dies and cut the next larger circle in Flirty Flamingo cardstock. After adhering the Designer Series Paper to the Flirty Flamingo circle, I added Stampin’ Dimensionals to the the back and adhered it to the front of the card.
I stamped the sentiment onto Basic White cardstock using the stamp set, Softly Sophisticated in Flirty Flamingo ink. I cut it out using the Everyday Details Dies, added Stampin’ Dimensionals to the back and adhered it to the front of my card. To complete my card, I added a piece of Basic White cardstock to the inside of the card.
Supply List
Below you’ll find all the Stampin’ Up! supplies I used for today’s card. If you need any stamping supplies, I’d love to be your demonstrator! You can place an order by clicking any of the images below to go to my Stampin’ Up! online store.
Bundle Alert: The Everyday Details Bundle which includes the Everyday Details stamp set and the Everyday Details Dies. You always save 10% when you purchase a bundle.

Measurements
- Flirty Flamingo cardstock: 11″ x 4-1/4″ scored at 5-1/2″ OR 8-1/2″ x 5-1/2″ scored at 4-1/4″
- Flirty Flamingo cardstock: 5″ x 2″
- Flirty Flamingo cardstock (circle): approx. 3-1/2″ x 3-1/2″
- Flight & Airy Designer Series Paper; 4-3/4″ x 1-3/4″
- Flight & Airy Designer Series Paper (circle): approx. 3-1/4″ x 3-1/4″
- Basic White cardstock (embossed and inside card): (2) 5-1/4″ x 4″
- Basic White cardstock (sentiment): approx. 2 3/4″ x 1-1/8″
Sale-a-Bration Ends Today

Sale-a- Bration is the best time of year! For every $50 in product you purchase (before shipping/tax), you can choose from free stamps, free paper and more. If your order total is $50, you can choose one product in the $50 category. If your order total is $100, you can choose (2) products from the $50 category or choose one item from the $100 category and so on and so on. There’s no limit to the amount of free gifts you can earn!
Very Important: The products from the Annual Catalog have special item numbers, just for Sale-a-Bration. Be sure to add them to your order during checkout where you can select the Sale-a-Bration items of your choice (don’t manually add them in with their regular item numbers).
Click here to see which products you can choose from with a $50 purchase.
Click here to see which products you can choose from with a $100 purchase.
Starter Kit with Two Options Ends Today!
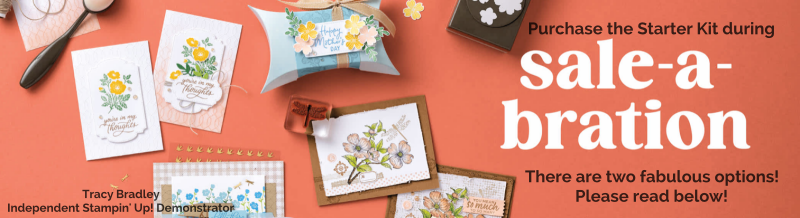
The best time to purchase the Starter Kit is during Sale-A-Bration!! The Starter Kit is $99 and you’ll receive $125 in Stampin’ Up! product (shipping is always free when you purchase the Starter Kit)! The Starter Kit is truly for anyone! It’s for the person who wants to receive a 20% (to start) discount when they buy their Stampin’ Up! products. It’s also for the business minded person. There’s no risk in purchasing the Starter Kit, only perks and you get to choose what you want to add to your Starter Kit. But wait, there’s more!
When I purchased the Starter Kit in 2009, I bought it just so I could get the discount. In 2009 you didn’t have the freedom to choose the products you wanted, it came with set products. I love that Stampin’ Up! gives you the chance to now customize your kit so that you pick the products you love and know you will use. For more information about the Starter Kit, you can take a look here for some frequently asked questions. You are also welcome to email me with any questions (click EMAIL ME on the sidebar).
You have two options during Sale-a-Bration:
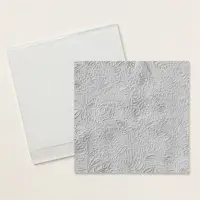
Option 1: Choose the Stampin’ Glass Mat Studio (Retail Value $60). If you choose this option, Stampin’ Up! will send this to you, absolutely FREE!
Demonstrators were able to purchase the Glass Mat before Sale-a-Bration began and before I got it, I’d never used a glass mat. Well, it’s awesome! It’s a product that I never knew I wanted!
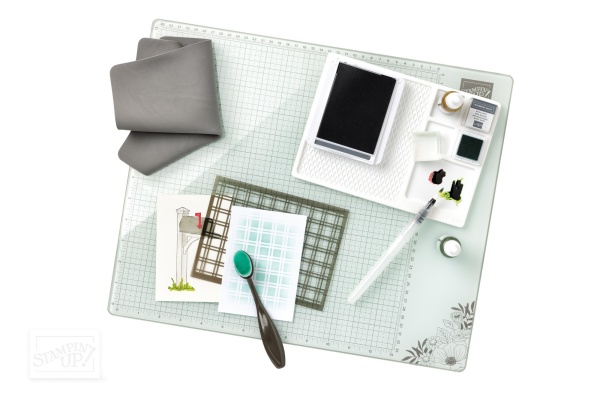
The heavy-duty glass mat comes printed with a ruler and grid lines for easy measuring, while the large surface space gives ample room for spreading out while paper crafting. The safety-tempered glass has a heat and scratch resistant surface that wipes clean with the included cloth and water—no chemicals needed. The reusable cloth also cleans ink off your stamps! The nonslip, heat resistant, waterproof silicone mat features four palette squares for mixing custom ink colors or for holding small ink spots in place while crafting. Each component can be used separately or you can use all three items together for a multipurpose paper crafting studio that’s both functional and elegant.
Option 2: Your choice of an additional $30 in FREE products to add to your Starter Kit!

New Online Exclusives on March 5th
March Paper Pumpkin Kit – Subscribe by March 10th
Share nature’s beauty with lovely all-occasion cards!
• Makes 9 cards: 3 each of 3 designs with 9 coordinating envelopes
• Precut vellum pieces & wood embellishments
• Coordinates with the Meandering Meadows Suite Collection (item 162745)
• Coordinating colors: Granny Apple Green, Garden Green (Classic Stampin’ Spot), Balmy Blue, Night of Navy, Gorgeous Grape, Fresh Freesia

Thank you for stopping by today!
by Tracy | Feb 12, 2024 | Hello Card
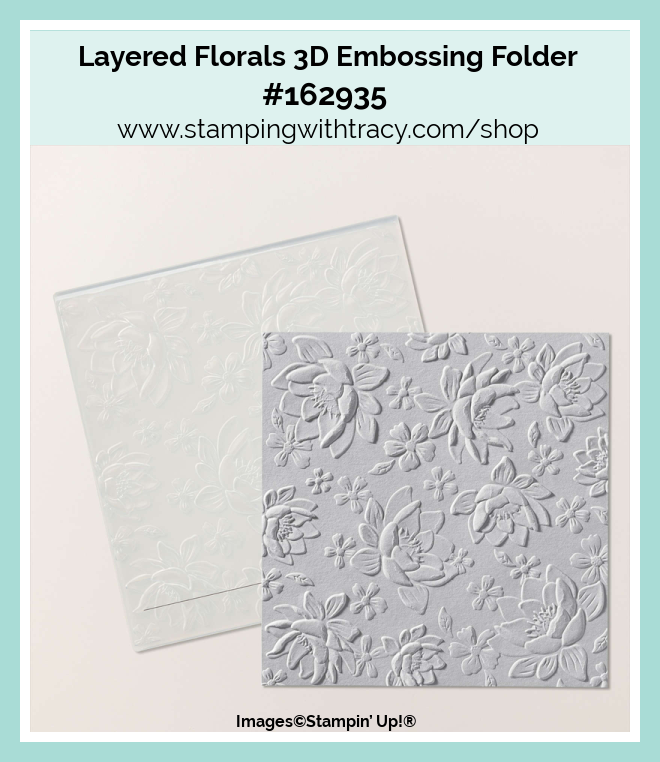
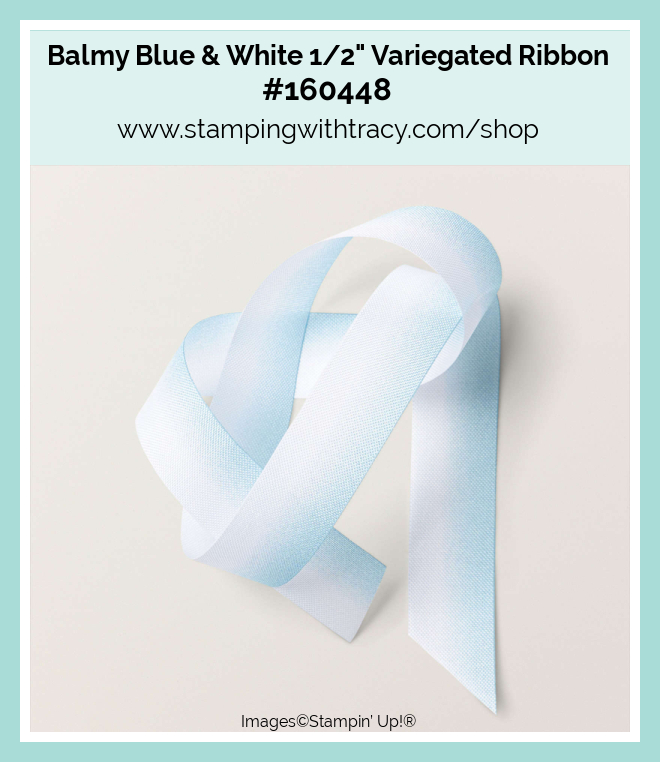
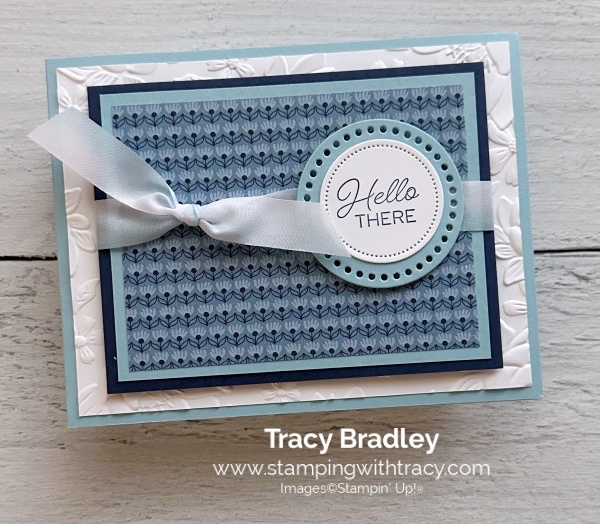
Today’s card was created using Countryside Inn Designer Series Paper, the Blueberry Bunches stamp set, Everyday Details Dies, Layered Florals 3D Embossing Folder and Balmy Blue & White 1/2″ Variegated Ribbon.
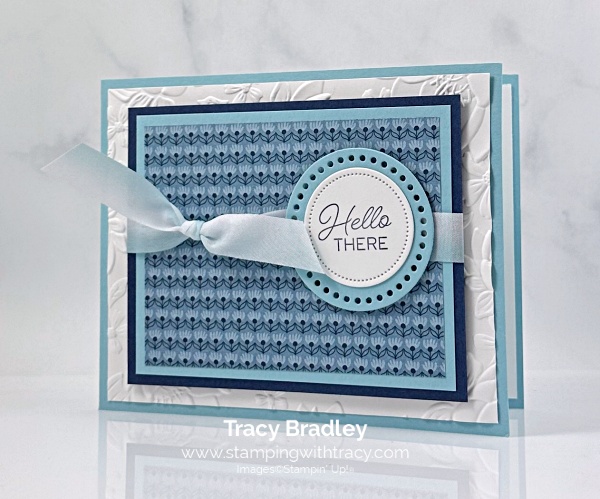

I started with Balmy Blue cardstock for the base of my card. Then, I embossed a piece of Basic White cardstock using the Layered Florals 3D Embossing Folder and my Stampin’ Cut & Emboss Machine. Then, I adhered the beautifully embossed cardstock to the base of my card.
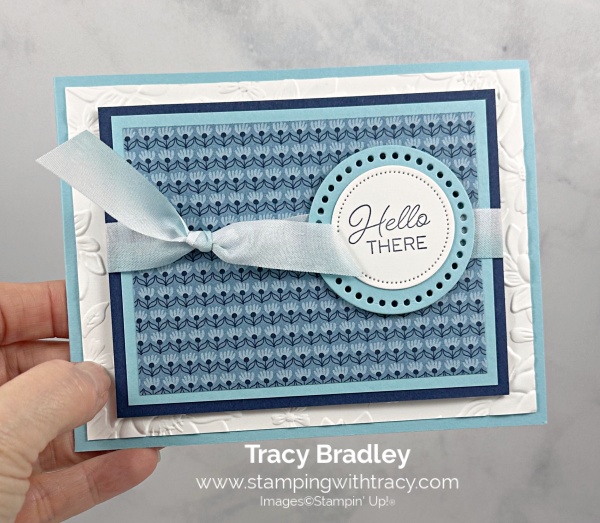
Next, I layered a piece of Night of Nav cardstock with a piece of Balmy Blue cardstock. Then, I cut a piece of Countryside Inn Designer Series Paper and adhered it to the front the layered piece. Next, I wrapped a piece of Balmy Blue & White ribbon around the middle and tied a knot. I added Stampin’ Dimensionals to the back and adhered it to the embossed Basic White cardstock.
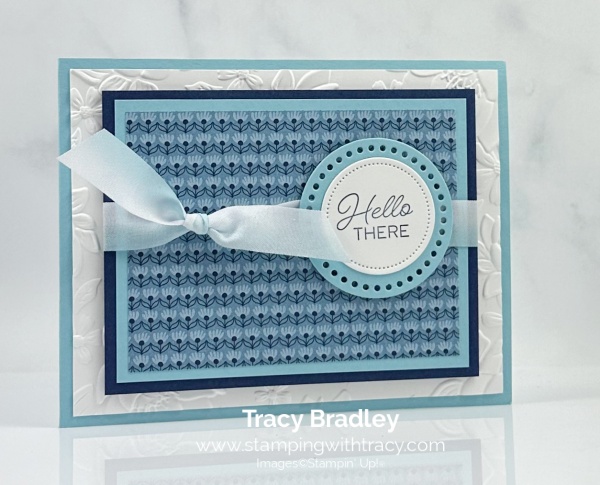
I stamped the sentiment onto Basic White cardstock using the stamp set, Blueberry Bunches and Night of Navy ink and cut it out using the Everyday Details Dies. I cut a larger circle out of Balmy Blue cardstock using the same dies. I adhered the sentiment to the front, added Stampin’ Dimensionals to the top and bottom and placed it on the ribbon. By placing the Dimensionals to the top and bottom, it doesn’t interfere with the ribbon.
Supply List
Below you’ll find all the Stampin’ Up! supplies I used for today’s card. If you need any stamping supplies, I’d love to be your demonstrator! You can place an order by clicking any of the images below to go to my Stampin’ Up! online store.
The Specialty Plate is used with 3D Embossing Folders.
Bundle Alert: The Everyday Details Bundle includes the Everyday Details Dies and the Everyday Details stamp set.
Measurements
- Balmy Blue cardstock: 11″ x 4-1/4″ score at 5-1/2″ or 8-1/2″ x 5-1/2″ score at 4-1/4″
- Balmy Blue cardstock: 4-1/4″ x 3-1/4″
- Balmy Blue cardstock: approx. 2-1/4″ x 2-1/4″
- Night of Navy cardstock: 4-1/2″ x 3-1/2″
- Basic White cardstock: (2) 5-1/4″ x 4″
- Basic White cardstock: approx. 1-3/4″ x 1-3/4″
- Countryside Inn Designer Series Paper: 4″ x 3″
Sale-a-Bration!!
Sale-a- Bration is the best time of year! For every $50 in product you purchase (before shipping/tax), you can choose from free stamps, free paper and more. If your order total is $50, you can choose one of the items listed below. If your order total is $100, you can choose (2) products from the $50 category or choose one item from the $100 category and so on and so on. There’s no limit to the amount of free gifts you can earn!
Very Important: The products (below) from the Annual Catalog have special item numbers, just for Sale-a-Bration. Be sure to add them to your order during checkout where you can select the Sale-a-Bration items of your choice (don’t manually add them in with their regular item numbers).
Here are the products you can choose from with a $50 purchase (click the images for more information about each product).
Here are the products you can choose from with a $100 purchase.
Three Weeks Left to Purchase the Starter Kit with Two Options!
The best time to purchase the Starter Kit is during Sale-A-Bration!! The Starter Kit is $99 and you’ll receive $125 in Stampin’ Up! product (shipping is always free when you purchase the Starter Kit)! The Starter Kit is truly for anyone! It’s for the person who wants to receive a 20% (to start) discount when they buy their Stampin’ Up! products. It’s also for the business minded person. There’s no risk in purchasing the Starter Kit, only perks and you get to choose what you want to add to your Starter Kit. But wait, there’s more!
When I purchased the Starter Kit in 2009, I bought it just so I could get the discount. In 2009 you didn’t have the freedom to choose the products you wanted, it came with set products. I love that Stampin’ Up! gives you the chance to now customize your kit so that you pick the products you love and know you will use. For more information about the Starter Kit, you can take a look here for some frequently asked questions. You are also welcome to email me with any questions (click EMAIL ME on the sidebar).
You have two options during Sale-a-Bration:
Option 1: Choose the Stampin’ Glass Mat Studio (Retail Value $60). If you choose this option, Stampin’ Up! will send this to you, absolutely FREE!
The heavy-duty glass mat comes printed with a ruler and grid lines for easy measuring, while the large surface space gives ample room for spreading out while paper crafting. The safety-tempered glass has a heat and scratch resistant surface that wipes clean with the included cloth and water—no chemicals needed. The reusable cloth also cleans ink off your stamps! The nonslip, heat resistant, waterproof silicone mat features four palette squares for mixing custom ink colors or for holding small ink spots in place while crafting. Each component can be used separately or you can use all three items together for a multipurpose paper crafting studio that’s both functional and elegant.
Option 2: Your choice of an additional $30 in FREE products to add to your Starter Kit!
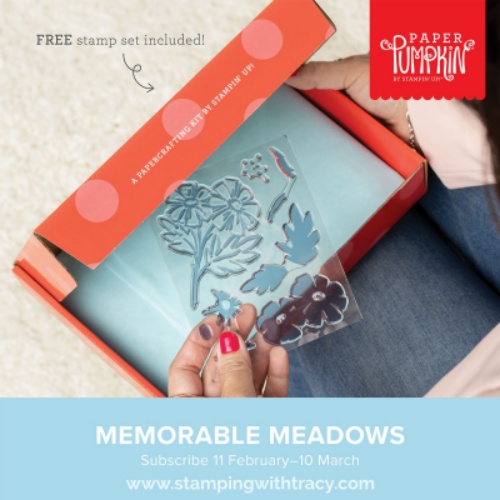
March Paper Pumpkin Kit – Subscribe by March 10th
Share nature’s beauty with lovely all-occasion cards!
• Makes 9 cards: 3 each of 3 designs with 9 coordinating envelopes
• Precut vellum pieces & wood embellishments
• Coordinates with the Meandering Meadows Suite Collection (item 162745)
• Coordinating colors: Granny Apple Green, Garden Green (Classic Stampin’ Spot), Balmy Blue, Night of Navy, Gorgeous Grape, Fresh Freesia
Two New Stampin’ Up! Kits are Now Available!
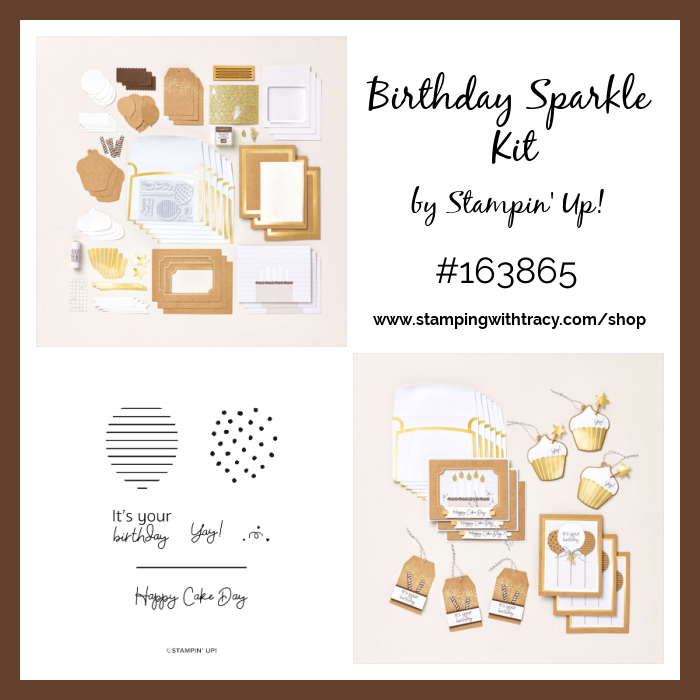
For more information or to purchase the Birthday Sparkle Kit click here.
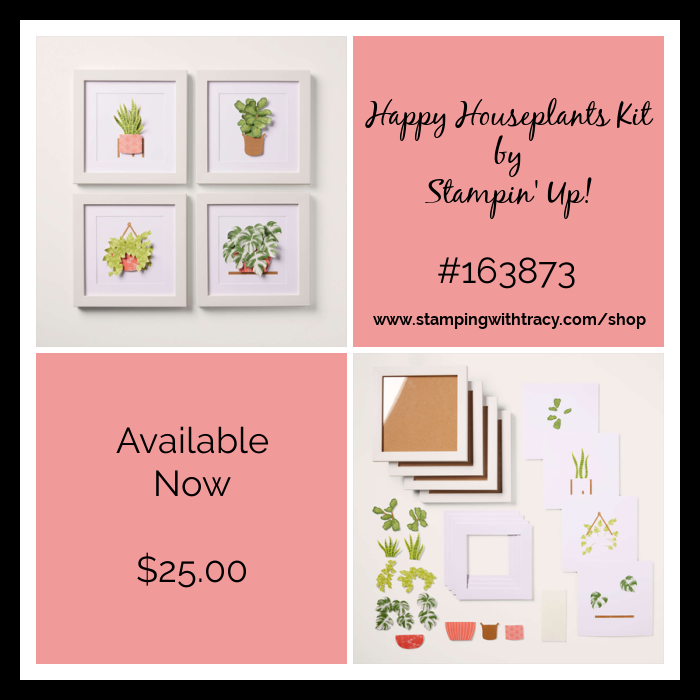
For more information or to purchase the Happy Houseplants Kits click here.
Host Code
Use the host code PGSZWAYV with your $50 or more Stampin’ Up! order and you’ll receive a package of Rainbow Adhesive-Backed Dots after the promotion has ended.To make sure you’re shopping with me, if you’re on a phone, click the three lines at the top of the page and you should see my name. If you’re on a computer, my name will be in the upper left-hand corner. Please read all the details below.
Please note: If your order is $150 or more, do NOT use the host code so you can receive the Stampin’ Rewards directly from Stampin’ Up! If you put my host code in, you will forfiet your rewards. If you’d like the Rainbow Dots, just send me an email (only if your order is $150 or more) letting me know you’d like the Rainbow Dots.


Thanks for stopping by today!