by Tracy | Jun 2, 2017 | Uncategorized
 It’s the first Friday of the month so that means it’s time for the First Fridays Blog Hop! The new Stampin’ Up! Annual Catalog went live yesterday and we’re very excited about that so the theme for this month’s hop is NEW CATALOG PRODUCT!!

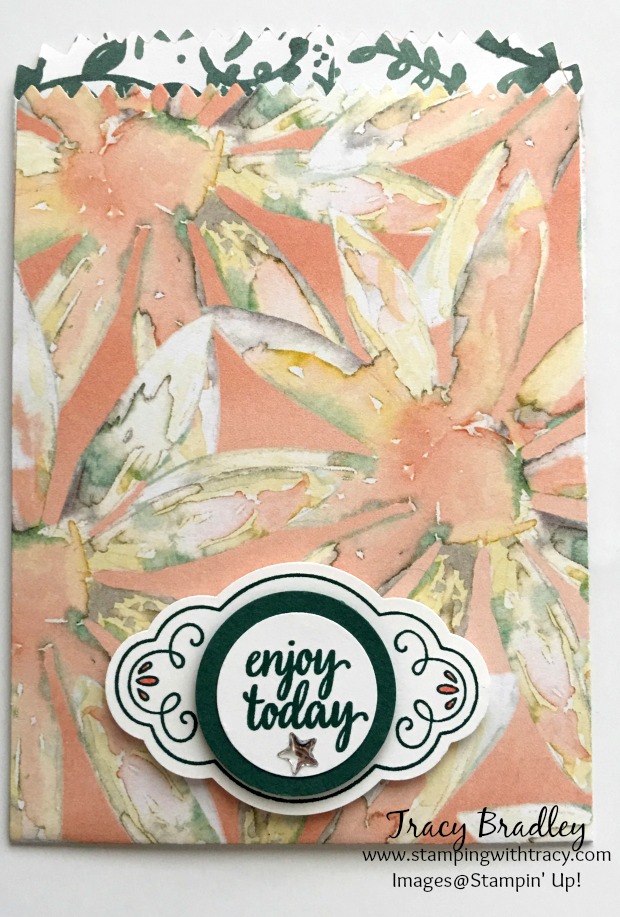
I chose to make a gift card holder using our new Fresh Florals Designer Series Paper Stack which coordinates with all five new In Colors. This paper stack contains 40 12″ x 12″ sheets with 4 each of 2 double-sided designs in all five In Colors! My cards today use three of the new In Colors: Lemon Lime Twist, Berry Burst and Tranquil Tide.
My cards also feature one of our punches – the Daisy punch! Unfortunately this punch has already been extremely popular and is on backorder until June 26th. Fortunately there are so many wonderful new products to purchase and play with that the time will go fast before you can order the Daisy punch!
My first gift card holder, above, was made using Lemon Lime Twist. It’s such a cheerful color. I wasn’t sure that I’d like it but I have to admit that I really do!
The card below is made using Berry Burst.

And this one is made using Tranquil Tide.


It’s very easy to make these gift card holders!
- Start with a piece of card stock measuring 11″ x 4-1/4″. Score at 2-1/2″ and 5-1/2″.
- Cut two pieces of Designer Series Paper: 4″ x 2-3/4″ and 4″ x 2-1/4″
- Fold the card stock in half and then on the other score line to create a pocket.
- Glue the smaller piece of DSP to the pocket. Then, use a 1″ Circle Punch to create a notch to pull the gift card out (see photo).
- Add Tear and Tape to the sides of the pocket and fold up. (see photo below)
- Add the remaining piece of DSP to the front of the card.
- Add a piece of Whisper White to the inside of the card measuring 5-1/4″ x 4″. Add either a piece of DSP measuring 4″ x 1″ along the right hand side or stamp along the edges. Another option would be to leave it blank.

To create the daisy, punch out three pieces – one in Whisper White, one out of the same color as the card stock base and one out of the DSP that’s used on the card. Add one Stampin’ Dimensional in the center of In Color daisy and place the Whisper White daisy on top of it. Place another dimensional in the center of the Whisper White daisy and add the DSP daisy to the top of that. On the bottom of the daisy, add three dimensionals and attach it to the front of the card, making sure that the adhesive doesn’t prevent the card from opening!

I stamped my sentiment from the Eastern Beauty stamp set and punched it out with the 1″ Circle Punch. It’s attached to the daisy using Stampin’ Dimensionals.
Below you’ll find a list of the supplies I used to create my cards! For more information about any of the products, click on the pictures below and you’ll head over to my Stampin’ Up! online store.

Next stop on the hop is Dawn Griffith!
Michelle Veller
Dee Slater
Tracy Bradley YOU ARE HERE!
Use this month’s host code when placing your order to receive a free gift!
2N7YSBEM
by Tracy | Jun 1, 2017 | Uncategorized

All of the products in the new Stampin’ Up! 2017-2018 Catalog will be available today at NOON Mountain Time! Online ordering will be unavailable from midnight to noon (MT) while Stampin’ Up! transitions their systems to the new catalog.
If you’re reading this before NOON, mountain time, click here to view the catalog online to see all the beautiful new products!
Click here to place your online order over at my Stampin’ Up! online store today after NOON, Mountain Time!! Be sure to use the new Host Code for June so that you’ll receive a gift from me! This is my way of saying thank you for choosing me as your demonstrator!
June Host Code: 2N7YSBEM
Please join me again tomorrow for the First Fridays Blog Hop! Our projects will be featuring products from the new catalog!
by Tracy | May 31, 2017 | Uncategorized
 Today is the last day to order any retiring products from the 2016-2017 Annual Catalog!!! Click HERE to head over to my Stampin’ Up! online store to see what’s still available. Don’t wait too late to place your order!
I have several more projects to end my Delightful Daisy Designer Series Paper Mini-Series! This first card uses paper that I’ve already shared – it was just too pretty to use just once. The sentiment comes from a new stamp set called Label Me Pretty and it was cut out with the Stitched Shapes Framelits. It sits on top of a scalloped circle, one of the dies in the Layering Circles Framelits.

The next two projects were made using the Mini Treat Bag Thinlits and of course, the Delightful Daisy Designer Series Paper. Both bags also use a stamp from the Label Me Pretty stamp set and I punched it out with the new Pretty Label Punch. The sentiment on both bags comes from the new Eastern Beauty stamp set which was cut out with the 1″ Circle Punch. It sits on a piece of card stock cut out using the 1-1/4″ Circle Punch.

All of the supplies used to create all three projects are listed below. All new products won’t be available in the store until Thursday when the new catalog goes LIVE!! I can’t wait!!
If you have any questions about today’s projects, don’t hesitate to contact me!
Stamping Supplies
Eastern Beauty Stamp Set # 143675 Photopolymer $21.00
by Tracy | May 29, 2017 | Uncategorized

It’s Memorial Day in the United States, a day when we honor those that have served in our armed forces. I am very grateful for the freedoms we enjoy in this country and want to thank all of the men and women who have served or are serving in our military. To those who gave the ultimate sacrifice for our country, there aren’t enough words to express my gratitude.

As my Delightful Daisy Designer Series Paper Mini-Series continues, I’m showcasing another design from this package of paper. It really is beautiful paper and in just three days you’ll be able to order your very own! I am counting down the days until I can order all of the products I’ve had my eye on for weeks now!
The Delightful Daisy Designer Series Paper is part of the Delightful Daisy Suite. Per Stampin’ Up! policy, I’m not allowed to show catalog pictures until June 1st but this suite also includes a Daisy Punch and the Daisy Delight stamp set! The nice bold thank you used on my card comes from this stamp set.

Daisy Punch Update
The daisy punch has been extremely popular among Stampin’ Up! demonstrators, so much so that it is now on backorder status. I know that this may be very disappointing for those of you who have seen it in the catalog and had hoped to order it on June 1st. Stampin’ Up! explained the backorder status the other day and I found it quite interesting. Stampin’ Up! sells about 7,000 of any given punch in a year. Knowing that the daisy punch would be popular, they ordered 10,000 (a four month supply). Within two weeks, during the demonstrator preorder, 7,200 were ordered! Stampin’ Up! quickly placed two additional orders but it takes time to manufacture and ship. They are expecting 6,800 by June 26th and 4,400 in July. So please know that many are on the way!!!
All of the supplies I used to create today’s card are listed below. Although the Delightful Daisy DSP and Daisy Delight stamp set are both on the supply list, you won’t be able to order them until June 1st. Everything else is available today! Just click on any of the pictures and you’ll head over to my Stampin’ Up! online store.
Enjoy the rest of your day!
Stamping Supplies
I am very appreciative for every Stampin’ Up! order placed through me!! Use the host code below when you place your online order and you’ll receive a gift as a thank you!

by Tracy | May 27, 2017 | Uncategorized

It’s Day 3 of my Delightful Daisy Mini-Series where I showcase the many beautiful designs in the Delightful Daisy Designer Series Paper! This package of paper will be available in just 6 days on June 1st!

The paper on on my card today really lives up to the name Delightful Daisy. One of the coordinating colors listed on the package is Old Olive so I used that color to create the frame around the sentiment.

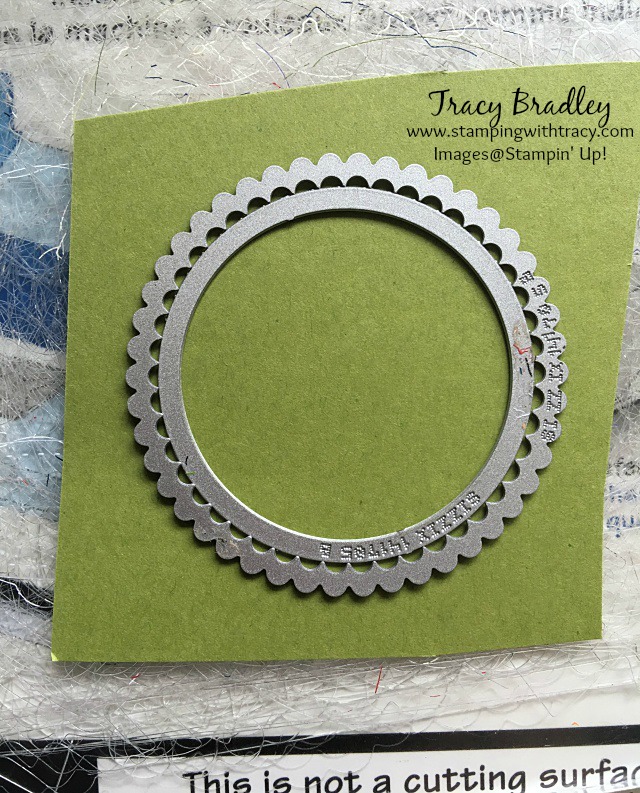
The first step in creating this card is to cut a piece of DSP (Designer Series Paper) measuring 4″ x 5-1/4″. At the same time, cut a piece of Whisper White using these same measurements. Now,using the Layering Circles Framelits, cut a circle on the front of the DSP.
To make the frame, I used that same circle and the next size up with scallops. The picture below shows how I placed them both on my Old Olive paper. Run them through the Big Shot and you’ve created a perfect frame! Glue this Old Olive frame to the front of the DSP.
The sentiment is from the stamp set Eastern Beauty (it’s available June 1, 2017 – just a few days away!). I placed the Daisy paper on top of the Whisper White paper so I could see where to stamp the sentiment. I made some faint marks with a pencil and then removed the DSP and stamped the sentiment using Memento Ink. Now glue this to the base of your card. I used Whisper White measuring 11″ x 4-1/4″.
Lots of Stampin’ Dimensionals on the back of the DSP gives the card lots of dimension. Attach this piece to the front of your card and add an Old Olive heart from the Brights Enamel Shapes and your card is finished!


The Eastern Beauty stamp set will be available on June 1st but you can purchase it today as part of either the Eastern Beauty Starter Bundle or the Eastern Palace Premier Bundle. For more information about both of these bundles, you can click their pictures in the Stamping Supplies list below or click here to see a blog post about them. These bundles will not be available after the 31st.
Stamping Supplies: Listed below are the products below that I used to create my card. The Delightful Daisy DSP IS listed but it won’t be available for purchase until June 1, 2017. Everything else is available today!
Have a wonderful weekend!
by Tracy | May 26, 2017 | Uncategorized

It’s Day 2 of my Delightful Daisy Mini-Series where I’m sharing the beautiful patterns in a package of Delightful Daisy Designer Series Paper! Today I’m sharing a card that has a matchbook on the front of the card and it’s the perfect spot for a gift card!

I thought about decorating the front with a sentiment but I decided against covering up the pretty daisies.
There are three new products on my card and all available next week! In addition to the Delightful Daisy DSP, the embossing folder is also new as well as the ribbon! Funny story about the ribbon! Since I’m using new products, I have to double check the catalog for names and details. The ribbon didn’t look familiar to me at all. When I checked in the catalog with what I thought it was supposed to be, I was confused. But I figured it out! When I looked at the ribbon in the catalog, all I saw was a crisscross pattern but the other side there are two rows of straight stitching, which is what shows up on my card. Both sides ARE shown in the catalog but my eyes went right to the crisscrosses.

Ready for all the measurements to make this card?
Base of Card: Thick Whisper White 4-1/4″ x 11″ scored at 5-1/2″
Whisper White layer: 4-1/4″ x 5-1/2″
Daffodil Delight: 4-1/2′ X 3-3/8″
Night of Navy: 3-1/4′ X 4-3/8″
Matchbook: Daffodil Delight: 3″ x 8-1/2″ Score at 3-1/2″ and 7-5/8″
Delightful Daisy DSP: 2-7/8″ x 3-3/8″ and 3/4″ x 2-7/8″
Tips:
After folding up the matchbook, staple it together as low as you can on the small flap. Then attach the small piece of DSP.
Attach the Night of Navy card stock to the piece of Daffodil Delight and then glue the matchbook to those two pieces. Wrap the ribbon around all of those pieces. Then, attach Stampin’ Dimensionals to the back and place on top of the embossed Whisper White piece.

Below you’ll find a list of all the supplies I used to create my card. Ready to place an order? Click on any product below and you’ll head over to my Stampin’ Up! online store. Please note: All of the new products on my card cannot be listed since the catalog hasn’t gone live.

 It’s the first Friday of the month so that means it’s time for the First Fridays Blog Hop! The new Stampin’ Up! Annual Catalog went live yesterday and we’re very excited about that so the theme for this month’s hop is NEW CATALOG PRODUCT!!


