Bonus Days are Here!
Hi Friends,

Wow! What a fun promotion! Here are all of the details!

If you have any questions at all, don’t hesitate to send me an email!
Click HERE to visit my online store!


Hi Friends,
Wow! What a fun promotion! Here are all of the details!
If you have any questions at all, don’t hesitate to send me an email!
Click HERE to visit my online store!
Hi Friends!
I’m popping in to let you know that you can now order from the Stampin’ Up! 2016-2017 Catalog! I just placed my order and can’t wait to play with new stamp sets, Framelits and paper!

Want to take a look inside? Click on the catalog cover and see what’s new!
Click here to place an order! Use the host code for this month and receive an extra thank you from me in the mail!
June Host Code:
Questions? Don’t hesitate to email me: tracy@stampingwithtracy.com

Hi Friends!
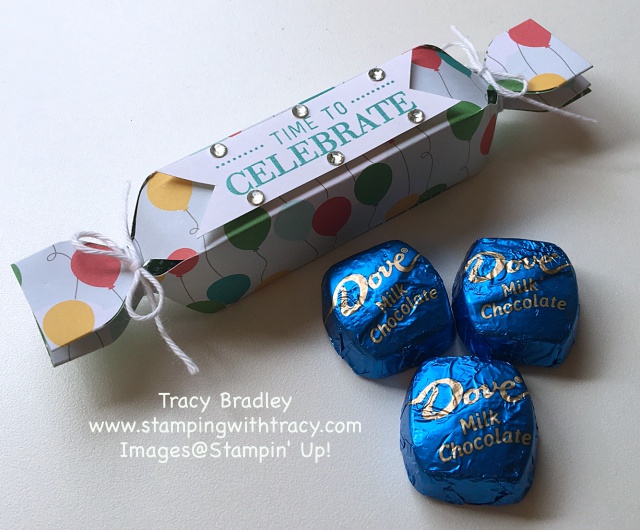
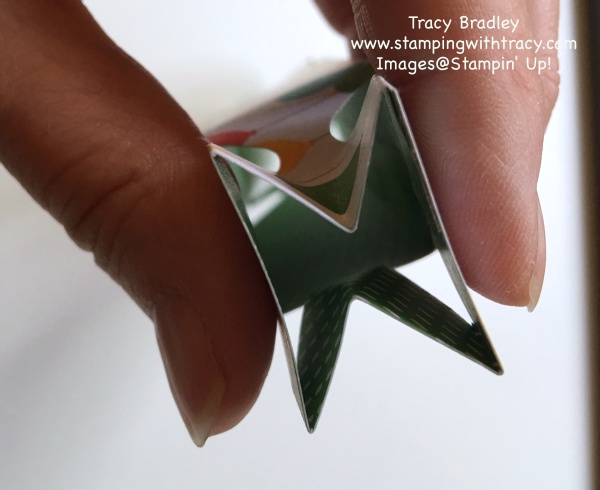
I’m back to share the directions for the Popper that I posted several days ago! It is fairly easy to make but it can be confusing with all of the steps. I’ve created a picture tutorial and I hope that if you decide to make one, it will be helpful!
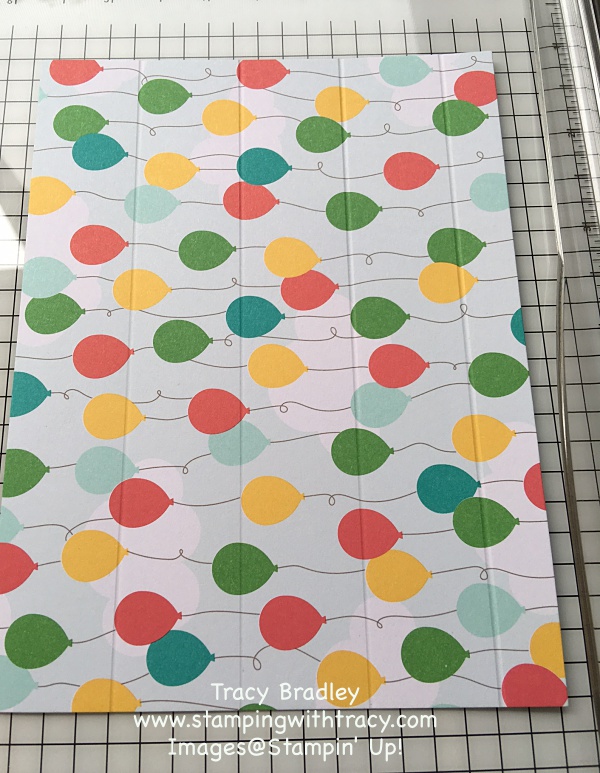
To start out, you’ll need paper and an Envelope Punch Board. You’ll need paper measuring 4-1/2″ x 6″. If you have a specific design on the paper that you want to be right-side up, such as my paper below, make sure that the design is going the correct way on the long side (hope that makes sense).
You’ll score it on the portrait side at 1″, 2″, 3″ and 4″.
Fold on all of the score lines. Then, notice that one end of the paper has a larger section than the other. Take the bigger end and place it at the 1″ mark on your Envelope Punch Board.

Punch. (Push that large “button” down.)

This is what your paper will look like when you remove it.

Now flip your paper over and do the same thing to the other side at the 1″ mark. You will always punch on the 1″ mark.

Your paper should look like this.

The next step is to fold the paper on the first score line.

Punch and then turn your paper over and do it again on the other side.

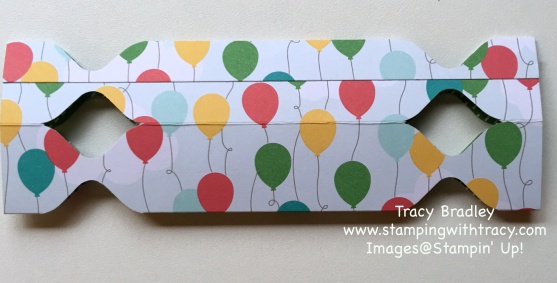
Here’s what it should now look like.

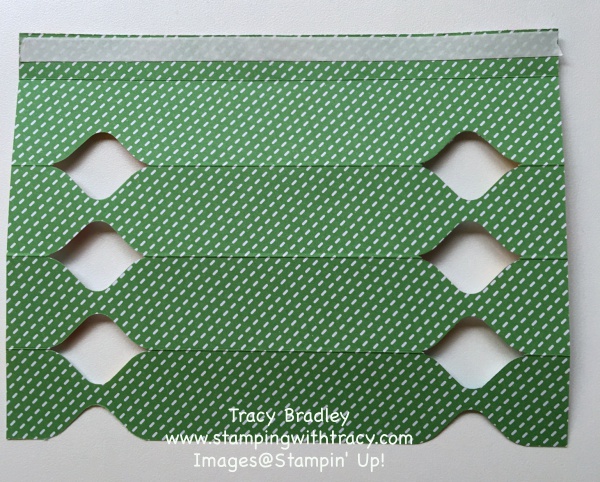
Continue to fold your paper down and punch on both sides but STOP when you get to the last one (the small section at the bottom). (oops, not sure why this picture didn’t get rotated in the editing process!)

Add Tear and Tape (a strong adhesive) on the inside flap of that last section.
Now, fold that piece over just like you did the others, place it in the punch board, again at the 1″ mark, and punch on both sides.
The next step will be to remove the tape and bring the bottom piece up to the fold where the tape is.

Fold the top piece over and press down to get a good seal.
Squeeze one end and close it up with Baker’s Twine or ribbon. Add a goodie (I was able to fit 3 Dove chocolates) to the inside and do the same thing to the other end (see the original photo at the top of the post).

If you have any questions, let me know! If you make any poppers, I would love to see what you’ve created!
Below you’ll find a supply list with the Stampin’ Up! products I used. The paper is on the retiring list so if you want it, I would grab it quickly. My sentiment is not part of a stamp set but a card Kit (Watercolor Wishes Card Kit). You can place an order by clicking here or if you’d like more information on a particular product, just click the picture below.
Product List

|
|||

|

|

|
|

|
Hi Friends!
If you are someone who has ordered your Stampin’ Up! supplies from me, please know that I am always so very appreciative!
When you place an online order and choose me as your demonstrator, I’ll send some goodies your way! First, you’ll receive a thank you card made with supplies from the current catalogs. You’ll also receive a small handmade gift, again made with Stampin’ Up! supplies (it has to be something that I can easily send via snail mail). In addition, if you use the monthly host code (the code changes monthly and can be found on the right hand side of my blog below the Order Online button), I will send you an additional surprise. Scroll down to see what I sent out to my April customers yesterday!
First up is my thank you card! I used the stamp set Picture Perfect which was in the Occasions catalog but I am so happy to say that it will be carried over into the new catalog which comes out in June.

Can you see the pretty shimmer? I achieved this look using a Wink of Stella Glitter Brush (clear) . It’s so easy – you just brush it on..

Next up is the thank you gift I sent. It is a quick and easy pouch with a few little treats inside.

And here’s the gift I sent out for using the Host Code – supplies to make three Poppers.

Over the next few days I will showcase each of these projects on my blog with directions and the supplies I used.
Click here to see all of the products that are retiring! Accessories are while supplies last and stamp sets can be ordered until May 22, 2016.
If you’d like to place an order, click here.
If you have any questions, I’m always here to help! Contact me at: tracy@stampingwithtracy.com
I thought I would list some of my very favorite Stampin’ Up! retiring accessories. All of these products are while supplies last! I have linked each product to my Stampin’ Up! online store.

Images@Stampin’ Up!

Images@Stampin’ Up!
Images@Stampin’ Up!
Images@Stampin’ Up!

Images@Stampin’ Up!

Images@Stampin’ Up!

Images@Stampin’ Up!
Images@Stampin’ Up!

Images@Stampin’ Up!

Images@Stampin’ Up!
Images@Stampin’ Up!

Images@Stampin’ Up!

Images@Stampin’ Up! Available in 5 colors
If you have any questions about any of these products, please email me: tracy@stampingwithtracy.com
 Yesterday was a whirlwind day for Stampin’ Up! and I apologize if it was frustrating for some of you. With the release of the retirement list and orders being placed, the SU! website was overloaded and down for some time. I believe that you should now be able to place an order without difficulties. Again, I apologize for any and all frustration yesterday!
Here’s the link for the retired list: Retired List PDF
I realize that the list can be a bit overwhelming. I have gone through and marked in my catalog all of the retired products. If you are curious about whether some of your favorites are retiring, send me an email and I’d be happy to look it up for you!
Stamps will be available until May 22nd.
Everything else (punches, ribbon, Big Shot accessories, buttons, etc.) are while supplies last.
The PDF list will be updated daily so be sure to check back. I looked this morning and only a few items are no longer available.
Any questions, please ask!
April Host Code: 4BJ4ZJ9N
This code can be entered at the bottom of the cart page)
Click here to place an order!


![]()


