by Tracy | Jun 6, 2025 | Birthday Card, Special Day
The card I’m sharing with you today was made using the Beautiful Butterflies Bundle (an Online Exclusive), Celebratory Sips Designer Series Paper (an Online Exclusive), Textured Notes Dies (an Online Exclusive), Glass & Gardens Embossing Folders (an Online Exclusive) and Adhesive-Backed Sparkle Gems (an Online Exclusive – these on the Last Chance List and are on sale). You can see another version of this card, here!
If the links don’t work, please try again!


I started with a piece of Blackberry Bliss cardstock for the base of my card. Then I embossed a piece of Blackberry Bliss cardstock using one of the Glass & Gardens Embossing Folders and my Stampin’ Cut & Emboss Machine. I adhered it to a piece of Basic White cardstock. I cut a piece of Celebratory Sips Designer Series Paper and adhered it to the Basic White cardstock. Next, I adhered the Basic White cardstock to the front of the card.


I used the Textured Notes Dies to cut a rectangle out of Basic White cardstock. I stamped the sentiment on the rectangle using Blackberry Bliss ink and the Beautiful Butterflies stamp set. I added Stampin’ Dimensionals to the back and adhered it to the front of the card.


I cut two butterflies out of Celebratory Sips Designer Series Paper using the dies that come with the Beautiful Butterflies Hybrid Embossing Folder. I then attached them to the top of the sentiment using Mini Glue Dots.
I added two small Adhesive-Backed Sparkle Gem to each butterfly and three more to the card front (these gems are on the Last Chance List and they are sale)!
To complete my card, I added a piece of Basic White cardstock to the inside of the card.


Supply List
Below you’ll find all the Stampin’ Up! supplies I used for today’s card. If you need any stamping supplies, I’d love to be your demonstrator! You can place an order by clicking any of the images below to go to my Stampin’ Up! online store.
The Specialty Plate is used with 3D Embossing Folders and Hybrid Embossing Folders. I forgot to add it in, Specialty Plate #154711.
Measurements
- Blackberry Bliss cardstock: 4-1/4″ x 11″ score at 5-1/2″
- Blackberry Bliss cardstock: 2″ x 5″
- Celebratory Sips Designer Series Paper: 2″ x 3-3/4″
- Celebratory Sips Designer Series Paper (two butterflies): scraps
- Basic White cardstock: (2) 4″ x 5-1/4″
- Basic White cardstock (rectangle): approximately 4-1/8″ x 2-5/8″
Month by Month Album Retreat 2025 Kit
Calling all scrapbookers! Simply purchase the Month by Month Album Retreat 2025 Kit, and you can attend the event Stampin’ Up! is putting on. This item is only while supplies last!
- Who: Crafters who love to scrapbook!
- When: July 16–18, 2025, 2:00–10:30 p.m. (MT)
- Where: Private Facebook Group
- Registration: There is no registration for this event! By purchasing the Month by Month Album Retreat 2025 Kit, you’ll get access to an exclusive Facebook group where the live event will stream.
- Price of Month by Month Album Retreat 2025 kit: $250
- Language of Event: This event will be presented in English only.
- After the Event: You can access the recorded event videos on the Virtual Album Retreat Facebook group page.


All Suites & Suite Products, Buy One, Get One 50% Off

- All available suites and suite products from the 2025–2026 Annual Catalog and Online Exclusives are buy one, get one 50% off.
- When you shop the sale, the 50% off discount will apply to the lower-priced item (for example, if you buy a suite collection and a stamp set from a suite, the suite would be full price, and the stamp set would be 50% off).
- Suite collections are available if all items are in stock; if all items are not in stock, you can still shop the available suite products.
- You don’t have to buy a suite and suite products all from the same suite collection for the discount to apply. You can buy any suite products from any suite.
- The discount will appear in your cart once you’ve added two items within the sale parameters to your cart.
- Products are available only while supplies last.
Last Chance Products

Click here to go straight to the Last Chance Products page on the Stampin’ Up! site!
Two New Stampin’ Up! Kits
Click each graphic below for more information about the kit. These kits can be found in the Online Exclusives part of the Stampin’ Up! website.


Full of Charm Paper Pumpkin Kit
You can now order subscriptions and manage your Paper Pumpkin subscription on the Stampin’ Up! website! You can cancel your Paper Pumpkin subscription at any time. If you want to skip the next kit, you can do that! You also receive Stampin’ Rewards when you order a single kit or purchase a 3-month, 6-month or 12-month subscription to Paper Pumpkin. If you’d like to subscribe, please click the graphic below.

An additional coordinating add-on is available but only for Paper Pumpkin subscribers. Click the image below for more information.

Thanks for stopping by today! Enjoy your weekend!
by Tracy | Jun 4, 2025 | Fun Fold Card, Hello Card
The card I’m sharing with you today was made using the Beautiful Butterflies Bundle (an Online Exclusive), Beautiful Bokeh Designer Series Paper, Textured Notes Dies (an Online Exclusive) and Two-Tone Sparkle Gems (an Online Exclusive).
If my links don’t work, please click them again!

I started with a piece of Balmy Blue cardstock for the base of my card (you can find all the measurements I used below the Supply List). Then, I embossed two pieces of Basic White cardstock using the Beautiful Butterflies Hybrid Embossing and my Stampin’ Cut & Emboss Machine. I adhered one to the top panel and the other inside the card.
Then, I cut two pieces of Balmy Blue cardstock using the second largest die in the Textured Notes Dies. Then, I used the third largest die and cut a piece out of Beautiful Bokeh Designer Series Paper and one out of Basic White cardstock. I adhered both to the Balmy Blue pieces (one will go inside the card and one will go in the front).


I adhered the Balmy Blue & Basic White cardstock piece to the inside (you can see the picture below) and the other to the front of the card, making sure they are on top of each other (I added two rows of Stampin’ Dimensionals to the front piece). I cut a butterfly out of Beautiful Bokeh Designer Series Paper and adhered a tiny strip of glue on the back and adhered it to the front of the card.
I stamped the sentiment in Balmy Blue ink using the Beautiful Butterflies stamp set onto Basic White cardstock. Then, I cut it out using the Textured Notes Dies. I added Stampin’ Dimensionals to the back and adhered it below the butterfly.
To complete my card, I added a Two-Tone Sparkle Gem to the middle of the butterfly and added two more at each end of the sentiment.


Supply List
Below you’ll find all the Stampin’ Up! supplies I used for today’s card. If you need any stamping supplies, I’d love to be your demonstrator! You can place an order by clicking any of the images below to go to my Stampin’ Up! online store.
The Specialty Plate is used with 3D Embossing Folders and Hybrid Embossing Folders
Measurements
- Balmy Blue cardstock: 4-1/4″ x 8 score @ 2-1/2″
- Balmy Blue cardstock: (2) approx. 5-1/4″ x 3-3/4″
- Beautiful Bokeh Designer Series Paper: approx. 3-1/4″ x 4-3/4″
- Beautiful Bokeh Designer Series Paper (butterfly): approx. 4″ x 3-1/4″
- Basic White cardstock (top piece): 4″ x 2-1/4″
- Basic White cardstock (inside card): 4″ x 5-1/4″
- Basic White cardstock (on top of Balmy Blue cardstock): approx. 3-1/4″ x 4-3/4″
- Basic White cardstock (sentiment): approx. 2-1/2″ x 1″
Virtual Album Retreat
Calling all scrapbookers! Simply purchase the Month by Month Album Retreat 2025 Kit, and you can attend the event Stampin’ Up! is putting on. This item is only while supplies last!
- Who: Crafters who love to scrapbook!
- When: July 16–18, 2025, 2:00–10:30 p.m. (MT)
- Where: Private Facebook Group
- Registration: There is no registration for this event! By purchasing the Month by Month Album Retreat 2025 Kit, you’ll get access to an exclusive Facebook group where the live event will stream.
- Price of Month by Month Album Retreat 2025 kit: $250
- Language of Event: This event will be presented in English only.
- After the Event: You can access the recorded event videos on the Virtual Album Retreat Facebook group page.
All Suites & Suite Products, Buy One, Get One 50% Off
- All available suites and suite products from the 2025–2026 Annual Catalog and Online Exclusives are buy one, get one 50% off.
- When you shop the sale, the 50% off discount will apply to the lower-priced item (for example, if you buy a suite collection and a stamp set from a suite, the suite would be full price, and the stamp set would be 50% off).
- Suite collections are available if all items are in stock; if all items are not in stock, you can still shop the available suite products.
- You don’t have to buy a suite and suite products all from the same suite collection for the discount to apply. You can buy any suite products from any suite.
- The discount will appear in your cart once you’ve added two items within the sale parameters to your cart.
- Products are available only while supplies last.
Two New Stampin’ Up! Kits
These kits can be found in Online Exclusives. Click the graphic for more information about each kit.
Last Chance Products
Click here to go straight to the Last Chance Products page on the Stampin’ Up! site!
Full of Charm Paper Pumpkin Kit
You can now order subscriptions and manage your Paper Pumpkin subscription on the Stampin’ Up! website! You can cancel your Paper Pumpkin subscription at any time. If you want to skip the next kit, you can do that! You also receive Stampin’ Rewards when you order a single kit or purchase a 3-month, 6-month or 12-month subscription to Paper Pumpkin. If you’d like to subscribe, please click the graphic below.
An additional coordinating add-on is available but only for Paper Pumpkin subscribers. Click the image below for more information.
Thanks for stopping by today!
by Tracy | Jun 2, 2025 | In Case You Need Me
The card I’m sharing with you today was made using the Beautiful Butterflies Bundle (an Online Exclusive), Stylish Shapes Dies, Starburst Sequins (another Online Exclusive) and Wink of Stella Glitter Brush.
If the links don’t work, please try again!


I started with Fresh Freesia cardstock for the base of my card. Then, I used the Beautiful Butterflies 3D Hybrid Embossing Folder and my Stampin’ Cut & Emboss Machine to emboss Basic White cardstock (you can find all the measurements I used below the Supply List).

I cut another piece of Fresh Freesia cardstock and layered it with a piece of Basic White cardstock that I also embossed using the Beautiful Butterflies 3D Hybrid Embossing Folder. I then adhered it to the front of the card.
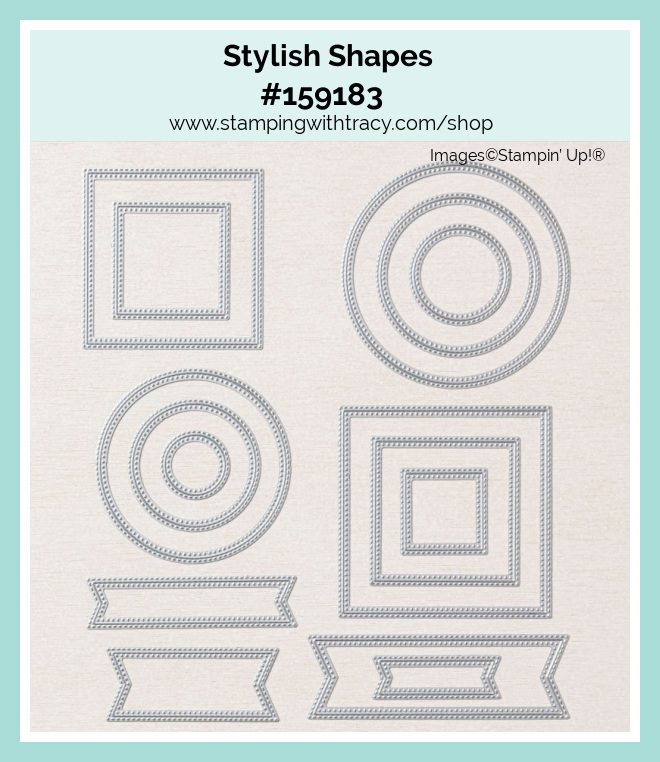
Using the Stylish Shapes Dies, I cut a square out of Fresh Freesia cardstock (the largest die) and another one in Basic White cardstock (the next smaller size). I stamped the sentiment onto the Basic White cardstock square in Highland Heather ink and then adhered the two squares together. I added Stampin’ Dimensionals to the back and adhered it to the front of the card.


I stamped a butterfly onto Basic White cardstock using the Beautiful Butterflies stamp set in Memento Ink. I then cut it out using the dies that come with the Beautiful Butterflies Hybrid Embossing Folder. I colored the butterfly using Stampin’ Blends: Fresh Freesia and Highland Heather. I added Wink of Stella to the butterfly so it would have a shimmery effect. I added Stampin’ Dimensionals to the back of the butterfly and adhered it the Basic White cardstock square.
To complete my card, I added three Fresh Freesia Starburst Sequins to the front and added a piece of Basic White cardstock to the inside of the card.


Supply List
Below you’ll find all the Stampin’ Up! supplies I used for today’s card. If you need any stamping supplies, I’d love to be your demonstrator! You can place an order by clicking any of the images below to go to my Stampin’ Up! online store.
The Specialty Plate is used with 3D Embossing Folders and Hybrid Embossing Folders.
Measurements
- Fresh Freesia cardstock: 4-1/4″ x 11″ score at 5-1/2″
- Fresh Freesia cardstock: 1-3/4″ x 4-3/4″
- Fresh Freesia cardstock (square): approx. 3-1/4″ x 3-1/4″
- Basic White cardstock (embossed and inside card): (2) 4″ x 5-1/4″
- Basic White cardstock (embossed): 1-1/2″ x 4-1/2″
- Basic White cardstock (square): approx. 2-3/4″ 2-3/4″
Virtual Album Retreat
Calling all scrapbookers! Simply purchase the Month by Month Album Retreat 2025 Kit, and you can attend the event Stampin’ Up! is putting on. The kits went on sale last week on May 28th, but stock of the item is only while supplies last!
- Who: Crafters who love to scrapbook!
- When: July 16–18, 2025, 2:00–10:30 p.m. (MT)
- Where: Private Facebook Group
- Registration: There is no registration for this event! By purchasing the Month by Month Album Retreat 2025 Kit, you’ll get access to an exclusive Facebook group where the live event will stream.
- Price of Month by Month Album Retreat 2025 kit: $250
- Language of Event: This event will be presented in English only.
- After the Event: You can access the recorded event videos on the Virtual Album Retreat Facebook group page.
Coming On June 3rd!
- All available suites and suite products from the 2025–2026 Annual Catalog and Online Exclusives are buy one, get one 50% off.
- When you shop the sale, the 50% off discount will apply to the lower-priced item (for example, if you buy a suite collection and a stamp set from a suite, the suite would be full price, and the stamp set would be 50% off).
- Suite collections are available if all items are in stock; if all items are not in stock, you can still shop the available suite products.
- You don’t have to buy a suite and suite products all from the same suite collection for the discount to apply. You can buy any suite products from any suite.
- The discount will appear in your cart once you’ve added two items within the sale parameters to your cart.
- Products are available only while supplies last.
Last Chance Products
Click here to go straight to the Last Chance Products page on the Stampin’ Up! site!
Two New Stampin’ Up! Kits
Click each graphic below for more information about the kit. These kits can be found in the Online Exclusives part of the Stampin’ Up! website.


Full of Charm Paper Pumpkin Kit
You can now order subscriptions and manage your Paper Pumpkin subscription on the Stampin’ Up! website! You can cancel your Paper Pumpkin subscription at any time. If you want to skip the next kit, you can do that! You also receive Stampin’ Rewards when you order a single kit or purchase a 3-month, 6-month or 12-month subscription to Paper Pumpkin. If you’d like to subscribe, please click the graphic below.
An additional coordinating add-on is available but only for Paper Pumpkin subscribers. Click the image below for more information.
Thanks for stopping by today!
by Tracy | May 30, 2025 | Just a Note card
The card I’m sharing with you today was made with the same layout on Wednesday’s card and Thursday’s card.
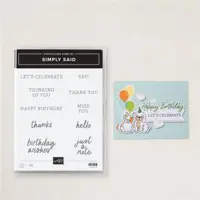
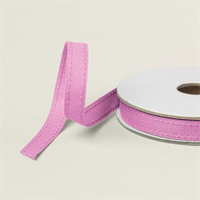
For today’s card, I used Celebratory Sips Designer Series Paper (an Online Exclusive), the Simply Said Stamp Set, Forever Plaid 3D Embossing Folder, Stylish Shapes Dies, and Silver & White Sheer Ribbon (an Online Exclusive).
If you get a 404 error or Out with the Old, In With the New error, please click the link again.

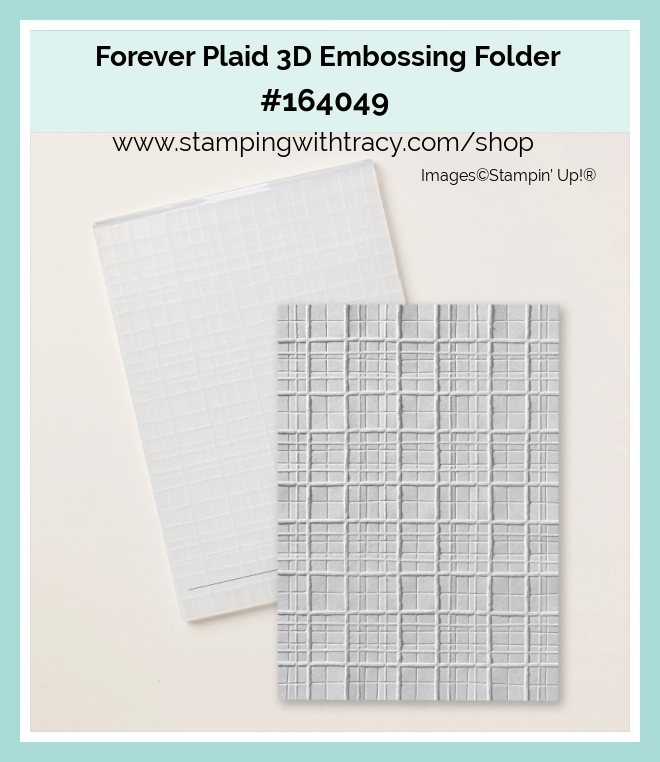
I started with Berry Burst cardstock for the base of my card. Then, I embossed a piece of Basic White cardstock using the Forever Plaid 3D Embossing Folder and my Stampin’ Cut & Emboss Machine. Next, I adhered the Basic White cardstock to the front of the card.

I layered a piece of Berry Burst cardstock and Celebratory Sips Designer Series Paper together. I wrapped a piece of Silver & White Sheer Ribbon around the layer and tied a knot. I added Stampin’ Dimensionals to the back but made sure the ribbon was over to the far left, so the sentiment would fit. I added the layered piece to the front of the card.

I stamped the sentiment on Basic White cardstock using Berry Burst ink. I cut it out using the Stylish Shapes Dies. Then, I cut another circle out of Berry Burst cardstock (the next largest size) and adhered the sentiment to the front. I added Stampin’ Dimensionals to the top and bottom and adhered it over the ribbon.
To complete my card, I added a piece of Basic White cardstock to the inside of the card.


Supply List
Below you’ll find all the Stampin’ Up! supplies I used for today’s card. If you need any stamping supplies, I’d love to be your demonstrator! You can place an order by clicking any of the images below to go to my Stampin’ Up! online store. The Specialty Plate is used with 3D Embossing Folders and Hybrid Embossing Folders.
Measurements
- Berry Burst cardstock: 8-1/2″ x 5-1/2″ score at 4-1/4″
- Berry Burst cardstock: 4-1/4″ x 3-1/4″
- Berry Burst cardstock (under sentiment): approx. 2-1/2″ x 2-1/2″
- Basic White cardstock (embossed & inside card): (2) 5-1/4″ x 4
- Basic White cardstock (sentiment): approx. 2″ x 2″
- Celebratory Sips Designer Series Paper: 4″ x 3″
Virtual Album Retreat
Calling all scrapbookers! Simply purchase the Month by Month Album Retreat 2025 Kit, and you can attend the event Stampin’ Up! is putting on. The kits went on sale this week on May 28th, but stock of the item is only while supplies last!
- Who: Crafters who love to scrapbook!
- When: July 16–18, 2025, 2:00–10:30 p.m. (MT)
- Where: Private Facebook Group
- Registration: There is no registration for this event! By purchasing the Month by Month Album Retreat 2025 Kit, you’ll get access to an exclusive Facebook group where the live event will stream.
- Price of Month by Month Album Retreat 2025 kit: $250
- Language of Event: This event will be presented in English only.
- After the Event: You can access the recorded event videos on the Virtual Album Retreat Facebook group page.
Coming On June 3rd!
- All available suites and suite products from the 2025–2026 Annual Catalog and Online Exclusives are buy one, get one 50% off.
- When you shop the sale, the 50% off discount will apply to the lower-priced item (for example, if you buy a suite collection and a stamp set from a suite, the suite would be full price, and the stamp set would be 50% off).
- Suite collections are available if all items are in stock; if all items are not in stock, you can still shop the available suite products.
- You don’t have to buy a suite and suite products all from the same suite collection for the discount to apply. You can buy any suite products from any suite.
- The discount will appear in your cart once you’ve added two items within the sale parameters to your cart.
- Products are available only while supplies last.
Starter Kit Special – This Special Ends on May 31st!

Starting May 6 and ending on May 31st, you can purchase the Starter Kit for $99. You will receive $165 in Stampin’ Up! product! That’s $66 more in product! You choose products you want! The Starter Kit ships free and you’ll receive a 20% discount on the products you purchase. You’ll also receive a Paper Pumpkin Kit, too!
Commonly Asked Questions
- If I purchase the Starter Kit, do I have to sell Stampin’ Up! products to my family and friends? No, you are under NO obligation to sell. You can be your only customer. Of course once your friends see the cute cards you’re making, they’ll want to buy their stamping supplies from you.
- Will I receive a discount on any products I buy? Yes!! This is the best part! You’ll receive at least a 20% discount on all your purchases.
- Do I have to buy/sell a certain amount of product? The quarterly minimum is $300 in product (which is only $240 after your discount!) that can be from personal orders, online orders or ones from family and friends. The quarters are January – March, April – June, July – September, October – December. Once you join, your quarterly minimum begins during your first FULL quarter.
- What if I can’t make the quarterly minimum? You’ll simply be dropped. No one will hassle you. No one will bother you. It truly is risk free to purchase the Starter Kit!
Are there other perks to purchasing the Starter Kit? Yes! Here are just a few:
- The Starter Kit ships FREE!
- Approximately a month before new products are released, you’ll be able to participate in a preorder and purchase brand new products ahead of the public
- Attend Stampin’ Up! events like OnStage
- Personal purchases of $20 are eligible to receive Stampin’ Rewards. Yes, demonstrators can also receive Stampin’ Rewards!
- Complimentary copy of each current catalog from Stampin’ Up! Once the preorder begins, a complimentary copy will be included in your order. If no preorder is made, the catalog will be included in the first order placed during the catalog sales period.
- Free access to my Card Sampler PDF tutorials
If you have more questions, please reach out to me sending an email to me (you can send me an email on the sidebar of my blog)
Last Chance Products
Click here to go straight to the Last Chance Products page on the Stampin’ Up! site!
Two New Stampin’ Up! Kits
Click each graphic below for more information about the kit. These kits can be found in the Online Exclusives part of the Stampin’ Up! website.
Full of Charm Paper Pumpkin Kit
You can now order subscriptions and manage your Paper Pumpkin subscription on the Stampin’ Up! website! You can cancel your Paper Pumpkin subscription at any time. If you want to skip the next kit, you can do that! You also receive Stampin’ Rewards when you order a single kit or purchase a 3-month, 6-month or 12-month subscription to Paper Pumpkin. If you’d like to subscribe, please click the graphic below.
An additional coordinating add-on is available but only for Paper Pumpkin subscribers. Click the image below for more information.
Thanks for stopping by today! Enjoy your weekend!
by Tracy | May 29, 2025 | So Glad We're Friends
The card I’m sharing with you today uses the same layout as yesterday’s card. I used the Mixed Labels Bundle (an Online Exclusive), Florals in Bloom Designer Series Paper, Damask Designs Embossing Folder, and Petunia Pop 3/8″ Bordered Ribbon, which is now an Online Exclusive.
If you get a 404 error, please try the link again!


I started with a piece of Petunia Pop cardstock for the base of my card. Then, I embossed a piece of Basic White cardstock using the Damask Designs Embossing Folder and my Stampin’ Cut & Emboss Machine. I adhered the embossed Basic White cardstock to the front of the card.


I layered a piece of Petunia Pop cardstock with Florals in Bloom Designer Series Paper. Then, I wrapped a piece of Petunia Pop Bordered Ribbon around the layer and tied a knot. Next, I added Stampin’ Dimensionals to the back and adhered it to the front of the card, making sure my ribbon was over to the far left so my sentiment would fit.


I stamped the sentiment onto Basic White cardstock using Petunia Pop ink and the stamp set, Mixed Labels. I cut it out using the Mixed Labels Dies, added Stampin’ Dimensionals to the top and bottom and placed it over the ribbon.
To complete my card, I added a piece of Basic White cardstock to the inside.


Supply List
Below you’ll find all the Stampin’ Up! supplies I used for today’s card. If you need any stamping supplies, I’d love to be your demonstrator! You can place an order by clicking any of the images below to go to my Stampin’ Up! online store.
Measurements
- Petunia Pop cardstock: 8-1/2″ x 5-1/2″ score at 4-1/4″
- Petunia Pop cardstock: 4-1/4″ x 3-1/4″
- Basic White cardstock (embossed & inside card): (2) 5-1/4″ x 4
- Basic White cardstock (sentiment): approx. 3″ x 2″
- Florals in Bloom Designer Series Paper: 4″ x 3″
Virtual Album Retreat
Calling all scrapbookers! Simply purchase the Month by Month Album Retreat 2025 Kit, and you can attend the event Stampin’ Up! is putting on. The kits went on sale yesterday, May 28th, but stock of the item is only while supplies last!
- Who: Crafters who love to scrapbook!
- When: July 16–18, 2025, 2:00–10:30 p.m. (MT)
- Where: Private Facebook Group
- Registration: There is no registration for this event! By purchasing the Month by Month Album Retreat 2025 Kit, you’ll get access to an exclusive Facebook group where the live event will stream.
- Price of Month by Month Album Retreat 2025 kit: $250
- Language of Event: This event will be presented in English only.
- After the Event: You can access the recorded event videos on the Virtual Album Retreat Facebook group page.
Coming On June 3rd!
- All available suites and suite products from the 2025–2026 Annual Catalog and Online Exclusives are buy one, get one 50% off.
- When you shop the sale, the 50% off discount will apply to the lower-priced item (for example, if you buy a suite collection and a stamp set from a suite, the suite would be full price, and the stamp set would be 50% off).
- Suite collections are available if all items are in stock; if all items are not in stock, you can still shop the available suite products.
- You don’t have to buy a suite and suite products all from the same suite collection for the discount to apply. You can buy any suite products from any suite.
- The discount will appear in your cart once you’ve added two items within the sale parameters to your cart.
- Products are available only while supplies last.
Starter Kit Special – This Special Ends on May 31st!
Starting May 6 and ending on May 31st, you can purchase the Starter Kit for $99. You will receive $165 in Stampin’ Up! product! That’s $66 more in product! You choose products you want! The Starter Kit ships free and you’ll receive a 20% discount on the products you purchase. You’ll also receive a Paper Pumpkin Kit, too!
Commonly Asked Questions
- If I purchase the Starter Kit, do I have to sell Stampin’ Up! products to my family and friends? No, you are under NO obligation to sell. You can be your only customer. Of course once your friends see the cute cards you’re making, they’ll want to buy their stamping supplies from you.
- Will I receive a discount on any products I buy? Yes!! This is the best part! You’ll receive at least a 20% discount on all your purchases.
- Do I have to buy/sell a certain amount of product? The quarterly minimum is $300 in product (which is only $240 after your discount!) that can be from personal orders, online orders or ones from family and friends. The quarters are January – March, April – June, July – September, October – December. Once you join, your quarterly minimum begins during your first FULL quarter.
- What if I can’t make the quarterly minimum? You’ll simply be dropped. No one will hassle you. No one will bother you. It truly is risk free to purchase the Starter Kit!
Are there other perks to purchasing the Starter Kit? Yes! Here are just a few:
- The Starter Kit ships FREE!
- Approximately a month before new products are released, you’ll be able to participate in a preorder and purchase brand new products ahead of the public
- Attend Stampin’ Up! events like OnStage
- Personal purchases of $20 are eligible to receive Stampin’ Rewards. Yes, demonstrators can also receive Stampin’ Rewards!
- Complimentary copy of each current catalog from Stampin’ Up! Once the preorder begins, a complimentary copy will be included in your order. If no preorder is made, the catalog will be included in the first order placed during the catalog sales period.
- Free access to my Card Sampler PDF tutorials
If you have more questions, please reach out to me sending an email to me (you can send me an email on the sidebar of my blog)
Last Chance Products
Click here to go straight to the Last Chance Products page on the Stampin’ Up! site!
Two New Stampin’ Up! Kits
Click each graphic below for more information about the kit. These kits can be found in the Online Exclusives part of the Stampin’ Up! website.
Full of Charm Paper Pumpkin Kit
You can now order subscriptions and manage your Paper Pumpkin subscription on the Stampin’ Up! website! You can cancel your Paper Pumpkin subscription at any time. If you want to skip the next kit, you can do that! You also receive Stampin’ Rewards when you order a single kit or purchase a 3-month, 6-month or 12-month subscription to Paper Pumpkin. If you’d like to subscribe, please click the graphic below.
An additional coordinating add-on is available but only for Paper Pumpkin subscribers. Click the image below for more information.
Thanks for stopping by today!
by Tracy | May 28, 2025 | Thank You Card
Calling all scrapbookers! Simply purchase the Month by Month Album Retreat 2025 Kit, and you can attend the event on July 16-18, 2025 in a private Facebook group! The kits go on sale today, May 28th, but only while supplies last!
- Who: Crafters who love to scrapbook! The kit is available today, May 28th, but only while supplies last!
- When: July 16–18, 2025, 2:00–10:30 p.m. (MT)
- Where: Private Facebook Group
- Registration: There is no registration for this event! By purchasing the Month by Month Album Retreat 2025 Kit, you’ll get access to an exclusive Facebook group where the live event will stream.
- Price of Month by Month Album Retreat 2025 kit: $250
- Language of Event: This event will be presented in English only.
- After the Event: You can access the recorded event videos on the Virtual Album Retreat Facebook group page.
You will get all this:
- Exclusive stamp sets
- Precut designer pieces and embellishments
- Supplies for 12 two page layouts
- Access to a private Facebook group with all live sessions plus recordings
The picture below shows all you will get in the Month by Month Album Retreat 2025 Kit!


The card I’m sharing with you today was made using Floral Impressions Designer Series Paper, the Textured Notes Bundle, the Eyelet 3D Embossing Folder, White Woven 1/2″ Woven Ribbon and Drusy Adhesive Backed Embellishments.


I started with Darling Duckling cardstock (a new In Color) for the base of my card. Then, I embossed a piece of Basic White cardstock using the Eyelet 3D Embossing Folder and my Stampin’ Cut & Emboss Machine. Next, I adhered the embossed cardstock to the front of the card.


I cut a piece of Darling Duckling cardstock and layered it with a piece of Floral Impressions Designer Series Paper. Next, I wrapped a piece of White 1/2″ Woven Ribbon around the layered piece and tied a knot. I trimmed off the ends and made sure to slide the ribbon over to the far left. I added Stampin’ Dimensionals to the back and adhered it to the front of the card.


I stamped the sentiment onto a piece of Basic White cardstock using Garden Green ink and the stamp set, Textured Notes. I then cut it out using the Textured Notes Dies. I added Stampin’ Dimensionals to the back and adhered it over the ribbon.
To complete my card, I added two Drusy Adhesive-Backed Embellishments to each end of the sentiment and added a piece of Basic White cardstock to the inside of the card.


Supply List
Below you’ll find all the Stampin’ Up! supplies I used for today’s card. If you need any stamping supplies, I’d love to be your demonstrator! You can place an order by clicking any of the images below to go to my Stampin’ Up! online store. The Specialty Plate is used with 3D Embossing Folders and Hybrid Embossing Folders.
Measurements
- Darling Duckling cardstock: 8-1/2″ x 5-1/2″ score at 4-1/4″
- Darling Duckling cardstock: 4-1/4″ x 3-1/4″
- Basic White cardstock (embossed & inside card): (2) 5-1/4″ x 4
- Basic White cardstock (sentiment): approx. 3″ x 1-1/2″
- Floral Impressions Designer Series Paper: 4″ x 3″
Starter Kit Special – This Special Ends on May 31st!
Starting May 6 and ending on May 31st, you can purchase the Starter Kit for $99. You will receive $165 in Stampin’ Up! product! That’s $66 more in product! You choose products you want! The Starter Kit ships free and you’ll receive a 20% discount on the products you purchase. You’ll also receive a Paper Pumpkin Kit, too!
Commonly Asked Questions
- If I purchase the Starter Kit, do I have to sell Stampin’ Up! products to my family and friends? No, you are under NO obligation to sell. You can be your only customer. Of course once your friends see the cute cards you’re making, they’ll want to buy their stamping supplies from you.
- Will I receive a discount on any products I buy? Yes!! This is the best part! You’ll receive at least a 20% discount on all your purchases.
- Do I have to buy/sell a certain amount of product? The quarterly minimum is $300 in product (which is only $240 after your discount!) that can be from personal orders, online orders or ones from family and friends. The quarters are January – March, April – June, July – September, October – December. Once you join, your quarterly minimum begins during your first FULL quarter.
- What if I can’t make the quarterly minimum? You’ll simply be dropped. No one will hassle you. No one will bother you. It truly is risk free to purchase the Starter Kit!
Are there other perks to purchasing the Starter Kit? Yes! Here are just a few:
- The Starter Kit ships FREE!
- Approximately a month before new products are released, you’ll be able to participate in a preorder and purchase brand new products ahead of the public
- Attend Stampin’ Up! events like OnStage
- Personal purchases of $20 are eligible to receive Stampin’ Rewards. Yes, demonstrators can also receive Stampin’ Rewards!
- Complimentary copy of each current catalog from Stampin’ Up! Once the preorder begins, a complimentary copy will be included in your order. If no preorder is made, the catalog will be included in the first order placed during the catalog sales period.
- Free access to my Card Sampler PDF tutorials
If you have more questions, please reach out to me sending an email to me (you can send me an email on the sidebar of my blog)
Last Chance Products
Click here to go straight to the Last Chance Products page on the Stampin’ Up! site!
Two New Stampin’ Up! Kits
Click each graphic below for more information about the kit. These kits can be found in the Online Exclusives part of the Stampin’ Up! website.
Full of Charm Paper Pumpkin Kit
You can now order subscriptions and manage your Paper Pumpkin subscription on the Stampin’ Up! website! You can cancel your Paper Pumpkin subscription at any time. If you want to skip the next kit, you can do that! You also receive Stampin’ Rewards when you order a single kit or purchase a 3-month, 6-month or 12-month subscription to Paper Pumpkin. If you’d like to subscribe, please click the graphic below.
An additional coordinating add-on is available but only for Paper Pumpkin subscribers. Click the image below for more information.
Thanks for stopping by today!
by Tracy | May 23, 2025 | Cheers Card
I used the same layout for today’s card that I posted on Wednesday and Thursday. You can see the previous cards here and here.
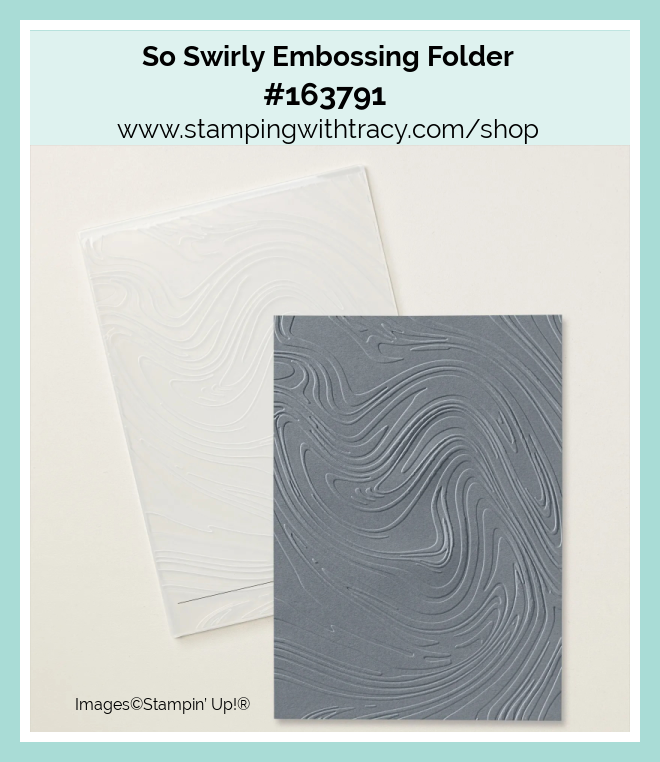
For today’s card, I used the Cheers & Sips stamp set (an Online Exclusive), Celebratory Sips Designer Series Paper (also an Online Exclusive), So Swirly Embossing Folder, Stylish Shapes Dies and Rainbow Adhesive Backed Dots.


I started with Bubble Bath cardstock for the base of my card. Then, I embossed a piece of Basic White cardstock using the So Swirly Embossing Folder and my Stampin’ Cut & Emboss Machine. Next, I adhered it to the front of the card.

I layered a piece of Bubble Bath cardstock with Celebratory Sips Designer Series Paper and then adhered it to the front of the card with Multipurpose Glue.

I stamped my sentiment on Basic White cardstock using the stamp set, Sips & Cheers in Berry Burst ink. I cut it out with the Stylish Shapes Dies. I added Stampin’ Dimensionals to the back and adhered it to the front of the card.
To complete my card I added three Bubble Bath Rainbow Adhesive-Backed Dots to the embossed part of the card. I also added a piece of Basic White cardstock to the inside of the card.


Supply List
Below you’ll find all the Stampin’ Up! supplies I used for today’s card. If you need any stamping supplies, I’d love to be your demonstrator! You can place an order by clicking any of the images below to go to my Stampin’ Up! online store.
Bundle Alert: The Cheers & Sips Bundle is available with a 10% discount rather than buying the products separately. It includes the Sips & Cheers Stamp Set and the Sips & Cheers Dies.

Measurements
- Bubble Bath cardstock: 4-1/4″ x 11″ scored at 5-1/2″
- Bubble Bath cardstock: 2-1/2″ x 4-3/4″
- Celebratory Sips Designer Series Paper: 2-1/4″ x 4-1/2″
- Basic White cardstock (embossed and inside card): (2) 4″ x 5-1/4″
- Basic White cardstock (sentiment): approx. 2-3/4″ x 1-1/4″
Starter Kit Special – This Special Ends on May 31st!
Starting May 6 and ending on May 31st, you can purchase the Starter Kit for $99. You will receive $165 in Stampin’ Up! product! That’s $66 more in product! You choose products you want! The Starter Kit ships free and you’ll receive a 20% discount on the products you purchase. You’ll also receive a Paper Pumpkin Kit, too!
Commonly Asked Questions
- If I purchase the Starter Kit, do I have to sell Stampin’ Up! products to my family and friends? No, you are under NO obligation to sell. You can be your only customer. Of course once your friends see the cute cards you’re making, they’ll want to buy their stamping supplies from you.
- Will I receive a discount on any products I buy? Yes!! This is the best part! You’ll receive at least a 20% discount on all your purchases.
- Do I have to buy/sell a certain amount of product? The quarterly minimum is $300 in product (which is only $240 after your discount!) that can be from personal orders, online orders or ones from family and friends. The quarters are January – March, April – June, July – September, October – December. Once you join, your quarterly minimum begins during your first FULL quarter.
- What if I can’t make the quarterly minimum? You’ll simply be dropped. No one will hassle you. No one will bother you. It truly is risk free to purchase the Starter Kit!
Are there other perks to purchasing the Starter Kit? Yes! Here are just a few:
- The Starter Kit ships FREE!
- Approximately a month before new products are released, you’ll be able to participate in a preorder and purchase brand new products ahead of the public
- Attend Stampin’ Up! events like OnStage
- Personal purchases of $20 are eligible to receive Stampin’ Rewards. Yes, demonstrators can also receive Stampin’ Rewards!
- Complimentary copy of each current catalog from Stampin’ Up! Once the preorder begins, a complimentary copy will be included in your order. If no preorder is made, the catalog will be included in the first order placed during the catalog sales period.
- Free access to my Card Sampler PDF tutorials
If you have more questions, please reach out to me sending an email to me (you can send me an email on the sidebar of my blog)
The New Stampin’ Rewards Program

The New Stampin’ Rewards Program was rolled out on April 15th. You will receive 10% in rewards when your order is $20 or more but you have to opt in to get the rewards. The more you shop, the more you earn!
Last Chance Products
Click here to go straight to the Last Chance Products page on the Stampin’ Up! site!
Two New Stampin’ Up! Kits
Click each graphic below for more information about the kit. These kits can be found in the Online Exclusives part of the Stampin’ Up! website.
Full of Charm Paper Pumpkin Kit
You can now order subscriptions and manage your Paper Pumpkin subscription on the Stampin’ Up! website! You can cancel your Paper Pumpkin subscription at any time. If you want to skip the next kit, you can do that! You also receive Stampin’ Rewards when you order a single kit or purchase a 3-month, 6-month or 12-month subscription to Paper Pumpkin. If you’d like to subscribe, please click the graphic below.
An additional coordinating add-on is available but only for Paper Pumpkin subscribers. Click the image below for more information.
Thanks for stopping by today! Enjoy your weekend!
by Tracy | May 22, 2025 | Friend Card
I took yesterday’s card and added a different Designer Series Paper, stamp set, embossing folder, embellishments, etc. and recreated today’s card.
Today’s card was made using the Mixed Labels Bundle (an Online Exclusive), Florals in Bloom Designer Series Paper, Forever Plaid 3D Embossing Folder, and 2024-2026 In Color Flat Pearls.

I started with Petunia Pop cardstock for the base of my card. Then, I embossed a piece of Basic White cardstock using the Forever Plaid 3D Embossing Folder and my Stampin’ Cut & Emboss Machine. Next, I adhered the embossed cardstock to the front of the card.

I took a piece of Petunia Pop cardstock and layered it with Florals in Bloom Designer Series Paper and then adhered it to the front of the card.
I stamped my sentiment onto Basic White cardstock using Petunia Pop ink and the stamp set, Mixed Labels. I cut it out using the Mixed Labels Dies, added Stampin’ Dimensionals to the back and adhered it to the front of the card.

To complete my card, I added three medium sized 2024-2026 In Color Flat Pearls (in Petunia Pop) on the embossed Basic White cardstock and two smaller ones on each side of the sentiment. I also added a piece of Basic White cardstock to the inside of the card.


Supply List
Below you’ll find all the Stampin’ Up! supplies I used for today’s card. If you need any stamping supplies, I’d love to be your demonstrator! You can place an order by clicking any of the images below to go to my Stampin’ Up! online store. The Specialty Plate is used with 3D Embossing Folders and Hybrid Embossing Folders.
Measurements
- Petunia Pop cardstock: 4-1/4″ x 11″ scored at 5-1/2″
- Petunia Pop cardstock: 2-1/2″ x 4-3/4″
- Florals in Bloom Designer Series Paper: 2-1/4″ x 4-1/2″
- Basic White cardstock (embossed and inside card): (2) 5-1/4″ x 4″
- Basic White cardstock (sentiment): approx. 3″ x 2″
Starter Kit Special – This Special Ends on May 31st!
Starting May 6 and ending on May 31st, you can purchase the Starter Kit for $99. You will receive $165 in Stampin’ Up! product! That’s $66 more in product! You choose products you want! The Starter Kit ships free and you’ll receive a 20% discount on the products you purchase. You’ll also receive a Paper Pumpkin Kit, too!
Commonly Asked Questions
- If I purchase the Starter Kit, do I have to sell Stampin’ Up! products to my family and friends? No, you are under NO obligation to sell. You can be your only customer. Of course once your friends see the cute cards you’re making, they’ll want to buy their stamping supplies from you.
- Will I receive a discount on any products I buy? Yes!! This is the best part! You’ll receive at least a 20% discount on all your purchases.
- Do I have to buy/sell a certain amount of product? The quarterly minimum is $300 in product (which is only $240 after your discount!) that can be from personal orders, online orders or ones from family and friends. The quarters are January – March, April – June, July – September, October – December. Once you join, your quarterly minimum begins during your first FULL quarter.
- What if I can’t make the quarterly minimum? You’ll simply be dropped. No one will hassle you. No one will bother you. It truly is risk free to purchase the Starter Kit!
Are there other perks to purchasing the Starter Kit? Yes! Here are just a few:
- The Starter Kit ships FREE!
- Approximately a month before new products are released, you’ll be able to participate in a preorder and purchase brand new products ahead of the public
- Attend Stampin’ Up! events like OnStage
- Personal purchases of $20 are eligible to receive Stampin’ Rewards. Yes, demonstrators can also receive Stampin’ Rewards!
- Complimentary copy of each current catalog from Stampin’ Up! Once the preorder begins, a complimentary copy will be included in your order. If no preorder is made, the catalog will be included in the first order placed during the catalog sales period.
- Free access to my Card Sampler PDF tutorials
If you have more questions, please reach out to me sending an email to me (you can send me an email on the sidebar of my blog)
The New Stampin’ Rewards Program
The New Stampin’ Rewards Program was rolled out on April 15th. You will receive 10% in rewards when your order is $20 or more but you have to opt in to get the rewards. The more you shop, the more you earn!
Last Chance Products
Click here to go straight to the Last Chance Products page on the Stampin’ Up! site!
Two New Stampin’ Up! Kits
Click each graphic below for more information about the kit. These kits can be found in the Online Exclusives part of the Stampin’ Up! website.
Full of Charm Paper Pumpkin Kit
You can now order subscriptions and manage your Paper Pumpkin subscription on the Stampin’ Up! website! You can cancel your Paper Pumpkin subscription at any time. If you want to skip the next kit, you can do that! You also receive Stampin’ Rewards when you order a single kit or purchase a 3-month, 6-month or 12-month subscription to Paper Pumpkin. If you’d like to subscribe, please click the graphic below.
An additional coordinating add-on is available but only for Paper Pumpkin subscribers. Click the image below for more information.
Thanks for stopping by today!
by Tracy | May 21, 2025 | Thank You Card
The card I’m sharing with you today was made using the stamp set, With You In Mind (an Online Exclusive but you can find it in the catalog on page 37), Floral Impressions Designer Series Paper (another Online Exclusive), Strawberry Slush & Pretty In Pink Gems (another Online Exclusive), the Damask Designs Embossing Folder and the Nested Essentials Dies.


I started with a base of Strawberry Slush cardstock. Did you know this was once a Stampin’ Up! color and they brought it back! I love this color!
I embossed a piece of Basic White cardstock using the Damask Designs Embossing Folder and my Stampin’ Cut & Emboss Machine. Then, I adhered it to the front of the card.

I cut a piece of Strawberry Slush cardstock and layered it with a piece of Floral Impressions Designer Series Paper. Then, I adhered it to the front of the card.

I stamped the sentiment using Garden Green ink and the With You In Mind stamp set onto Basic White cardstock. I cut it out using the Nested Essentials Dies. Then, I cut the next larger shape in Strawberry Slush cardstock. I adhered the sentiment to the Strawberry Slush, added Stampin’ Dimensionals to the back and adhered it to the card front.
To complete my card, I added three Strawberry Slush gems to the front and added a piece of Basic White cardstock to the inside of the card.


Supply List
Below you’ll find all the Stampin’ Up! supplies I used for today’s card. If you need any stamping supplies, I’d love to be your demonstrator! You can place an order by clicking any of the images below to go to my Stampin’ Up! online store.
Measurements
- Strawberry Slush cardstock: 4-1/4″ x 11″ scored at 5-1/2″
- Strawberry Slush cardstock: 2-1/2″ x 4-3/4″
- Strawberry Slush cardstock (under sentiment): approx. 3″ x 2-1/4″
- Floral Impressions Designer Series Paper: 2-1/4″ x 4-1/2″
- Basic White cardstock (embossed and inside card): (2) 5-1/4″ x 4″
- Basic White cardstock (sentiment): approx. 2-5/8″ x 1-7/8″
Starter Kit Special – This Special Ends on May 31st!
Starting May 6 and ending on May 31st, you can purchase the Starter Kit for $99. You will receive $165 in Stampin’ Up! product! That’s $66 more in product! You choose products you want! The Starter Kit ships free and you’ll receive a 20% discount on the products you purchase. Did I mention you’ll also receive a Paper Pumpkin Kit, too!
Commonly Asked Questions
- If I purchase the Starter Kit, do I have to sell Stampin’ Up! products to my family and friends? No, you are under NO obligation to sell. You can be your only customer. Of course once your friends see the cute cards you’re making, they’ll want to buy their stamping supplies from you.
- Will I receive a discount on any products I buy? Yes!! This is the best part! You’ll receive at least a 20% discount on all your purchases.
- Do I have to buy/sell a certain amount of product? The quarterly minimum is $300 in product (which is only $240 after your discount!) that can be from personal orders, online orders or ones from family and friends. The quarters are January – March, April – June, July – September, October – December. Once you join, your quarterly minimum begins during your first FULL quarter.
- What if I can’t make the quarterly minimum? You’ll simply be dropped. No one will hassle you. No one will bother you. It truly is risk free to purchase the Starter Kit!
Are there other perks to purchasing the Starter Kit? Yes! Here are just a few:
- The Starter Kit ships FREE!
- Approximately a month before new products are released, you’ll be able to participate in a preorder and purchase brand new products ahead of the public
- Attend Stampin’ Up! events like OnStage
- Personal purchases of $20 are eligible to receive Stampin’ Rewards. Yes, demonstrators can also receive Stampin’ Rewards!
- Complimentary copy of each current catalog from Stampin’ Up! Once the preorder begins, a complimentary copy will be included in your order. If no preorder is made, the catalog will be included in the first order placed during the catalog sales period.
- Free access to my Card Sampler PDF tutorials
If you have more questions, please reach out to me sending an email to me (you can send me an email on the sidebar of my blog)
The New Stampin’ Rewards Program
The New Stampin’ Rewards Program was rolled out on April 15th. You will receive 10% in rewards when your order is $20 or more but you have to opt in to get the rewards. The more you shop, the more you earn!
Last Chance Products
Click here to go straight to the Last Chance Products page on the Stampin’ Up! site!
Two New Stampin’ Up! Kits
Click each graphic below for more information about the kit. These kits can be found in the Online Exclusives part of the Stampin’ Up! website.
Full of Charm Paper Pumpkin Kit
You can now order subscriptions and manage your Paper Pumpkin subscription on the Stampin’ Up! website! You can cancel your Paper Pumpkin subscription at any time. If you want to skip the next kit, you can do that! You also receive Stampin’ Rewards when you order a single kit or purchase a 3-month, 6-month or 12-month subscription to Paper Pumpkin. If you’d like to subscribe, please click the graphic below.
An additional coordinating add-on is available but only for Paper Pumpkin subscribers. Click the image below for more information.
Thanks for stopping by today!
by Tracy | May 16, 2025 | Birthday Card
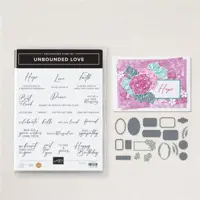
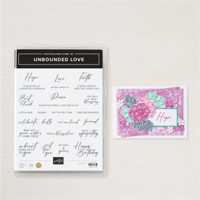
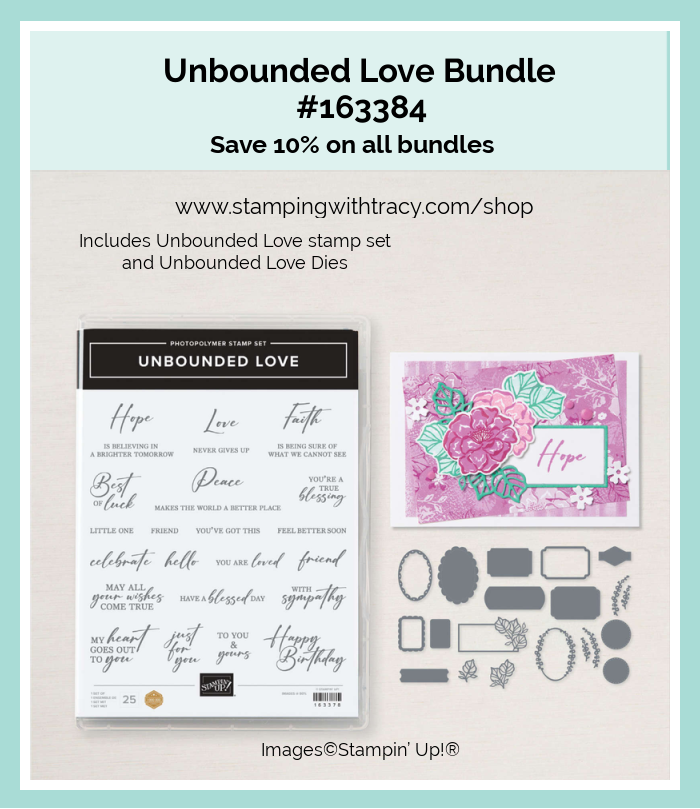
Today’s card was made using the Unbounded Love Bundle, Floral Impressions Designer Series Paper, and 2024-2026 In Color Flat Pearls. The Unbounded Love Bundle is an Online Exclusive. If you get a page that says “Out With the Old, In With the New”, please click the link again.
Please see the message after the Measurements I provide for you. It addresses the Back in Stock Notifications.

I started with a piece of Thick Basic White cardstock for the base of my card (which is now an Online Exclusive). Stampin’ Up! was going to discontinue Basic White Thick cardstock but they didn’t because Stampin’ Up! demonstrators said it was a staple of cardmaking. Stampin’ Up! sends the catalog to the printer way in advance and they thought they weren’t bringing it back so that’s why it is an Online Exclusive. Hopefully it will be in the next Annual Catalog. Time will tell.

Back to my card. I cut a piece of Petunia Pop cardstock and adhered it to the front of my card (you can find all the measurements I used below the Supply List. I cut a piece of Basic White cardstock and then set it aside.
I cut a piece of Floral Impressions Designer Series Paper and then cut it into 1″ strips. Then, I adhered them to the Basic White cardstock that I set aside.

I stamped the sentiment onto Basic White cardstock using the Unbounded Love Stamp Set in Misty Moonlight ink. Next, I cut the sentiment out using the Unbounded Love Dies. I added Stampin’ Dimensionals to the back and adhered it to the front of the card.
I completed my card by adding three 2024-2026 In Color Flat Pearls in Petunia Pop to the center of the Misty Moonlight flowers.

Supply List
Below you’ll find all the Stampin’ Up! supplies I used for today’s card. If you need any stamping supplies, I’d love to be your demonstrator! You can place an order by clicking any of the images below to go to my Stampin’ Up! online store.
Measurements
- Basic White Thick Cardstock: 4-1/4″ x 11″ score at 5-1/2″
- Petunia Pop cardstock: 4″ x 5-1/4″
- Floral Impressions Designer Series Paper: 3″ x 4-1/2″ then cut into (3) 1″ strips
- Basic White cardstock: 3-1/2″ x 4-3/4″
- Basic White cardstock (sentiment): approximately 2-1/2″ x 1-3/4″
Back in Stock Notifications
Unfortunately, the notification service experienced a disruption from May 6 to May 11. These products listed below are in stock as of yesterday. As a result, back in stock emails were not sent for the following items:
- Beautiful Butterflies Hybrid Embossing Folder
- Beautiful Butterflies Bundle
- Mixed Florals Dies
- Mixed Florals Bundle
- Elements of Text Cling Stamp Set
This issue was resolved on May 12. However, back in stock emails that should have been sent during the impacted timeframe will not send for items listed above. All messages moving forward should function properly.
Stampin’ Up! regrets that the emails did not go out but they are actively seeking ways to prevent similar issued moving forward.
Starter Kit Special – This Special Ends on May 31st!
Starting May 6 and ending on May 31st, you can purchase the Starter Kit for $99. You will receive $165 in Stampin’ Up! product! That’s $66 more in product! You choose products you want! The Starter Kit ships free and you’ll receive a 20% discount on the products you purchase. Did I mention you’ll also receive a Paper Pumpkin Kit, too!
Commonly Asked Questions
- If I purchase the Starter Kit, do I have to sell Stampin’ Up! products to my family and friends? No, you are under NO obligation to sell. You can be your only customer. Of course once your friends see the cute cards you’re making, they’ll want to buy their stamping supplies from you.
- Will I receive a discount on any products I buy? Yes!! This is the best part! You’ll receive at least a 20% discount on all your purchases.
- Do I have to buy/sell a certain amount of product? The quarterly minimum is $300 in product (which is only $240 after your discount!) that can be from personal orders, online orders or ones from family and friends. The quarters are January – March, April – June, July – September, October – December. Once you join, your quarterly minimum begins during your first FULL quarter.
- What if I can’t make the quarterly minimum? You’ll simply be dropped. No one will hassle you. No one will bother you. It truly is risk free to purchase the Starter Kit!
Are there other perks to purchasing the Starter Kit? Yes! Here are just a few:
- The Starter Kit ships FREE!
- Approximately a month before new products are released, you’ll be able to participate in a preorder and purchase brand new products ahead of the public
- Attend Stampin’ Up! events like OnStage
- Personal purchases of $20 are eligible to receive Stampin’ Rewards. Yes, demonstrators can also receive Stampin’ Rewards!
- Complimentary copy of each current catalog from Stampin’ Up! Once the preorder begins, a complimentary copy will be included in your order. If no preorder is made, the catalog will be included in the first order placed during the catalog sales period.
- Free access to my Card Sampler PDF tutorials
If you have more questions, please reach out to me sending an email to me (you can send me an email on the sidebar of my blog)
The New Stampin’ Rewards Program
The New Stampin’ Rewards Program was rolled out on April 15th. You will receive 10% in rewards when your order is $20 or more but you have to opt in to get the rewards. The more you shop, the more you earn!
Last Chance Products
Click here to go straight to the Last Chance Products page on the Stampin’ Up! site!
Two New Stampin’ Up! Kits
Click each graphic below for more information about the kit. These kits can be found in the Online Exclusives part of the Stampin’ Up! website.
Full of Charm Paper Pumpkin Kit
You can now order subscriptions and manage your Paper Pumpkin subscription on the Stampin’ Up! website! You can cancel your Paper Pumpkin subscription at any time. If you want to skip the next kit, you can do that! You also receive Stampin’ Rewards when you order a single kit or purchase a 3-month, 6-month or 12-month subscription to Paper Pumpkin. If you’d like to subscribe, please click the graphic below.
An additional coordinating add-on is available but only for Paper Pumpkin subscribers. Click the image below for more information.
Thanks for stopping by today! Enjoy your weekend!
by Tracy | May 14, 2025 | Stampin' Up! Card Kits
I’m highlighting the Beautiful Blues Kit by Stampin’ Up! today. I saw it in the catalog and the first thing I thought, I’m going to purchase that kit! I made a few changes to the cards, I inadvertently swapped two of the sayings and I used our Rhinestone Basic Jewels instead of what the kit supplied. Everything that you need to complete all nine of the cards is enclosed in the kit. Here’s how I made the cards and the second picture shows how the kit shows them made (with the correct sentiments). Even though this kit is in the catalog, it’s an Online Exclusive.
I’ve emailed Stampin’ Up! about my links, so if one doesn’t work, please try again. I know this is a pain!


The picture below shows everything you get in the kit.

The kit even comes with a stamp set!

I had a lot of fun putting this kit together! You can also watch a YouTube video by Stampin’ Up! making this kit! You can purchase this kit, here!
Starter Kit Special
Starting May 6 and ending on May 31st, you can purchase the Starter Kit for $99. You will receive $165 in Stampin’ Up! product! That’s $66 more in product! You choose products you want! The Starter Kit ships free and you’ll receive a 20% discount on the products you purchase. Did I mention you’ll also receive a Paper Pumpkin Kit, too!
Commonly Asked Questions
- If I purchase the Starter Kit, do I have to sell Stampin’ Up! products to my family and friends? No, you are under NO obligation to sell. You can be your only customer. Of course once your friends see the cute cards you’re making, they’ll want to buy their stamping supplies from you.
- Will I receive a discount on any products I buy? Yes!! This is the best part! You’ll receive at least a 20% discount on all your purchases.
- Do I have to buy/sell a certain amount of product? The quarterly minimum is $300 in product (which is only $240 after your discount!) that can be from personal orders, online orders or ones from family and friends. The quarters are January – March, April – June, July – September, October – December. Once you join, your quarterly minimum begins during your first FULL quarter.
- What if I can’t make the quarterly minimum? You’ll simply be dropped. No one will hassle you. No one will bother you. It truly is risk free to purchase the Starter Kit!
Are there other perks to purchasing the Starter Kit? Yes! Here are just a few:
- The Starter Kit ships FREE!
- Approximately a month before new products are released, you’ll be able to participate in a preorder and purchase brand new products ahead of the public
- Attend Stampin’ Up! events like OnStage
- Personal purchases of $20 are eligible to receive Stampin’ Rewards. Yes, demonstrators can also receive Stampin’ Rewards!
- Complimentary copy of each current catalog from Stampin’ Up! Once the preorder begins, a complimentary copy will be included in your order. If no preorder is made, the catalog will be included in the first order placed during the catalog sales period.
- Free access to my Card Sampler PDF tutorials
If you have more questions, please reach out to me sending an email to me (you can send me an email on the sidebar of my blog)
The New Stampin’ Rewards Program
The New Stampin’ Rewards Program was rolled out on April 15th. You will receive 10% in rewards when your order is $20 or more but you have to opt in to get the rewards. The more you shop, the more you earn!
Last Chance Products
Click here to go straight to the Last Chance Products page on the Stampin’ Up! site!
Two New Stampin’ Up! Kits
Click each graphic below for more information about the kit. These kits can be found in the Online Exclusives part of the Stampin’ Up! website.
Full of Charm Paper Pumpkin Kit
You can now order subscriptions and manage your Paper Pumpkin subscription on the Stampin’ Up! website! You can cancel your Paper Pumpkin subscription at any time. If you want to skip the next kit, you can do that! You also receive Stampin’ Rewards when you order a single kit or purchase a 3-month, 6-month or 12-month subscription to Paper Pumpkin. If you’d like to subscribe, please click the graphic below.
An additional coordinating add-on is available but only for Paper Pumpkin subscribers. Click the image below for more information.
Thanks for stopping by today!
by Tracy | May 12, 2025 | Birthday Card
I hope you all had a good weekend! I needed to make a birthday card for my brother-in-law and I’m sharing that card with you today. I made it with Country Woods Designer Series Paper, With You in Mind Stamp Set and the Textured Notes Dies.
Both the Textured Notes Dies and the With You in Mind Stamp Set can be found in the Online Exclusives section of the Stampin’ Up! website.

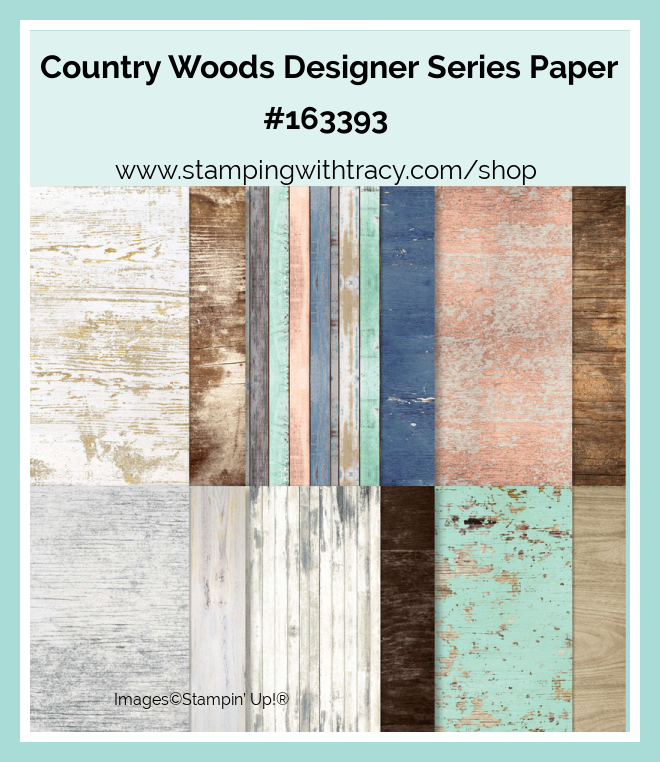
I started with a piece of Pool Party cardstock for the base of my card. Then, I added a layer of Country Woods Designer Series Paper to the front of the card. You can find all the measurements I used below the Supply List.

I stamped the sentiment onto Basic White cardstock using the stamp set, With You In Mind, in Misty Moonlight ink. I cut the sentiment out using the Textured Notes Dies. Then, I cut the next larger size and cut it out with Pool Party cardstock.

I adhered the sentiment to the Pool Party rectangle, added Stampin’ Dimensionals to the back and adhered it to the front of the card. To complete my card I added a piece of Basic White cardstock to the inside. I hope my brother-in-law likes the card I made him!

Supply List
Below you’ll find all the Stampin’ Up! supplies I used for today’s card. If you need any stamping supplies, I’d love to be your demonstrator! You can place an order by clicking any of the images below to go to my Stampin’ Up! online store.
Bundle Alert: The Textured Notes Bundle is available with a 10% discount rather than buying the products separately.
Measurements
- Pool Party cardstock: 5-1/2″ x 8-1/2″ score at 4-1/4″
- Pool Party cardstock (rectangle): approximately 4-1/8″ x 2-5/8″
- Country Woods Designer Series Paper: 5-1/4″ x 4″
- Basic White cardstock (sentiment): approximately 3-1/2″ x 2″
- Basic White cardstock (inside card): 5-1/4″ x 4″
Starter Kit Special
Starting May 6 and ending on May 31st, you can purchase the Starter Kit for $99. You will receive $165 in Stampin’ Up! product! That’s $66 more in product! You choose products you want! The Starter Kit ships free and you’ll receive a 20% discount on the products you purchase. Did I mention you’ll also receive a Paper Pumpkin Kit, too!
Commonly Asked Questions
- If I purchase the Starter Kit, do I have to sell Stampin’ Up! products to my family and friends? No, you are under NO obligation to sell. You can be your only customer. Of course once your friends see the cute cards you’re making, they’ll want to buy their stamping supplies from you.
- Will I receive a discount on any products I buy? Yes!! This is the best part! You’ll receive at least a 20% discount on all your purchases.
- Do I have to buy/sell a certain amount of product? The quarterly minimum is $300 in product (which is only $240 after your discount!) that can be from personal orders, online orders or ones from family and friends. The quarters are January – March, April – June, July – September, October – December. Once you join, your quarterly minimum begins during your first FULL quarter.
- What if I can’t make the quarterly minimum? You’ll simply be dropped. No one will hassle you. No one will bother you. It truly is risk free to purchase the Starter Kit!
Are there other perks to purchasing the Starter Kit? Yes! Here are just a few:
- The Starter Kit ships FREE!
- Approximately a month before new products are released, you’ll be able to participate in a preorder and purchase brand new products ahead of the public
- Attend Stampin’ Up! events like OnStage
- Personal purchases of $20 are eligible to receive Stampin’ Rewards. Yes, demonstrators can also receive Stampin’ Rewards!
- Complimentary copy of each current catalog from Stampin’ Up! Once the preorder begins, a complimentary copy will be included in your order. If no preorder is made, the catalog will be included in the first order placed during the catalog sales period.
- Free access to my Card Sampler PDF tutorials
If you have more questions, please reach out to me sending an email to me (you can send me an email on the sidebar of my blog)
The New Stampin’ Rewards Program
The New Stampin’ Rewards Program was rolled out on April 15th. You will receive 10% in rewards when your order is $20 or more but you have to opt in to get the rewards. The more you shop, the more you earn!
Last Chance Products
Click here to go straight to the Last Chance Products page on the Stampin’ Up! site!
Two New Stampin’ Up! Kits
Click each graphic below for more information about the kit. These kits can be found in the Online Exclusives part of the Stampin’ Up! website.
Full of Charm Paper Pumpkin Kit
You can now order subscriptions and manage your Paper Pumpkin subscription on the Stampin’ Up! website! You can cancel your Paper Pumpkin subscription at any time. If you want to skip the next kit, you can do that! You also receive Stampin’ Rewards when you order a single kit or purchase a 3-month, 6-month or 12-month subscription to Paper Pumpkin. If you’d like to subscribe, please click the graphic below.
An additional coordinating add-on is available but only for Paper Pumpkin subscribers. Click the image below for more information.
Thanks for stopping by today!