by Tracy | May 4, 2017 | Uncategorized

The deadline is drawing near to sign up to receive your very own Paper Pumpkin box this month! Sign up by the 10th and around the 15th, your Paper Pumpkin kit will be on it’s way, right to your mailbox!
What is Paper Pumpkin? It’s a convenient, all inclusive kit that’s shipped direct to you each month!
- Every kit comes with an exclusive stamp set to use over and over!
- You’ll receive at least one Classic Stampin’ Spot with every kit. The colors don’t repeat in a 12-month period, so it’s easy to build a collection of colorful ink.
- Every new subscriber receives a clear block (size D) with their first kit to help them get started and to use throughout their subscription.
- In addition to a stamp set an ink spot(s), the kits are packed with supplies many to make awesome projects like cards, home décor, gift packaging, and more. For example, our card kits (6+ per year) always include 8 cards—at least!
- It’s flexible! You can suspend (for a month) or cancel at anytime.

- Every month, Stampin’ Up! shares a video to quickly demonstrate how to assemble each kit. I love this feature!
- Every subscriber has exclusive access to past kits. So, when a kit runs out, you can buy more—either as a full kit or a refill (without stamp set and ink).
The kit last month was a very special one designed by the Stampin’ Up! CEO Sara Douglass and a free gift of pencils was included! It’s always fun to open the box, pull back the blue tissue paper and see what’s inside!

Would you like a bit more information or are you ready to sign up? Click here and you’ll be taken to my sign up page. For more information, select How It Works at the top of the page! If you have any questions, don’t hesitate to ask!
I’ll hope you’ll join me tomorrow for the First Fridays Blog Hop!

by Tracy | May 3, 2017 | Uncategorized

If you love the products on this card, you can purchase the Eastern Palace Premier Bundle today (the individual products are not available until June 1st)!
You’ll receive all of the products you see below (only 6 of the 14 dies in the Eastern Medallions Thinlits are pictured AND you’ll receive 12 mini tassels). You’ll also receive a FREE package of Very Vanilla envelopes and a FREE package of Very Vanilla Thick Cardstock!

The Eastern Palace Starter Bundle is also available! This bundle includes everything in the Premier set with the exception of the cardstock package, mini tassels, and Thinlits. Your FREE item in this bundle is a package of Very Vanilla Note Cards & Envelopes.

My card features all new products from the Premier Bundle, with the exception of the Very Vanilla cardstock. Don’t you just love the mini tassel??? The color of the tassel is Fresh Fig, one of the new In Colors. I also used this color for the base of my card and it’s the color peeking through the medallion. The polka dot Designer Series Paper is included in both bundles.

Stamping Supplies: I used the Eastern Palace Premier Bundle to create my card today but I’ve also included the Starter Bundle in my list of supplies.


Ready to place your online order? Click here!
Have a wonderful day!
by Tracy | May 2, 2017 | Uncategorized

It’s Day 2 of the Eastern Palace Suite Bundles preorder! These two special bundles are only available for the month of May and each one comes with a free gift!
Eastern Palace Starter Bundle = FREE Very Vanilla Notecards & Envelopes
Eastern Palace Premier Bundle = FREE Very Vanilla Envelopes & a package of Very Vanilla Thick Cardstock

My card today uses four new products from this Suite. Please note that you cannot buy these products individually until the new catalog comes out in June. You can only purchase them as part of either bundle.
- Eastern Beauty Photopolymer Stamp Set – included in both bundles
- Eastern Palace Specialty Designer Series Paper – included in both bundles
- Lemon Lime Twist Stamp Pad – included in both bundles
- Eastern Medallions Thinlits – included only in the Eastern Palace Premier Bundle
This is a very quick and easy card to make but the Thinlits really make it WOW! The intricate shape is just one of dozens and dozens that you can create with the pieces in this die set. I like that many of the sentiments in the stamp set can be punched out with the 1″ Circle punch!
Stamping Supplies
During the month of May, the only way to get items from the Eastern Palace Suite is by purchasing either the Eastern Palace Starter Bundle or the Eastern Palace Premier Bundle.
Ready to place an order? Click here! If you have any questions, don’t hesitate to contact me!
by Tracy | May 1, 2017 | Uncategorized

Today I have a card that uses products from the Eastern Palace Suite! Starting right now, the Eastern Palace Suite Bundle is available for purchase! This is a new suite of products that will be debuting on June 1st in the new catalog but bundle prices are available only in the month of May!
You can choose between one of two bundles – the Eastern Palace Starter Bundle or the Eastern Palace Premier Bundle. Demonstrators were able to purchase these bundles at the beginning of April. I bought the Premier Bundle because I wanted the Eastern Medallions Thinlits. There are 14 dies included in this set but you can mix and match them for so many possibilities!

In both kits, you will receive 3 of the five brand new 2017-2018 In Colors (Fresh Fig, Tranquil Tide, and Lemon Lime Twist) and you’ll receive a FREE GIFT with each bundle. The Eastern Palace Starter Bundle includes a package of Very Vanilla Notecards and Envelopes (a new product debuting in the new catalog) and in the Premier Bundle you’ll receive a package of Very Vanilla Thick Cardstock (another new product) and Very Vanilla envelopes.
Each bundle is listed in detail below (you can click the picture to enlarge it). If you’d like to print out a PDF flyer of these bundles, click here!

The products on my card from the Eastern Palace Suite of products are:
Eastern Beauty Photopolymer Stamp Set
Eastern Palace Speciality Designer Series Paper
Eastern Medallions Thinlits
Stampin’ Supplies used to make my card but not included in the Eastern Palace Bundles:
Ready to place your order? Click here! If you have any questions, don’t hesitate to contact me!
by Tracy | Apr 28, 2017 | Uncategorized

Today I have a Sneak Peek for you! My project uses three new products and they all come from the Eastern Palace Suite. This is a new line of products that I was able to preorder earlier in the month. It makes its debut in the new catalog but starting on Monday, May 1st, you’ll have the opportunity to purchase one of two bundles featuring products from this suite. These bundle prices will only be available for the month of May.
In both bundles, you’ll receive three of the five new In Color stamp pads! Each bundle also includes free product (these are items that are also debuting in the new catalog release). Click on the bundle picture below to enlarge it.
Throughout next week I’ll be sharing cards I’ve made with the Eastern Palace Premier Bundle. But onto today’s project!

My box uses four NEW products from the Eastern Palace Bundle:
- Tranquil Tide cardstock – one of the new In-Colors
- Eastern Palace Speciality Designer Series Paper
- Eastern Beauty stamp set – I love the fonts in this set!
- Tranquil Tide stamp pad
I shared this box last month and if you’d like a picture tutorial so that you can recreate it, click here to see that blog post. I used the Gift Card Envelope and Trims Thinlits to make the top of my box. Run your paper through the Big Shot and you instantly have a topper for your box. It can also double as a quick and easy envelope. These Thinlits are on the RETIRING LIST which means it’s only around WHILE SUPPLIES LAST. While I won’t be sharing projects using it after it’s gone (I only share what I know you can purchase), it will be staying in my craft room .
The box topper isn’t glued down but wrapped up with Very Vanilla 1/2″ Lace Trim. My sentiment was stamped with Tranquil Tide and punched out with the 1-1/4″ Circle Punch. It sits on top of a piece of Tranquil Tide card stock that I cut out using the 1-3/8″ Circle Punch.
The supplies I used are listed below but I can only list supplies that are in our current catalog, the new items can’t be linked to the store yet.
Have a terrific weekend!
Stamping Supplies
Ready to place an order? Click here!
Click to shop Retiring Stamp Sets!
Click to shop Retiring Bundles!
Click to shop (Retiring) Everything Else!

by Tracy | Apr 27, 2017 | Uncategorized

I’ve made boxes using the Envelope Punch Board but the easiest thing to make with it are envelopes! With a few punches and score lines, an envelope is made!
The small envelopes in the picture above were sent out to customers who recently placed an order with me (I tucked a little something inside for them).
Want to make one? Start out with a piece of Moroccan Designer Series Paper that measures 5-1/4″ x 5-1/4″. Line one side up to the 2-5/8″ mark. Then punch and score. Repeat on the remaining three sides and you’re almost done! Bring three of the edges up to create an envelope (I used glue dots to secure it).

I didn’t glue the top part of the envelope down but instead wrapped it with Very Vanilla Lace Trim. The sentiment comes from the Jar of Love stamp set.
The Moroccan Designer Series Paper IS on the retired list. It’s available while supplies last and it’s on sale. It normally sells for $11.00 but it’s been discounted 30% and is now $7.70! This package of paper is so pretty in person.
The supplies I used to make my card can be found below in the Stamping Supplies. The Moroccan Paper sale price will not show up until you click the picture below and you’ll head over to my Stampin’ Up! online store.
If you have any questions, please ask!
Stamping Supplies
Ready to place an order? Click here!
New items were added to the Clearance Rack! Click here to take a look!
by Tracy | Apr 26, 2017 | Uncategorized

The brand new 2017-2018 Annual Catalog goes live on June 1st! It’s filled with lots of new products!
How Can You Get a Copy?
*** If you’ve placed an order with me in the last year, I will automatically send you a copy that should arrive mid-May. Just sit back and wait for it to arrive!
*** If you live in the U.S., you may request a catalog using the form below. I will add you to my list for both a catalog and my email newsletter which features Stampin’ Up! updates, free project PDF’s, project ideas, etc.
[contact-form][contact-field label=’First Name’ type=’name’ required=’1’/][contact-field label=’Last Name’ type=’text’ required=’1’/][contact-field label=’Email’ type=’text’ required=’1’/][contact-field label=’Address’ type=’text’ required=’1’/][contact-field label=’Address’ type=’text’/][contact-field label=’City’ type=’text’ required=’1’/][contact-field label=’State’ type=’text’ required=’1’/][contact-field label=’Zip Code’ type=’text’ required=’1’/][/contact-form]
by Tracy | Apr 25, 2017 | Uncategorized
Since the Tasty Treats paper is still available (it’s currently on the retired list, on sale and while supplies last), I have one more card using it!
Please note, that this paper is now on the LOW INVENTORY list which means it is close to selling out! If you love it, don’t hesitate in picking it up, now! Click here to place your order!

Two of the 12 sheets of paper in this package, such as the one on my card, have a beautiful glossy sheen over the designs. It really makes your card look fancy!

I didn’t use the Framelits that coordinate with the Cool Treats stamp set on my card today but I am including them in my supply list because the bundle price is while supplies last. You can save 10% on the stamp set and framelits but this is a limited time offer – while supplies last. Both of the items will be returning in the new catalog but the bundle will not.

The stamp set I used is called Cool Treats and it comes with a whopping 36 pieces! If you click the item in the Stamping Supplies below, you can see all of the pieces to make popsicles, ice cream cones and more!
Stamping Supplies – Click on any item below and you’ll head on over to my Stampin’ Up! online store!
|
|
|
|
|
|
|
|
|
|

Tangelo Twist 8-1/2″ X 11″ Cardstock
[133677]
$7.00
|
|

Tangelo Twist Classic Stampin’ Pad
[133646]
$6.50
|
|
|
|
|
Do you have any questions about the Retired List? Please feel free to email me!
Have a terrific day!
by Tracy | Apr 24, 2017 | Uncategorized

Happy Monday! I hope you had an enjoyable weekend.
Last Friday I shared THIS CARD which uses the retiring paper, Tasty Treats! This paper is on sale and while supplies last (if you click it in the supply list below, you’ll see the sale price). Today’s card uses the same supplies as last week’s card but I added the embossed piece using the Softly Falling Embossing Folder.
As mentioned last week, the BUNDLE price of the Frozen Treats Framelits and the Cool Treats stamp set is also while supplies last. Both of these products are returning in the new catalog but the bundle won’t. Buy it today and save 10%. (It’s the first product in the Stamping Supplies list below).
Ready to place an order? Click here!
Stamping Supplies
Have a great day!
by Tracy | Apr 21, 2017 | Uncategorized

I hate to admit it but I’ve had this cute paper for months and used it for the first time yesterday! What was I thinking?? It’s a shame because it’s retiring!! And guess what, it’s ON SALE for 40% off but ONLY WHILE SUPPLIES LAST. It’s normally $13.00 but on sale for $7.80. If you think you want it, grab it quick!
The stamp set I used, Cool Treats, coordinates with this paper but it isn’t retiring. There’s also coordinating framelits which are also NOT retiring. But the BUNDLE, is. Confusing, isn’t it? What this means is that if you purchase the bundle, which includes the stamp set Cool Treats and the Frozen Treats Framelits dies, you’ll get it at a discount of 10%. Although these two pieces will be back in the new catalog, the 10% discount won’t. This bundle is also WHILE SUPPLIES LAST. Don’t wait!
I’ve listed all of the supplies I used to make my card below. The sale price for the Tasty Treats Designer Series Paper will not show up unless you click the picture! Remember, this paper and the bundle are while supplies last!
Stamping Supplies – Click on any item and you’ll head on over to my Stampin’ Up! online store!
If you have any questions, don’t hesitate to ask!
by Tracy | Apr 20, 2017 | Uncategorized

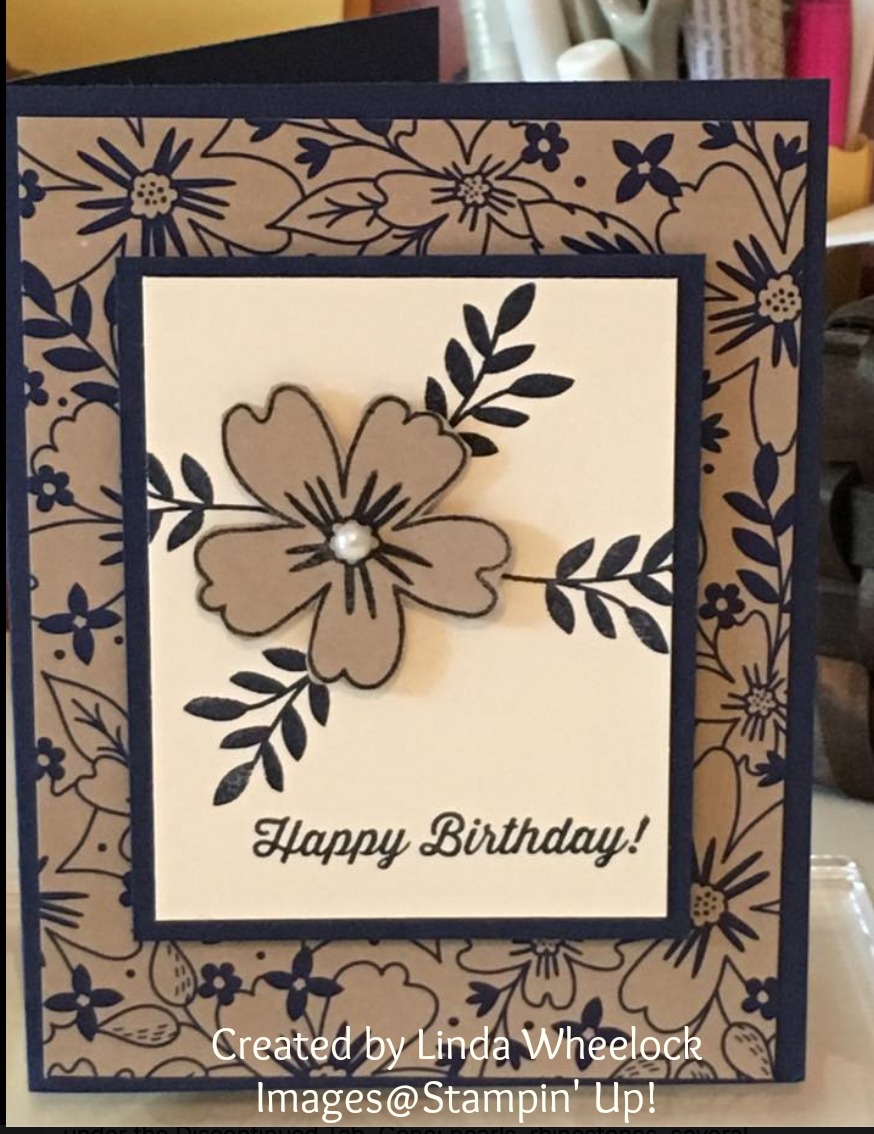
Today I wanted to share a card made by Linda Wheelock, a member of my Stampin’ Up! team. Isn’t it beautiful? She used the Speciality Designer Series Paper, Affectionately Yours which is on the retired list AND on sale. It’s normally $13.00 but while supplies last, you can pick it up for $9.10.

It looks like Linda used Night of Navy cardstock which matches beautifully with this paper. The stamp set, Love and Affection (#141545) was used for the leaves and the the flower in the middle. The stamp set Birthday Banners (#141506) was used for the sentiment, Happy Birthday. To finish the card, Linda used a pearl in the center. Unfortunately the Basic Pearls are no longer available until June when the new catalog comes out.
I’m so glad that Linda agreed to let me show you her card!
Ready to place an order? Click HERE to shop at my online Stampin’ Up! store!
by Tracy | Apr 19, 2017 | Uncategorized
Did you know that there are Bundle prices throughout the Occasions and Annual Catalogs? Two products are bundled together for a discount of 10%. ALL of the bundles are retiring but this doesn’t mean that the products themselves are retiring.

The Ready to Pop Bundle (click on the picture to see it enlarged) is one of the retiring bundles. The stamp set and Thinlits will be in the new catalog but the 10% discount won’t be available. This bundle is WHILE SUPPLIES LAST.
But please note this, if you are interested in a bundle, PLEASE check on the individual pieces FIRST. In some instances, buying the two items individually is cheaper than the bundle!! Normally this isn’t the case but with the retiring sale, you need to check!
The Birthday Fiesta Bundle is another bundle in the catalog. Both the stamp set and the Framelits are retiring. Neither product is on sale so your best price IS the bundle but the bundle is while supplies last!

The Sweet Cupcake Bundle includes the Sweet Cupcake stamp set and the Cupcake Cutouts Framelits. Neither of these two products are retiring so the bundle is a great deal! Again, while supplies last! 
If you have any questions about any of the bundles, don’t hesitate to email me!