Would you like to see some of the new DSP that will be available tomorrow? Stampin’ Up! has just released this video and in it they share some of the new DSP and the process that goes into creating their beautiful paper. I found it very interesting!
Today is my friend Kristina’s birthday. We met three years ago at a Stampin’ Up! convention. Last year we went up on the stage together for her 10th Stampin’ Up! anniversary and my 5th. I was very nervous about going up there but it was special because we did it together. The second picture is from several years ago. Happy Birthday, Kristina!
My card today uses the stamp set Garden in Bloom. Although you can use an outline for the flower, I chose to just use the “inside” part (see the picture below of the stamp set).
Garden in Bloom #139433
After stamping, I used the Decorative Dots embossing folder. My sentiment comes from the stamp set Cottage Greetings. I used the Lots of Labels Framelits and sponged each piece with Daffodil Delight. I finished it off with a little bow using Cucumber Crush Dotted Lace Trim.
The Holiday Catalog goes live next Tuesday, September 1st, but today I have a sneak peek of four new products in this gem of a catalog! Can you guess what’s new?
Spider Web Doilies
BLACK Glimmer Paper
A Little Something stamp set
Softly Falling Embossing Folder – It is meant to be used as snow but I think it looks just fine on my Halloween card
I started out with my two favorite color combinations for Halloween – Elegant Eggplant and Pumpkin Pie. To adhere my layers together, I used our Liquid Multipurpose Glue. I’ve started using it more and more because it gives me a little bit of time to make sure that my layers are straight. I wanted my pumpkins orange on the sentiment so I used my Stampin’ Write markers to color it. The Black Glimmer Paper is so pretty and sparkly!! Lately I seem to finish every projects with several rhinestones and this one was no exception!
I can’t add our new products in my list below until they go live on Wednesday but below you will find the products that are available now. For more info or to place an order, click on any picture below.
If you would like your own copy of the Holiday Catalog, email me and I’ll send one out to you! If you’ve placed an order with me within the last 12 months, your copy is on its way!
Today is the last day to receive these three completed cards FREE with a minimum $35 order. In addition, you’ll receive a PDF for each card listing the supplies and cutting instructions and you’ll have access to a private video showing you tips and tricks to make these cards on your own. For more information, click here!
These special prices are good until Monday, August 31st, or while supplies last! Click on any of the products and you’ll be taken to my Stampin’ Up! online store. Any questions, let me know!
I’m not sure if I’ve mentioned this before, but in addition to being a Stampin’ Up! demonstrator, I also sell South Hill Designs products. As I was making today’s card, I immediately thought how easy it would be to make a locket to match.
Inside the Silver Tone Crystal locket are our beautiful birthstone Swarovski crystals surrounding a silver crystal butterfly. The chain (my absolute favorite) is called the Multifaceted Link Chain. If you would like to see more SHD products, click here.
Onto my card! The inspiration for this card comes from Donna Mikasa for Hero Arts. I made a Stampin’ Up! version.
I embossed a small section of Whisper White cardstock with the new Elegant Dots embossing folder. After cutting out three butterflies with the Bold Butterfly Framelits, I sponged the upper section of each with a sponge dauber and my stamp pads in Daffodil Delight, Wild Wasabi and Melon Mambo. I popped each one up with a piece of Stampin’ Dimensional (the part of the dimensionals that you might throw away, around the perimeter). My sentiment comes from the host set, Best Thoughts.
The supplies I used are listed below. If you would like more information about a product or you’d like to place an order, simply click on a picture below.
Here it is – the cover of the Holiday Catalog! It is FILLED with so many fun new products!!! You can start ordering from this catalog in less than two weeks, on September 1st.
If you’ve ordered from me in the past 12 months, your catalog will be in the mail early next week. If you don’t have a Stampin’ Up! Demonstrator and would like a catalog, please email me your mailing information and I’ll get one out to you (U.S. residents only).
You can email me at: tracy@stampingwithtracy.com OR use the button on the top left sidebar
Thanks for stopping by today! Hope you’ve had a good week!
My son-in-law celebrated his birthday on Thursday and I thought I would share my daughter’s gift to him. She took his favorite albums and posed the kids on top of them (its actually two separate photos). Isn’t it adorable – especially with their headphones on? I know he’ll hang these proudly in his music room.
Oh my! You certainly can make some beautiful butterflies with the stamp set Watercolor Wings! There are so many possibilities! To create my large butterfly, I used the stamps that I’ve labeled below. First, I stamped with Pool Party. Next, using Bermuda Bay, I inked up the stamp and then stamped off onto my grid paper before stamping over the Pool Party image. Blackberry Bliss was last and I used this full strength. I tried stamping it off first but really like how it looks full strength. The thing is, you can try all different combinations and have a beautiful creation!
Watercolor Wings #139424 $26.00 Photopolymer
I cut it out using the coordinating Bold Butterfly Framelits (the Framelits and stamp set can be purchased as a bundle with a 15% discount) but you could also cut it out with your scissors. My Blackberry Bliss butterfly on the top was made using the Butterflies Thinlits dies. All of these supplies will be listed in my Product List below. My sentiment is also from the Watercolor Wings stamp set along with the dots which I did in Bermuda Bay. I did some of the dots full strength and others I stamped off one or two times. I decided at the last minute to run it through the Decorative Dots embossing folder. I can’t wait to see what else I can create with this set!
Product List – Click on any item below for more information or to make a purchase.
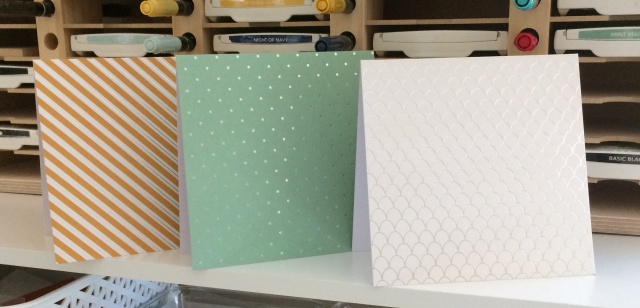
I was finally able to sit down and play with the Cottage Greetings Card Kit. I am so impressed with the contents! You’ll get enough supplies to make 15 cards. There are three different 5″ x 5″ card bases which all have silver sparkle on them. In addition, you’ll receive silver foil envelope liners, envelopes, die cut paper and foil images, baker’s twine, sequins, wood veneer sheets, enamel dots and Stampin’ Dimensionals. You need to supply stamp pads, Snail adhesive, Multipurpose Liquid Glue and a stamp set. I used the one that coordinates with the set, Cottage Greetings (I’ll provide a link to all of these extras in my supply list below) but you could use whatever you already own.
Three different card bases
You can put the cards together as shown on the cover of the kit or switch things around. I did a little of both!
If you would love to make your own cards and want something quick, easy and CUTE, this kit might be just what you’re looking for!
Product List – Click on any item below for more information or to place an order at my Stampin’ Up! online store!
Place a minimum $35 order and I’ll send you these three completed cards, a PDF for each card that includes cutting instructions and supplies, and you’ll have access to two videos with tips and tricks to make them on your own! Click here for more details!
Ordering Suggestion for August Ordering Incentive
Cottage Greetings Card Kit (138377) $16.00
Cottage Greetings Clear Mount Stamp Set (139962) $16.00
The Weekly Deals are here! These prices are good until Monday, August 24, 2015 or while supplies last! Click on any item for more information or to place an order at my Stampin’ Up! online store!
Place a minimum $35 order and I will send you these three completed cards, a PDF with all the supplies needed along with cutting instructions and access to a private video showing you tips for making the cards. For more details, click here!
I realize that it still Sunday evening but I am posting my Monday blog post just a little bit early.
Kathy over at thedailymarker.com is having what she is calling a Pop up Challenge and it is all about lines! I was intrigued with her Day 1 Challenge and thought I would give it a try! The idea is to make lines on your paper and then start coloring! I figured that was easy enough so I drew my lines with a black Sharpie and then colored in my areas with Copic markers. I started out with a half piece of Whisper White cardstock and created what you see below.
I cut this piece down to 5″ x 3 3/4″ and then added little “eyelash lines” as Kathy refers to them using a fine tip Sharpie. My base is Whisper White cardstock with a piece of Basic Black on top of it. My sentiment is one of the words in the Greetings Thinlits.
As I was coloring, I was thinking how fun this would have been for my second graders. If there are any teachers reading this, definitely try this with your students! I think they would love it and I know they would create gorgeous art pieces!
If you decide to give it a try, I would love to see your creations! Have a terrific week!
Product List – Click on any item for more information or to place an order at my Stampin’ Up! online store!
I hope you are enjoying your weekend so far! Several weeks ago my husband and I received an anniversary card (see below) and I immediately knew that I wanted to try and make a similar looking card.
It was really easy to make and each time you do it, you get a completely different look! I used one of my acrylic blocks, several Stampin’ Write markers and a spritzer. I colored directly onto my block with the markers. There’s no right way to do this. Then I spritzed it with water and stamped it onto my paper. I did try doing this directly onto the base of my card but I was never happy with it – it always seemed crooked to me. So, I ended up cutting it and mounting it onto Bermuda Bay cardstock. As I said, this is really easy and it will look very different each time you do it. You can lightly stamp it or press down harder for a different look. I used Whisper White cardstock which is fine as long as you don’t get the paper too terribly wet but you can use watercolor paper too. The markers I used were: Pacific Point, Bermuda Bay, Tempting Turquoise and Island Indigo. The first three can only be purchased as a set in the Brights collection but the Island Indigo can be purchased separately. See the product list below.
I finished the card by embossing my sentiment (from the set Build a Birthday) with silver embossing powder. Give this technique a try! I’d love to see what you create!
Product List – Click on any item below to make a purchase.