by Tracy | Apr 15, 2016 | Uncategorized
I love paper! With each and every Stampin’ Up! catalog release there’s always one pack of paper that I fall in love with and use over and over again. If you follow my blog, you’ve probably already guessed that Birthday Bouquet is my current favorite.
One of the ways that I like to use my paper is to place it in the cover sleeve of a binder. The binder on the right shows one design from Birthday Bouquet and the Copic binder paper has unfortunately retired.

I typed up the titles on my computer and then cut them out with the Ovals Framelits. The largest die in the set has the scalloped edges which was perfect as a base for my title. It’s a fun way to jazz up a binder!
I’d love to hear other ways that you’ve used paper!
Have a great day!
Product List – To purchase any of the products below, just click on the picture. Any questions? Please don’t hesitate to ask!
by Tracy | Apr 14, 2016 | Uncategorized

I really enjoy making these Dahlia flowers and I thought it would be fun to make one with paper in the Occasions catalog for Throwback Thursday! You can see a previous post here which also includes a tutorial. Want to see two more samples? Click here (I love this paper and wish it was still available) and here.
If you have any questions, don’t hesitate to ask! Have a great day!
Product List – Click on any product below for more information or to place an order. Updated: I realized that I forgot to list the most important punches that I used to create my flower: 1-3/4″ Circle Punch for the actual flowers and the 2-1/2″ Circle Punch (currently on the retirement list) for the base.
by Tracy | Apr 7, 2016 | Uncategorized

I love making cute AND easy projects and today’s project definitely fits under both of those categories. Since its Throwback Thursday I am recreating a treat bag I originally made last spring. You can see that original post HERE.
I’ll show you how easy it is to make this treat bag but first, as I mentioned yesterday, I’m celebrating my 7th Stampiversary with Stampin’ Up! this week! In honor of that, I am going to send out three of these Treat Bag kits to one lucky winner. You’ll receive a fun package in the mail with all the supplies you’ll need. I will cut, score and add the adhesive and you’ll just need to fold the flaps in (you’ll need to supply your own stamped image per Stampin’ Up!).

To enter to win, just leave a comment telling me which of the soon to be retiring In Colors (get them while you can) is your favorite! I’ll add an extra entry for you if you tell me which one is my favorite! I’ll announce the winner on Sunday, April 10th. I’m sorry but this is only open to U.S. residents.
Let me show you how easy it is to make the treat bag! You’ll need a piece of cardstock or DSP (I used Birthday Bouquet Designer Series Paper).
Card stock or DSP measurement: 5-1/2″ x 8-1/2″
Score on the portrait side at 1-1/2″
Turn it around to the landscape side and score it at 1-1/2″, 4″, 5-1/2″, and 8″
Now you will do some cutting and folding on the score lines (there’s some funky line above my score line, please just ignore that). When you lay your paper down to replicate my cutting, be sure the design you want on the outside is facing towards you and that the 1-1/2″ score line is down towards the bottom. Cut on the score lines indicated below. You’ll remove the piece on the right side, trim one of the flaps (this helps the bag fold up with less bulk), and take off a hair on the sides of the other pieces (again, less bulk).

Next, add Tear and Tape or Fast Fuse in the two areas shown below. The flap on the right hand side with the adhesive will attach to the opposite side to form the box. The flap with the adhesive will hold the bottom of the box together. I’ve put the adhesive on that particular flap so that it will face towards the back of the box (that will make more sense when you assemble your box).

You could pierce a hole at the top and attach ribbon but I decided to add a clothespin with some ribbon and my sentiment. Easy!! I’ll list all of the supplies that I used below. To place an order, just click on any of the products and you’ll be directed to my online store. Any questions, don’t hesitate to ask!
Don’t forget to leave a comment about your favorite retiring In Color!
Product List
by Tracy | Apr 1, 2016 | Uncategorized
Hi Stamping Friends!
I made this card last week with the intention of showing one way to use the glitter tape that was available during Sale-a-bration but it sold out before I could write my post. Another product that could be substituted is our Glimmer Paper. A small strip on both sides of the card would give it just the perfect amount of sparkle!
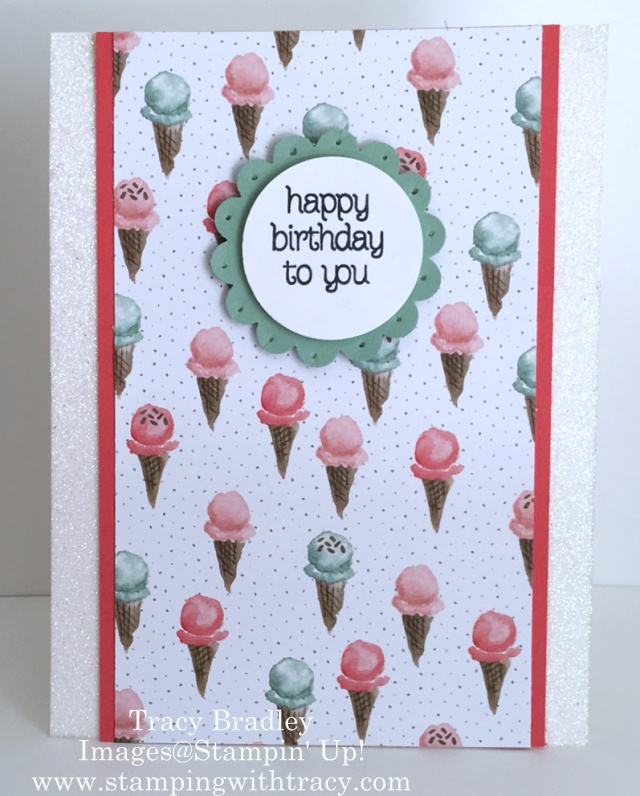
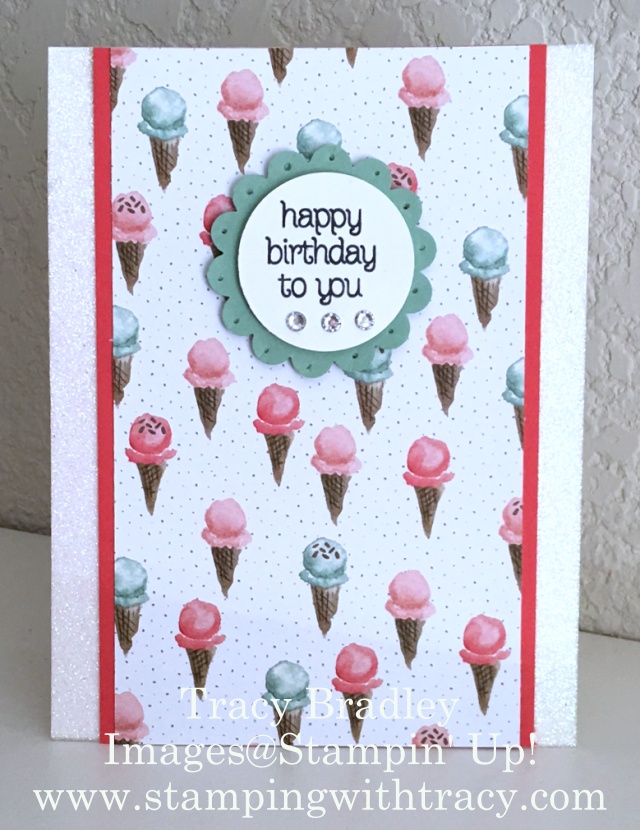
The real star of the show though is the Birthday Bouquet Designer Series Paper! It’s so pretty that you really don’t need much else to make this card. After adding the sparkle tape, I cut a 3-1/4″ x 5-1/2″ piece of DSP and adhered it to a piece of Watermelon Wonder that measured 3-1/2″ x 5-1/2″. My sentiment is stamped with Memento Ink using one of the Circle of Spring stamps. I used the 1-3/8″ Circle punch and adhered it to a Mint Macaron 1-3/4″ Scallop Circle. My paper piercer was used to poke holes around each scallop. (Edited: Earlier I stated the incorrect size Scallop Circle punch – it has been corrected).
After I photographed the card I thought it could use a little bling and that version can be seen below. What do you think? Which version do you prefer?
If you would like to purchase any of the crafting goodies used to make this card, click on any product below and you’ll be taken to my Stampin’ Up! online store. Use the host code for this month and receive a small gift from me as a thank you. If your order exceeds $150, don’t use the code as you’ll be able to receive host benefits. The host code for this month is:
4BJ4ZJ9N
Product List
If you have any questions, don’t hesitate to contact me!
by Tracy | Mar 30, 2016 | Uncategorized

Thanks for stopping by!
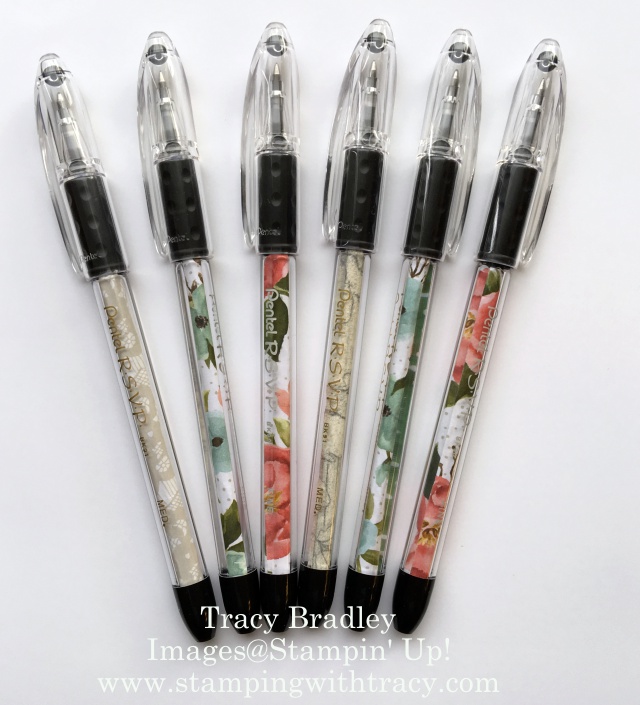
Today I’ll share the last of the goodies inside my stationary boxes. The boxes wouldn’t have been complete without something to write in and with! The coordinating notepads are 3″ x 5″ and I purchased them on Amazon. Just as I did with the gum holders, I used the same paper that coordinated with the paper that was used to slip inside the sleeve of the full size stamp case.

I used the stamp set that comes with the Watercolor Wishes Card Kit (the stamp set cannot be purchased separately). I used Pentel RSVP pens and unscrewed the black part which can be seen at the bottom of the picture, rolled up the paper and inserted it inside the barrel. In a previous post I did a short video on how to do this, so click here if you’d like to see it.
Product List – Click on any product below for more information or to place an order! If you have any questions, don’t hesitate to ask!


