by Tracy | Jul 25, 2025 | Thinking of You Card
This is the Last Day for Free Shipping on Orders $75 or More!

Promotion Details
- All order types qualify for this promotion.
- Free shipping is for three days only. Orders must be closed July 25.
- Free shipping automatically applies to your cart after the qualifying amount has been met, which is $75 (before tax).
- Coupon codes and Stampin’ Rewards will lower your order’s retail amount. Orders must meet the qualifying amount to be eligible for free shipping.
- The additional cost for expedited shipping is not covered by this promotion.
- Prepaid 3-, 6-, and 12-month Paper Pumpkin subscriptions and month-to-month subscriptions do not qualify for free shipping. Refills, past kits and add-ons do qualify toward free shipping, but you must be a subscriber to purchase. Subscriptions billed and shipped this month will be charged for the normal amount ($27.00 shipping included) + tax.
- Click the graphic above to get FREE SHIPPING on orders $75 or more!
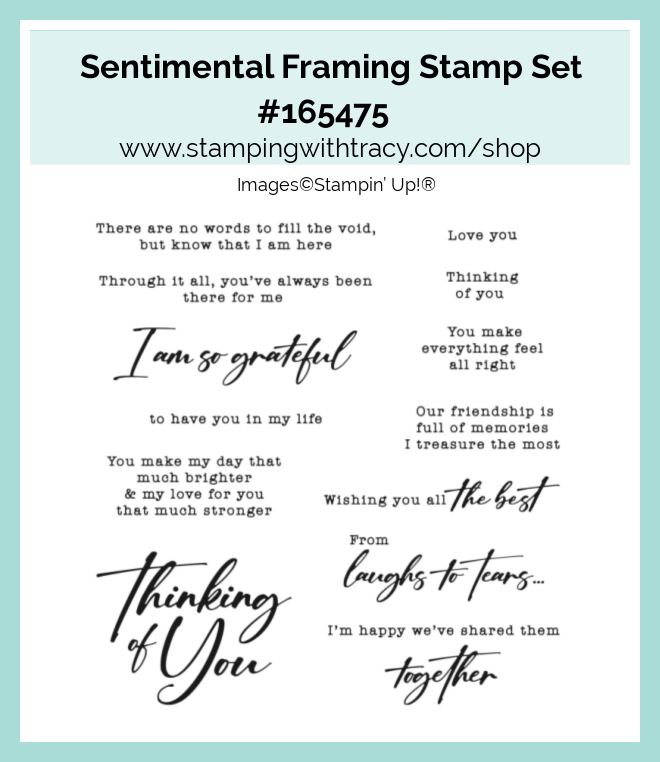
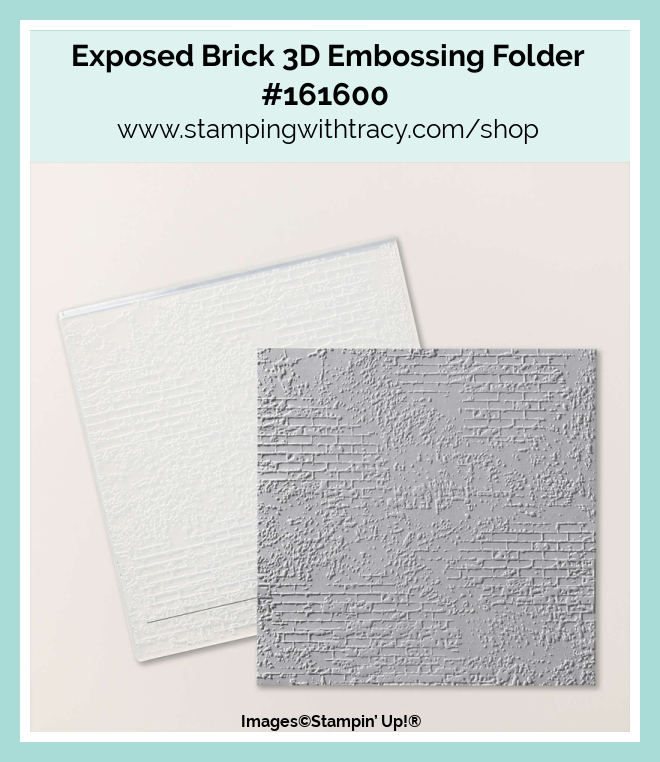
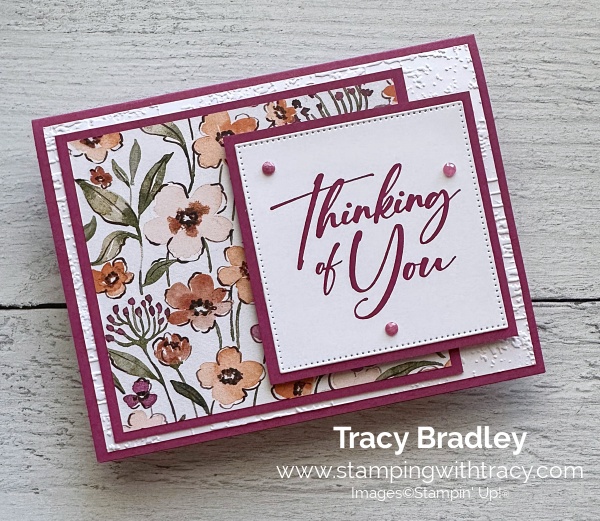
The card I’m sharing with you today was made using the Sentimental Framing Stamp Set, Floral Charm Designer Series Paper, Stylish Shapes Dies, Exposed Brick 3D Embossing Folder and Charming Shimmer Faceted Dots.
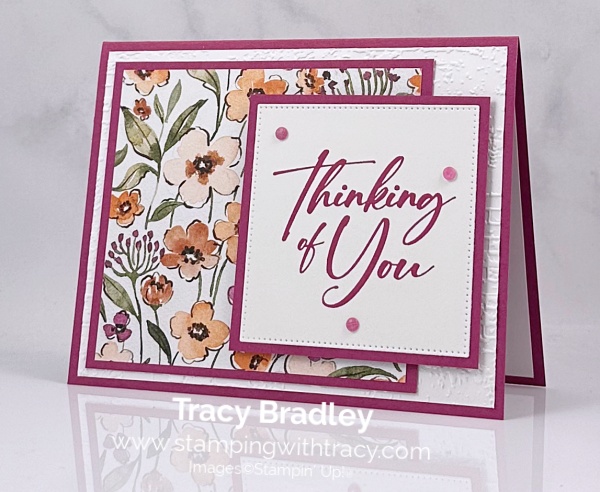
I started with a piece of Berry Burst cardstock for the base of my card. Then, I embossed a piece of Basic White cardstock using the Exposed Brick 3D Embossing Folder and my Stampin’ Cut & Emboss Machine. Next, I adhered the embossed Basic White cardstock to the front of the card.
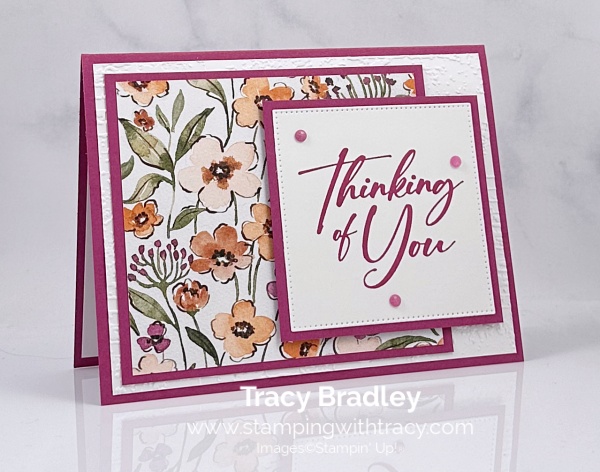

I layered a piece of Berry Burst cardstock with a piece of Floral Charm Designer Series Paper and adhered it to the front of the card. I used a piece of Basic White cardstock to cut a square using the Stylish Shapes Dies (I used the largest square in the set). I stamped the sentiment onto the Basic White square using the Sentimental Framing stamp set in Berry Burst ink.
I cut another piece of Berry Burst cardstock and adhered the sentiment to the front of it. I added Stampin’ Dimensionals to the back and adhered it to the front of the card.
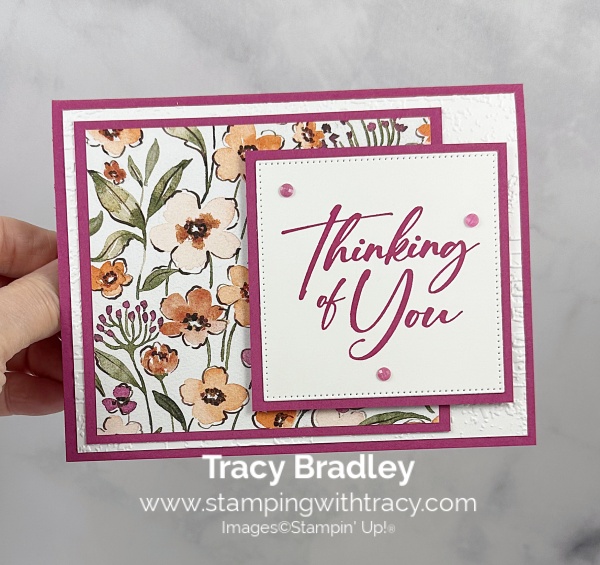

To complete my card, I added three Charming Shimmer Faceted Dots in Berry Burst around the sentiment and added a piece of Basic White cardstock to the inside of the card.

Supply List
Below you’ll find all the Stampin’ Up! supplies I used for today’s card. If you need any stamping supplies, I’d love to be your demonstrator! You can place an order by clicking any of the images below to go to my Stampin’ Up! online store.
The Specialty Plate is used with 3D Embossing Folders and Hybrid Embossing Folders.
Bundle Alert: The Sentimental Framing Bundle is available with a 10% discount rather than buying the products separately.

Measurements
- Berry Burst cardstock: 5-1/2″ x 8-1/2″ scored at 4-1/4″
- Berry Burst cardstock (under sentiment): 3″ x 3″
- Berry Burst cardstock: 4-1/4″ x 3-3/4″
- Basic White cardstock (sentiment): approximately 3-1/4″ x 3-1/4″
- Basic White cardstock (embossed & inside card): (2) 4″ x 5-1/4″
- Floral Charm Designer Series Paper: 4″ x 3-1/2″
BACK-TO-SCHOOL SALES TAX HOLIDAY
The 2025 back-to-school sales tax holiday season begins this weekend and there are thirteen states and Puerto Rico offering a sales tax holiday for school supplies during the months of July and August. Products that are eligible according to the statute include “items normally used by students in a standard classroom for educational purposes.” To see the names of participating states, products exempted from tax, and sales tax holiday dates, click here.
Please note: you must place your order with Stampin’ Up! during the tax holiday period to receive these items tax-free (which is midnight on the first day to midnight on the last day of the tax holiday). Also, keep in mind that this is a state sales tax holiday; the state statute may not apply to county, city, and special jurisdiction taxes.
Please note that Georgia, Illinois, Louisiana, New Jersey, and Wisconsin have suspended the sales tax holiday this year.
Last Chance Products

Click here to go straight to the Last Chance Products page on the Stampin’ Up! site! Some products are discounted!
Two New Stampin’ Up! Kits
Click each graphic below for more information about the kit. These kits can be found in the Online Exclusives part of the Stampin’ Up! website.


Farmhouse Florals Paper Pumpkin Kit – Last Day to Order: August 10th
You can now order subscriptions and manage your Paper Pumpkin subscription on the Stampin’ Up! website! You can cancel your Paper Pumpkin subscription at any time. If you want to skip the next kit, you can do that! You also receive Stampin’ Rewards when you order a single kit or purchase a 3-month, 6-month or 12-month subscription to Paper Pumpkin. If you’d like to subscribe, please click the graphic below.

An additional coordinating add-on is available but only for Paper Pumpkin subscribers. Click the image below for more information.

Thanks for stopping by today! Have a relaxing weekend!
by Tracy | Apr 28, 2025 | Thank You Card
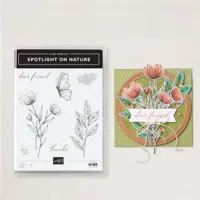
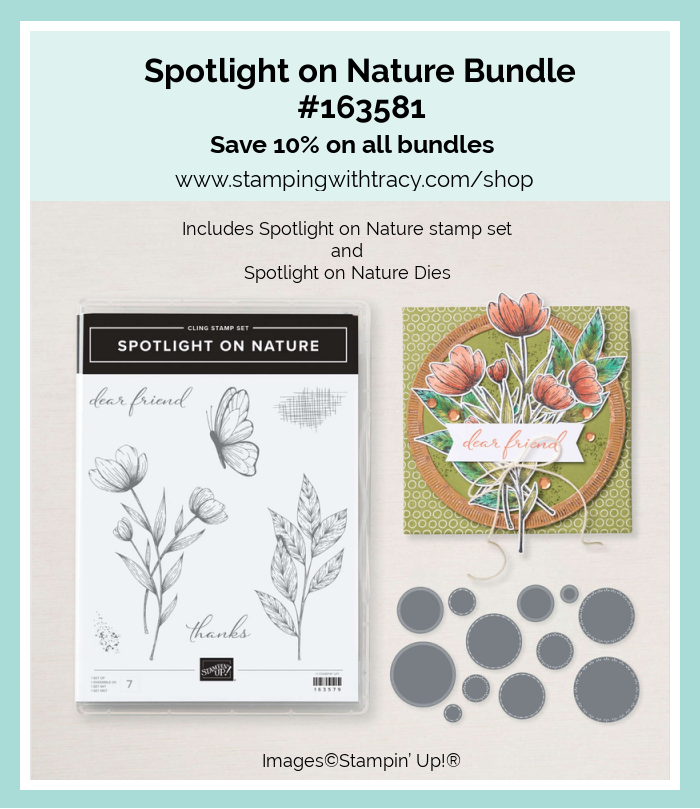
I’m sharing three cards with you today and one has a new product that will available for purchase on May 6th, Florals in Bloom Designer Series Paper #165175. The products I used on all the cards are the Spotlight on Nature Bundle and the Exposed Brick 3D Embossing Folder.
For this first one I used Florals in Bloom Designer Series Paper (available May 6. 2025) and Adhesive-Backed Sparkle Gems.
My links still aren’t working correctly. If the link doesn’t bring you to the product, please click again and possibly a third time. I have to call Stampin’ Up! about my links not working correctly. All of the products I’ve used, with the exception of the Florals in Bloom Designer Series Paper, are current so it shouldn’t say, “Out With the Old, In With the New”. I know it’s a pain to click on the links two or three times.

I started with a piece of Summer Splash cardstock for the base of my card. Then, I dry embossed a piece of Basic White cardstock using the Exposed Brick 3D Embossing Folder and my Stampin’ Cut & Emboss Machine. I adhered the embossed Basic White cardstock to the the base of my card.

I cut two smaller pieces of Summer Splash cardstock and layered them with Florals in Bloom Designer Series Paper (available May 6th). I used Multipurpose Glue to adhere the vertical one and added Stampin’ Dimensionals to the horizontal one and adhered it to the front of the card.


I stamped the sentiment in Summer Splash ink using the Spotlight on Nature stamp set. Then, I cut it out using the Spotlight on Nature dies. I added Stampin’ Dimensionals to the back and adhered it to the front of the card.
To complete my card, I added three Adhesive-Backed Sparkle Gems to the front and added a piece of Basic White cardstock to the inside.
For these next two cards I used the exact same products but I used the Rainbow Adhesive-Backed Dots and Floral Delight Designer Series Paper.
I used Lemon Lolly cardstock for this first card, Garden Green ink and Lemon Lolly Rainbow Adhesive Backed Dots.


I used Pool Party cardstock for this last card, Pool Party ink and Pool Party Rainbow Adhesive Backed Dots.


Supply List
Below you’ll find all the Stampin’ Up! supplies I used for today’s card. If you need any stamping supplies, I’d love to be your demonstrator! You can place an order by clicking any of the images below to go to my Stampin’ Up! online store. The Specialty Plate is used with 3D Embossing Folders and Hybrid Embossing Folder.
I also used Florals in Bloom Designer Series Paper #165175 (available May 6, 2025).
Measurements
- Summer Splash, Pool Party or Lemon Lolly cardstock: 5-1/2″ x 8-1/2″ score at 4-1/4″
- Summer Splash, Pool Party or Lemon Lolly cardstock: (2) 2″ x 3-3/4″
- Florals in Bloom and Floral Delight Designer Series Paper: 1-3/4″ x 3-1/2″
- Florals in Bloom and Floral Delight Designer Series Paper: 3-1/2″ x 1-3/4″
- Basic White cardstock (sentiment): approximately 2″ x 2″
- Basic White cardstock (inside card): 5-1/4″ x 4″
The New Stampin’ Rewards Program

The New Stampin’ Rewards Program was rolled out on April 15th. You will receive 10% in rewards when your order is $20 or more but you have to opt in to get the rewards. The more you shop, the more you earn!
Last Chance Products
Click here to go straight to the Last Chance Products page on the Stampin’ Up! site!
Three New Stampin’ Up! Kits
Click each graphic below for more information about the kit.


Mountain Majesties Paper Pumpkin Kit
Did you know that Paper Pumpkin has moved to the Stampin’ Up! website? You can now order subscriptions and manage your subscription on the Stampin’ Up! website! If you’d like to subscribe, please click the graphic below.

An additional coordinating add-on is available but only for Paper Pumpkin subscribers. Click the image below for more information.

Thanks for stopping by today!
by Tracy | Apr 26, 2025 | Appreciation Card
My card today was made using the Gallery Blooms Bundle #165213 (available on May 6th, when the new Annual Catalog goes live), Exposed Brick 3D Embossing Folder, the Textured Notes Bundle and Two-Tone Sparkle Gems.


I started with a piece of Bubble Bath cardstock for the base of my card. Next, I embossed a piece of Basic White cardstock using the Exposed Brick 3D Embossing Folder and my Stampin’ Cut & Emboss Machine. Then, I adhered it to the card base.
I used the Textured Notes Dies (the second largest one) to cut a rectangle out of Bubble Bath cardstock and then I embossed it using the Exposed Brick 3D Embossing Folder and adhered it to the front of the card. The Textured Notes Bundle is an Online Exclusive.

I stamped the flowers onto Basic White cardstock using Memento Ink. Then, I cut it out using the Gallery Blooms Dies (I like to cut it out before I color it). I colored it using my Stampin’ Blends: Bubble Bath (both light & dark) and Granny Apple Green (both light and dark). I added Stampin’ Dimensionals to the back and adhered it to the card front (I did have to cut a Stampin’ Dimensional in half to adhere the upper left leaf down).


I stamped the sentiment onto Basic White cardstock using the Textured Notes stamp set in Petunia Pop ink. I cut it out using the Textured Notes Dies. I added Stampin’ Dimensionals to the back and adhered it to the front of the card.
To complete my card, I added a piece of Basic White cardstock to the inside and added three Two-Tone Sparkle Gems around the flowers. These gems don’t look as good in pictures but they are so pretty in person. They have shades of Bubble Bath and Balmy Blue and they are very pretty on Bubble Bath cardstock.

Supply List
Below you’ll find all the Stampin’ Up! supplies I used for today’s card. If you need any stamping supplies, I’d love to be your demonstrator! You can place an order by clicking any of the images below to go to my Stampin’ Up! online store. The Specialty Plate is used with 3D Embossing Folders and Hybrid Embossing Folders.
I also used the Gallery Blooms Bundle #165213 – this product will be available on May 6th.
Measurements
- Bubble Bath cardstock: 4-1/4” x 11” scored at 5-1/2” OR 8-1/2” x 5-1/2” scored at 4-1/4” the only difference is how the card opens
- Bubble Bath cardstock (rectangle): approximately 5-1/4″ x 3-3/4″
- Basic White cardstock (embossed and inside card): (2) 5-1/4″ 4″
- Basic White cardstock (flowers): approximately 2-1/2″ x 4-1/2″
- Basic White cardstock (sentiment): approximately 2-1/2″ x 1″
The New Stampin’ Rewards Program
The New Stampin’ Rewards Program was rolled out on April 15th. You will receive 10% in rewards when your order is $20 or more but you have to opt in to get the rewards. The more you shop, the more you earn!
Last Chance Products
Click here to go straight to the Last Chance Products page on the Stampin’ Up! site!
Three New Stampin’ Up! Kits
Click each graphic below for more information about the kit.
Mountain Majesties Paper Pumpkin Kit
Did you know that Paper Pumpkin has moved to the Stampin’ Up! website? You can now order subscriptions and manage your subscription on the Stampin’ Up! website! If you’d like to subscribe, please click the graphic below.
An additional coordinating add-on is available but only for Paper Pumpkin subscribers. Click the image below for more information.
Thanks for stopping by today! Enjoy the rest of your weekend!
by Tracy | Apr 15, 2025 | Birthday Card
My card today was created using the Pattern of Friendship Stamp Set, Lovely Garden Designer Series Paper, the Textured Notes Dies, Exposed Brick 3D Embossing Folder and the Starburst Sequins.
I’ve mentioned this before, but if the links don’t work click them again! I had to click a link three times before it brought me to the right page.
Stampin’ Up! will be offline today, April 15th at 8:00 am (Mountain Time) for six hours. Visitors to the site will be redirected to a message about the planned downtime. Once the transition is complete the website will be available with the new Stampin’ Rewards program. The new Stampin’ Rewards program will reward customers with an order of $20 or more and you will now receive 10% in rewards. This new Rewards program will begin on April 15th once the Stampin’ Up! website is back up.


I started with a piece of Crushed Curry cardstock for the base of my card. I embossed a piece of Basic White cardstock using the Exposed Brick 3D Embossing Folder and my Stampin’ Cut & Emboss Machine. Then, I adhered it to the front of the card.


I cut two more pieces of Crushed Curry cardstock (you can find all the measurements I used below the Supply List) and two pieces of Lovely Garden Designer Series Paper and adhered them to the Crushed Curry cardstock. Then, I adhered them both to the front my card.


I stamped the sentiment onto Basic White cardstock using the Pattern of Friendship Stamp Set in Garden Green ink. I cut it out using the Textured Notes Dies. Then, I added Stampin’ Dimensionals to the back and adhered it to the front of the card.
To complete my card, I added three large Starburst Sequins to the front in Crushed Curry and added a piece of Basic White cardstock to the inside of the card.


Supply List
Below you’ll find all the Stampin’ Up! supplies I used for today’s card. If you need any stamping supplies, I’d love to be your demonstrator! You can place an order by clicking any of the images below to go to my Stampin’ Up! online store. The Specialty Plate is used with 3D Embossing Folders and Hybrid Embossing Folders.
Bundle Alert: The Pattern of Friendship Bundle is available with a 10% discount rather than buying the products separately.

Bundle Alert: The Textured Notes Bundle is available with a 10% discount rather than buying the products separately.
Measurements for Today’s Card
- Crushed Curry cardstock: 8-1/2″ x 5-1/2″ score at 4-1/4″
- Crushed Curry cardstock: 2-1/4″ x 3-3/4″
- Crushed Curry cardstock: 1-3/4″ x 3-1/4″
- Basic White cardstock (embossed and inside card): (2) 4″ x 5-1/4″
- Basic White cardstock (sentiment): approx. 3-1/2″ x 2″
- Lovely Garden Designer Series Paper: 2″ x 3-1/2″
- Lovely Garden Designer Series Paper: 1-1/2″ x 3″
Last Chance Products
Click here to go straight to the Last Chance Products page on the Stampin’ Up! site!
Three New Stampin’ Up! Kits
Click each graphic below for more information about the kit.
Mountain Majesties Paper Pumpkin Kit
Did you know that Paper Pumpkin has moved to the Stampin’ Up! website? You can now order subscriptions and manage your subscription on the Stampin’ Up! website! If you’d like to subscribe, please click the graphic below.
An additional coordinating add-on is available but only for Paper Pumpkin subscribers. Click the image below for more information.
Thanks for stopping by today!
by Tracy | Oct 10, 2024 | You're the Best
Today I’m sharing three more cards I made using the same layout I used on Tuesday. You can see Tuesday’s card here.
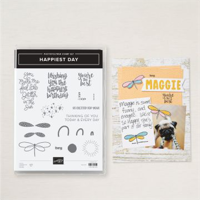
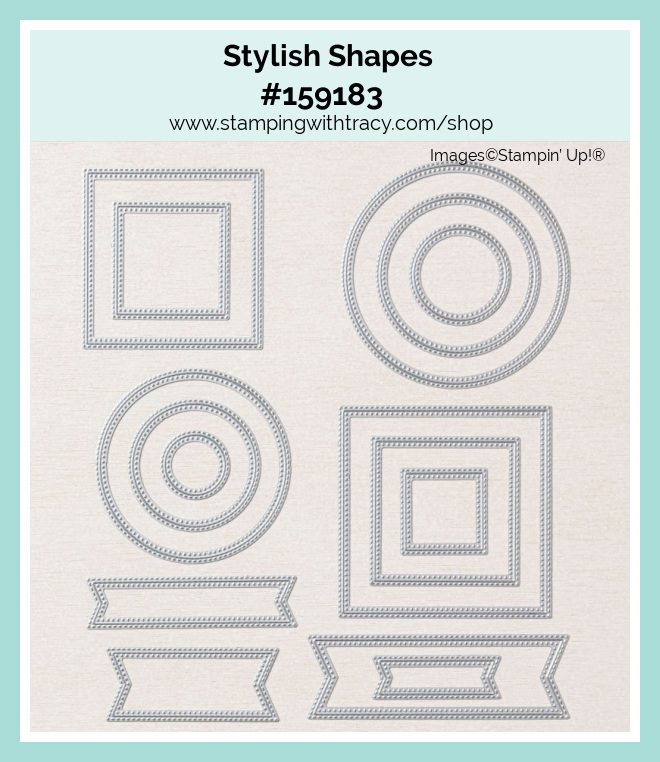
For this first card I used Perennial Lavender Designer Series Paper, Stylish Shapes Dies, Happiest Day stamp set and the Fern 3D Embossing Folder ( I used the Stylish Shapes Dies and the Happiest Day stamp set for all the cards).


I started with Pretty Peacock for the base of my card. Then, I embossed a piece of Basic White cardstock using the Fern 3D Embossing Folder and my Stampin’ Cut & Emboss Machine. I adhered the embossed cardstock on the inside flap of the card. Next I cut a piece of Perennial Lavender DSP and adhered it to the front of the card.


I stamped the sentiment onto Basic White cardstock using Pretty Peacock ink and the stamp set, Happiest Day. I cut it out using the Stylish Shapes Dies. Then, I cut a larger circle using the same dies out of Pretty Peacock cardstock. I adhered the sentiment to the Pretty Peacock circle. I added Stampin’ Dimensionals just at the top of the sentiment and adhered it to the DSP.

To complete my card, I added a piece of Basic White cardstock to the inside of the card. This is a quick and easy to make card!


For this next card, I also used Perennial Lavender Designer Series Paper and the Eyelet 3D Embossing Folder, Highland Heather cardstock and Gorgeous Grape ink.


For this final card, I used Regal Winter Designer Series Paper, Exposed Brick 3D Embossing Folder and Blackberry Bliss cardstock and ink.


Supply List
Below you’ll find all the Stampin’ Up! supplies I used for today’s card. If you need any stamping supplies, I’d love to be your demonstrator! You can place an order by clicking any of the images below to go to my Stampin’ Up! online store. The Specialty Plate is used with 3D Embossing Folders.
Measurements
- Blackberry Bliss, Pretty Peacock and Highland Heather cardstock: 11″ x 5-1/2″ scored at 3″ & 7-1/4″
- Blackberry Bliss Pretty Peacock and Highland Heather cardstock (under sentiment): approx. 2-1/2″ x 2-1/2″
- Basic White cardstock (inside): 5-1/4″ x 4″
- Basic White cardstock (embossed): 5-1/4″ x 3-1/2″
- Basic White cardstock (sentiment): approx. 2″ x 2″
- Regal Winter or Perennial Lavender Designer Series Paper: 5-1/4″ x 2-3/4″
Kits Collection Sale!
During the month of October, you can save up to 30% off Stampin’ Up! Kits. Each kit comes with everything you need to create an unique paper craft. Each kit is only available while supplies last. This promotion will end on October 31st. Click here to see all the kits Stampin’ Up! offers.

Starter Kit Special

From October 1–31, anyone who signs up to be a Stampin’ Up! demonstrator will get $155 worth of products in their Starter Kit for just $99! This offering also includes FREE business supplies and FREE shipping. The Starter Kit is for anyone – the business minded person or the person who wants to get at least a 20% discount on the products they buy! It’s a great deal for anyone! For more information, please click here!

Annual Catalog 2024-2052 Products
Stampin’ Up! has created a PDF of Designer Series Paper, Dies and Punches that can be found in the Annual Catalog. You can download (or print) the PDF here.
Two New Kits by Stampin’ Up!
Click each image below for more information about the kit. These new kits are also on sale!


To see all of the kits Stampin’ Up! offers, click here!
Online Exclusives

Click here to shop Stampin’ Up! Online Exclusives!
Last Day for Nests of Christmas Paper Pumpkin

Have you thought about subscribing to Paper Pumpkin? Now is the time to do it! You’ll get 40% off the first month when you subscribe by October 10th. Use the code HOLIDAY40. This is the last day you can sign up for the discount and the last day to order this kit.
Please read the terms below:
- This offer is only for new month to month subscribers.
- The discount will be applied to one kit in the first shipment of the Paper Pumpkin subscription. After your first box has arrived, each month’s kit will return to the regular price of $25.00
- You will receive the Nests of Christmas Paper Pumpkin kit. To get your first month 40% off you must use the code HOLIDAY40
- This offer expires on October 10, 2024.
Subscribe by clicking here or the image above.

An additional coordinating add-on is available but only for Paper Pumpkin subscribers. Click the image below for more information.

Thanks for stopping by today!