by Tracy | Jul 3, 2025 | You're Pretty Wonderful
I love the Sunflower Embossing Folder and the card I’m sharing today, it’s the focal point! I also used the Mixed Labels Bundle, Gold 1-1/2″ Open Weave Trim and Low Profile Dots. I also embossed the sentiment!


I started with a piece of Daffodil Delight cardstock for the base of my card. Then, I embossed another piece of Daffodil Delight cardstock and before adhering it to the card base, I wrapped Gold 1-1/2″ Open Weave Trim around the embossed cardstock and tied a knot. Then, I adhered the piece to the card front.


I heat embossed the sentiment and then cut it out using Mixed Labels Dies (you can find complete directions for heat embossing right above the Supply List). I added Stampin’ Dimensionals at the top and bottom (I didn’t want it to sit wonky on the Gold Open Weave Trim).


To complete my card I added three Low Profile Dots to the front of the card and added a piece of Basic White cardstock to the inside of the card.


How to Heat Emboss
Prepare your cardstock by rubbing the Embossing Buddy (an anti-static pouch that can be found in the Embossing Additions Tool Kit) over the surface of the paper as it helps keep away stray particles of embossing powder. Stamp your sentiment or image using a Versamark pad. This is very sticky ink and your embossing powder will stick right to it. Sprinkle embossing powder over the stamped image and then shake off any excess. Before applying heat to your paper, heat the Heat Tool first so your paper won’t warp (about 10 seconds). Direct the heat over your image and watch as your image becomes shiny and beautiful!
Supply List
Below you’ll find all the Stampin’ Up! supplies I used for today’s card. If you need any stamping supplies, I’d love to be your demonstrator! You can place an order by clicking any of the images below to go to my Stampin’ Up! online store.
The Specialty Plate is used with 3D Embossing Folders and Hybrid Embossing Folders
Measurements
- Daffodil Delight cardstock: 5-1/2″ x 8-1/2″ scored at 4-1/4″
- Daffodil Delight cardstock (embossed): 5-1/4″ x 4″
- Basic White cardstock (sentiment): approximately 3″ x 2″
- Basic White cardstock (inside card): 5-1/4″ x 4″
Month by Month Album Retreat 2025 Kit
The Month by Month Album Retreat 2025 Kit, is still available! This item is only while supplies last!


Last Chance Products

Click here to go straight to the Last Chance Products page on the Stampin’ Up! site!
Two New Stampin’ Up! Kits
Click each graphic below for more information about the kit. These kits can be found in the Online Exclusives part of the Stampin’ Up! website.


Sweeter With You Paper Pumpkin Kit
You can now order subscriptions and manage your Paper Pumpkin subscription on the Stampin’ Up! website! You can cancel your Paper Pumpkin subscription at any time. If you want to skip the next kit, you can do that! You also receive Stampin’ Rewards when you order a single kit or purchase a 3-month, 6-month or 12-month subscription to Paper Pumpkin. If you’d like to subscribe, please click the graphic below.

An additional coordinating add-on is available but only for Paper Pumpkin subscribers. Click the image below for more information.

Thanks for stopping by today!
by Tracy | Jan 8, 2025 | Birthday Card
Today I’m sharing a birthday card I made with the Beautiful Butterflies Bundle (sentiment & die), Wildflower Birthday Specialty Designer Series Paper (DSP), Party Dots and I did the sentiment in gold embossing powder.


I started with a piece of Night of Navy cardstock for the base of my card. Then, I added a piece of Wiildflower Birthday DSP to the front of the card.


I took one of the precut pieces in Wildflower Birthday DSP and adhered it to the front of the card.
I stamped the sentiment in Versamark ink onto Basic White cardstock using the Beautiful Butterflies stamp set. Then, I sprinkled gold embossing powder over the sentiment and then shook off the excess. I used my Heat Tool to melt the embossing powder. I cut the sentiment out using the Beautiful Butterflies Dies, added Stampin’ Dimensionals to the back and adhered it to the front of the card.


To complete my card, I added two Party Dots at each end of the sentiment and then added a piece of Basic White cardstock to the inside.

Supply List
Below you’ll find all the Stampin’ Up! supplies I used for today’s card. If you need any stamping supplies, I’d love to be your demonstrator! You can place an order by clicking any of the images below to go to my Stampin’ Up! online store.
Measurements
- Night of Navy cardstock: 11” x 4-1/4” scored at 5-1/2” OR 8-1/2” x 5-1/2” scored at 4-1/4” the only difference is how the card opens
- Wildflower Birthday Designer Series Paper: 5-1/4″ x 4″
- Wildflower Birthday Designer Series Paper (flowers): ready-to-use die cuts
- Basic White cardstock (inside) : 5-1/4″ x 4″
- Basic White cardstock (sentiment): scrap
Floral Delight Card Sampler

My Floral Delight Card Sampler is now available! When you use the host code 9GYPS93M and your order is a minimum of $60 (before shipping/tax), I’ll send you two each of three cards. To create this card sampler, I used Floral Delight Designer Series Paper and the With You in Mind stamp set to create this card sampler.
Here’s What You’ll Receive:
- All the paper and embellishments needed to make six cards. Envelopes will also be provided. For this Sampler you only need to provide a stamp set, ink and adhesive (see below for what you’ll need).
- A PDF Tutorial with instructions, pictures, cutting measurements and a complete supply list of all the products used.
- Earn at least one Bradley Point (earn ten Bradley Points and redeem them for free product) when your order is $50 or more.
- If your order is over $150, please do not use the host code or you won’t receive your Stampin’ Rewards. After you place your order, simply email me and let me know that you’d like the Floral Delight Card Sampler (you only need to do this if your order is over $150). You can send me an email on the sidebar.
All the Other Important Information:
- Your Floral Delight Card Sampler will be shipped first-class mail approximately January 23, 2025 and will be mailed to the address used on your online order.
- You’ll receive an email when I mail your Card Sampler and the PDF Tutorial will be included in that email.
- When using the Floral Delight Card Sampler host code to place your order, you will not qualify for other current host code rewards.
- Per Stampin’ Up! policy, card samplers can only be mailed within the United States.
You’ll receive all the materials to make six cards. You’ll quickly have beautiful cards ready to be mailed out to someone special. If you can’t make the cards once they arrive, no worries, each card is labeled in its own clear envelope which makes it easy to come back to later. Once you’ve made all the cards in the Sampler, you’ll be able to easily replicate each card by following the easy to follow directions in the PDF (pictures are included as well).
The special Floral Delight Card Sampler HOST CODE will close at the end of the day on January 13, 2025 and after that date, the Card Sampler will no longer be available.
Approximate ship date of the Card Sampler is January 23, 2025.
For more information about the Card Sampler and the supplies you’ll need to complete it, please click here.

Last Chance Products
Click here to go straight to the Last Chance Products page on the Stampin’ Up! site!
Three New Stampin’ Up! Kits
Click each graphic below for more information about the kit.


Paper Pumpkin Kit – Hearts For You

An additional coordinating add-on is available but only for Paper Pumpkin subscribers. Click the image below for more information.

Thanks for stopping by today!
by Tracy | Jan 3, 2025 | Valentine's Day Card
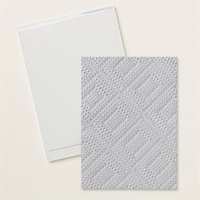
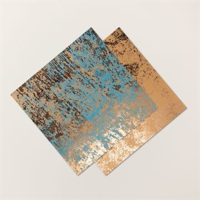
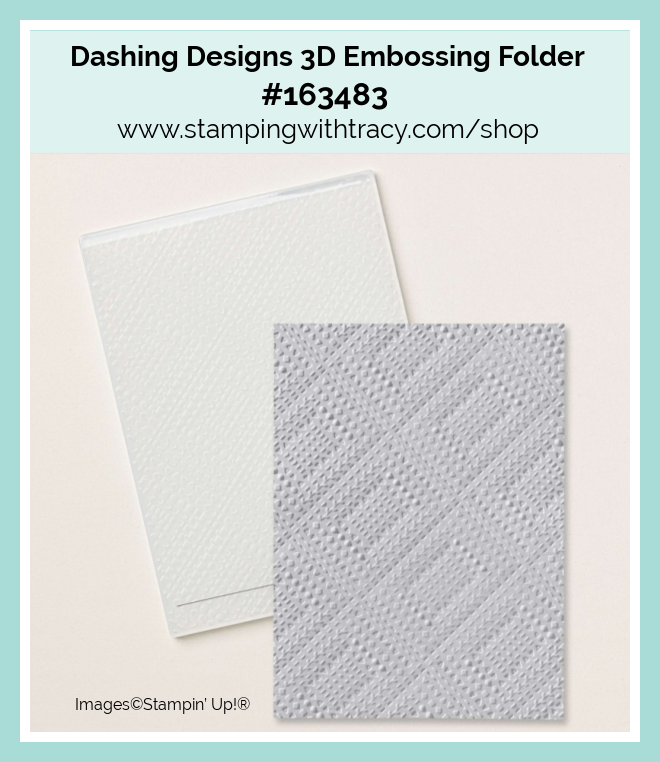
I have another card to share with you today using the Hearts of Elegance Bundle. I also used Marbled Elegance Specialty Designer Series Paper, Countryside Corners Dies, Dashing Designs 3D Embossing Folder, Gold Foil Sheets and the Adhesive-Backed Heart Sequins. I also added gold embossing to the sentiment.


I started with Real Red cardstock for the base of my card. Then, I embossed a piece of Basic White cardstock using the Dashing Designs 3D Embossing Folder and my Stampin’ Cut & Emboss Machine. Next, I adhered the embossed Basic White to the front of the card.


I cut two pieces of Marbled Elegance Designer Series Paper and adhered them to the front of the card. Next, I cut a piece of Gold Foil and embossed a smaller piece of Basic White cardstock using the Dashing Designs 3D Embossing Folder. I glued the embossed Basic White cardstock to the gold foil and then adhered it to the front of the card.


I used the Hearts of Elegance Dies to cut a piece of Real Red cardstock to make my heart. I love the details on the heart! Then I adhered the heart to the front of the card. I stamped the sentiment in Versamark ink using the Hearts of Elegance stamp set. I sprinkled gold embossing powder to the sentiment, shook the excess off and then applied my heat tool to the sentiment. I cut it out using the Countryside Corners Dies, added Stampin’ Dimensionals to the back (but only in the middle) and adhered it to the front of the card. I added two small hearts at each end of the sentiment.
To complete my card, I added a piece of Basic White cardstock to the inside.


Supply List
Below you’ll find all the Stampin’ Up! supplies I used for today’s card. If you need any stamping supplies, I’d love to be your demonstrator! You can place an order by clicking any of the images below to go to my Stampin’ Up! online store. The Specialty Plate is used with 3D Embossing Folders.
Measurements
- Real Red cardstock: 11” x 4-1/4” scored at 5-1/2” OR 8-1/2” x 5-1/2” scored at 4-1/4” the only difference is how the card opens
- Real Red cardstock (heart): scrap
- Basic White cardstock (embossed): 5-1/4″ x 4″
- Basic White cardstock (smaller embossed): 3-3/4″ x 2-1/4″
- Basic White cardstock (inside): 5-1/4″ x 4″
- Gold Sheet: 4″ x 2-1/2″
- Marbled Elegance Designer Series Paper: (2) 2-1/2″ x 2-1/2″
Last Chance Products
Click here to go straight to the Last Chance Products page on the Stampin’ Up! site!
Special Release of Three Designer Series Papers
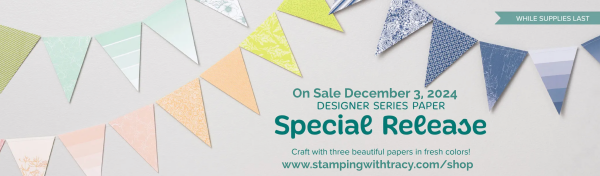
Click here to see the new papers in the Online Exclusives part of the Stampin’ Up! Online Store
Two New Stampin’ Up! Kits
Click each graphic for more information.


Paper Pumpkin Kit – Hearts For You
An additional coordinating add-on is available but only for Paper Pumpkin subscribers. Click the image below for more information.
Thanks for stopping by today!
by Tracy | Dec 28, 2024 | Valentine's Day Card
I hope everyone had an enjoyable holidays! I was so exhausted the day after Christmas that I just sat on the couch all day, relaxing! If you celebrate Hanukkah, you’re still celebrating! Happy Holidays to all!
I’m sharing another Valentine’s Day card using the Hearts of Elegance Bundle, Countryside Corners Dies, Distressed Tile 3D Embossing Folder, Adhesive-Backed Heart Sequins, Marbled Elegance Specialty Designer Series Paper and I added gold embossing powder to the sentiment. I posted another Valentine’s Day card earlier this week and you can see it here.

I started with a piece of Melon Mambo cardstock for the base of my card. Then I embossed a piece of Basic White cardstock and embossed it using the Distressed Tile 3D Embossing Folder and my Stampin’ Cut & Emboss Machine. Next, I adhered it to the front of the card.


Then, I used the Hearts of Elegance Dies to cut a heart out of Marbled Elegance Specialty Designer Series Paper and then adhered it to the front of the card. Next, I embossed the sentiment using the Hearts of Elegance stamp set with gold embossing powder and then cut it out using the Countryside Corners Dies. I added Stampin’ Dimensionals to the back and adhered it to the front of the card.

To complete my card, I added five small Adhesive-Backed Heart Sequins to the front of the card and I added a piece of Basic White cardstock to the inside of the card.

Supply List
Below you’ll find all the Stampin’ Up! supplies I used for today’s card. If you need any stamping supplies, I’d love to be your demonstrator! You can place an order by clicking any of the images below to go to my Stampin’ Up! online store. The Specialty Plate is used with 3D Embossing Folders.
Measurements
- Melon Mambo cardstock: 11” x 4-1/4” scored at 5-1/2” OR 8-1/2” x 5-1/2” scored at 4-1/4” the only difference is how the card opens
- Basic White cardstock (embossed and inside card): (2) 5-1/4″ x 4″
- Basic White cardstock (sentiment): scrap
- Marbled Elegance Designer Series Paper: approx. 4-1/2″ x 4″
Last Chance Products
Click here to go straight to the Last Chance Products page on the Stampin’ Up! site!
I always check my links to be sure they get you where you need to go but this link has been glitchy. Try it again if it doesn’t work.
Host Code – You Choose Between Faceted Gems Trio Pack or Purple Fine Shimmer Gems
Very Important: If your order is over $150, please do not use this host code because you will forfeit your Stampin’ Rewards! I will ask you which package you would like when I send my thank you email.

Special Release of Three Designer Series Papers
Click here to see the new papers in the Online Exclusives part of the Stampin’ Up! Online Store
Two New Stampin’ Up! Kits
Click each graphic for more information.
Paper Pumpkin Kit – Hearts For You
An additional coordinating add-on is available but only for Paper Pumpkin subscribers. Click the image below for more information.
Thanks for stopping by today! Have a relaxing and fun weekend!
by Tracy | Dec 13, 2024 | Thank You Card
The card I’m sharing with you today was made using Regal Winter Designer Series Paper (this paper is on the Last Chance List and is on sale), Everyday Greetings stamp set, Oxidized Copper Specialty Designer Series Paper, Nested Essentials Dies, Regal Foiled Adhesive-Backed Dots and I added some gold embossing powder to the sentiment.


I started with a piece of Cherry Cobbler cardstock for the base of my card. Then I added a piece of Regal Winter Designer Series Paper to the front of the card (you can find the measurements I used to make this card below the Supply List).


Next, I added a piece of Regal Winter DSP to the front of a piece of Oxidized Copper Specialty DSP, added Stampin’ Dimensionals to the back and adhered it to the front of the card.


I stamped the sentiment in Versamark ink onto Basic White cardstock, sprinkled gold embossing powder over the sentiment and heated it with my Heat Tool (if you’ve never embossed before, you should try it! I have directions below if you want to give it a try). I cut the sentiment out using the Nested Essentials Dies, added Stampin’ Dimensionals to the back and adhered it to the front of the card.
To complete my card, I added three Regal Foiled Adhesive-Backed Dots below the sentiment and added a piece of Basic White cardstock to the inside.


How to Heat Emboss
Prepare your cardstock by rubbing the Embossing Buddy (an anti-static pouch that can be found in the Embossing Additions Tool Kit) over the surface of the paper as it helps keep away stray particles of embossing powder. Stamp your sentiment or image using a Versamark pad. This is very sticky ink and your embossing powder will stick right to it. Sprinkle embossing powder over the stamped image and then shake off any excess. Before applying heat to your paper, heat the Heat Tool first so your paper won’t warp (about 10 seconds). Direct the heat over your image and watch as your image becomes shiny and beautiful!
Supply List
Below you’ll find all the Stampin’ Up! supplies I used for today’s card. If you need any stamping supplies, I’d love to be your demonstrator! You can place an order by clicking any of the images below to go to my Stampin’ Up! online store.
Please note: The sale price on the Regal Winter Designer Series Paper is only available while supplies last!
Sale: $11.25
Price: $12.50
Measurements
- Cherry Cobbler cardstock: 8-1/2″ x 5-1/2″ score at 4-1/4″
- Oxidized Copper Specialty Designer Series Paper: 4″ x 3″
- Basic White cardstock (inside card): 5-1/4″ x 4″
- Basic White cardstock (sentiment): scrap
- Regal Winter Designer Series Paper: 5-1/4″ x 4″
- Regal Winter Designer Series Paper: 3-3/4″ x 2-3/4″
New Host Code
Very Important: If your order is over $150, please do not use this host code because you will forfeit your Stampin’ Rewards! I will ask you which package you would like when I send my thank you email.
Last Chance Products
Click here to go straight to the Last Chance Products page on the Stampin’ Up! site!
Special Release of Three Designer Series Papers
Click here to see the new papers in the Online Exclusives part of the Stampin’ Up! Online Store
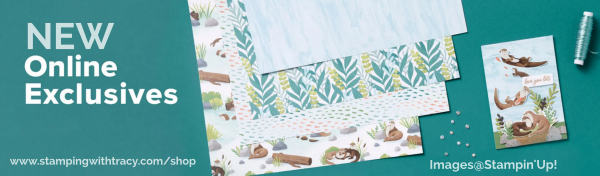
New Online Exclusives
New Online Exclusives went live November 5th. Click here to see what’s in our Online Exclusives part of the website!
Two New Stampin’ Up! Kits
Click each graphic for more information.
Paper Pumpkin Kit – Hearts For You
An additional coordinating add-on is available but only for Paper Pumpkin subscribers. Click the image below for more information.
Thanks for stopping by today! Enjoy your weekend!