
Stampin’ Up! Framed For You
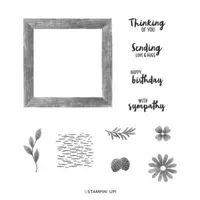
To create today’s card, I used a technique called masking and it features the stamp set, Framed For You.

The base of my card is Thick Whisper White cardstock with a layer of Magenta Madness cardstock.The top layer is our regular Whisper White cardstock. I took a piece of Blue Painter’s Tape (you can find this at the grocery store, Target or probably even a drug store) and made it a little bit longer than my Whisper White cardstock, so about 6-1/2″. Before taping it to my cardstock, I taped it to my arm (sounds silly, I know). I did this several times to get some of the stickiness off the tape. If you’re wearing long pants. that will work too. You’ll want to do this step because if the tape is too sticky, it will rip your paper when you remove it. After doing that process several times, I placed the tape in the middle of my cardstock because that’s where I wanted the sentiment to be.

Next, I stamped the flowers and leaves in Magenta Madness, Daffodil Delight and Old Olive ink using the stamp set, Framed For You. Because I wanted the flowers and leaves to look as though they were behind the sentiment, I stamped so that some of each image was on the Whisper White cardstock and some on the blue tape. Once I finished, I carefully pulled the blue tape off the paper. Voila! A masterpiece! Just a word of warning, the ink will be sitting right on top of the tape, so be careful where you put it once you remove it (ask me how I know).

Next, I stamped the sentiment in Memento Ink using the stamp set, Celebrate Sunflowers. If you wanted, you could always stamp your sentiment first and then place the blue tape over it.

To complete the card, I added three Artistry Blooms Sequins. These are so easy to use because they have adhesive on the back!


I hope you’ll give this technique a try! I had to practice several times because I didn’t like where I placed the flowers and leaves. You might want to practice on a piece of computer paper cut to the size of the cardstock you’ll be using. I did that and once I was happy with my results, I just looked at my practice piece and replicated it. Have fun!!
Supply List
If you need any stamping supplies, I’d love to be your demonstrator! You can place an order by clicking any of the images below to go to my Stampin’ Up! online store. If you have questions about products you’re considering purchasing or ones you’ve already purchased, I’m just an email away (click the Email Me button on the sidebar of my blog).


Non-Stampin’ Up!: Blue Painters Tape
Measurements
- Thick Whisper White cardstock: 11″ x 4-1/4″
- Magenta Madness cardstock: 5-1/4″ x 4″
- Whisper White cardstock: 5″ x 3-3/4″
June Mini Card Sampler
Receive my FREE Mini Card Sampler when you place a minimum $35 order at my Stampin’ Up! online store using the host code ECXAHDJY and I’ll send you three card kits along with a PDF Tutorial. Click here for all the information. Offer valid until Monday, June 29, 2020.


There are only a few days left to take advantage of the Starter Kit Promotion. Purchase the Starter Kit before June 30, 2020 and you’ll be able to add ANY bundle in the catalog, this is in addition to choosing $125 worth of products AND the Starter Kit ships FREE. The Starter Kit is absolutely risk free and such a great deal! If you’d like more information, click here!
People purchase the Starter Kit for all kinds of reasons whether it’s to start a business or just purchase for themselves and get a discount. Mary, who recently purchased the Starter kit had this to say: ” I had no idea that I could do the starter kit without selling to others”

Tracy’s Quick Links


