by Tracy | Mar 2, 2015 | Uncategorized
Happy Monday! Hope you had a nice weekend! I’m throwing a Baby Sprinkle (fun name for a shower for a second baby) for my daughter this weekend. I spent this past weekend making some things for it. I will share those projects with you after the shower!
Last week my friend, Cheryl, who also happens to be on my Stampin’ Up! team, came over to my house. She had commented on the notepads I made during the blog hop (click here to see them) so I pulled out a notepad for her and this is what she created! Isn’t it pretty!?!!

Cheryl used the Designer Series Paper, Best Year Ever, which you can earn FREE with a $50 order. It pairs nicely with Coastal Cabana and Calypso Coral cardstock. The sentiment is from the stamp set, Hello There, which is a hostess set. There are two ways to earn this set:
1. Place your own personal order of $150 and you’ll receive $25 in Hostess Dollars. This set can be purchased with those free dollars! You would also earn THREE Sale-a-bration items! Sale-a-bration is over on March 31st, so if you have a long wishlist, you can receive many freebies with your $150 order.
2. Host a party and once the sales hit $150, you as the hostess will earn Hostess Dollars.
If you have any questions about Cheryl’s notepad cover, don’t hesitate to ask!
Have a great day!
Product List – Click on the items below to be taken to my Stampin’ Up! online store. Please note that the prices for the Hello There stamp set, are Hostess Dollars prices and can only be purchased as noted above.
by Tracy | Feb 26, 2015 | Uncategorized

I made a card very similar to this one the other day. My card today is all about a beautiful shade of green – Wild Wasabi! I paired it up with a sheet of paper from the Painted Blooms Designer Series Paper pack. This card was given to a customer who placed an order this month!
My sentiment comes from the set And Many More. If you are looking for a versatile stamp set, this is it!

And Many More
Wood #134273
Clear #134276
Tip: When making this card, make several at a time. When you cut out your butterfly, you will use that same piece you cut it out of, for the front of the card. Your butterflies and card fronts will be ready when you are to create a card.
Thanks for stopping by! Go create!
Product List- Click any item below to be taken to my Stampin’ Up! online store.
by Tracy | Feb 25, 2015 | Uncategorized
As I was walking through the grocery store the other day, I saw a new product, Ghirardelli Milk Chocolate Eggs. I quickly knew I had to make a project with them! I am from the San Francisco Bay Area where they make Ghirardelli chocolate so I have an immense fondness for their candy. I’m a an expert on chocolate and it is delicious! 🙂

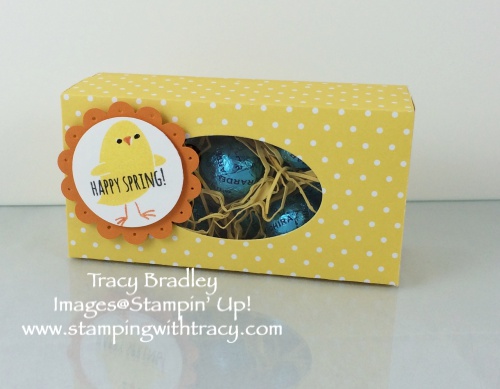
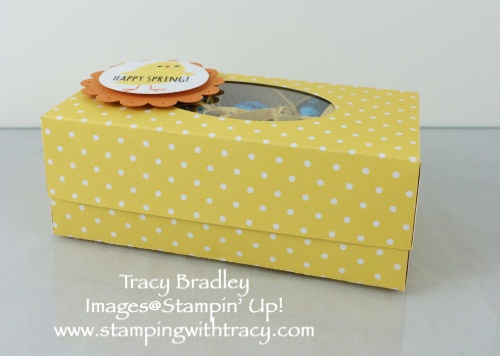
I thought that Daffodil Delight would look nice next to the blue foil eggs so I used the Brights Designer Series Paper Pack which includes Daffodil Delight. Here are the box dimensions that I came up with:
Bottom of the box: 5″ x 7″ Score each side at 1-1/2″
Top of the box: 4-1/8″ x 6- 1/8″ Score each side at 1″
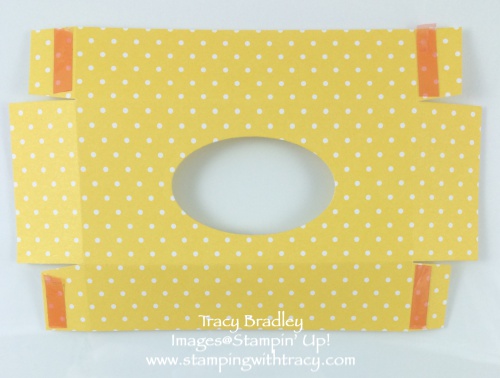
Once your paper has been scored, there’s some cutting and trimming to be done. It is hard to see the score lines in my picture below, but I have cut on a score line, up to a score line. If you are making this while reading, you will understand what I mean. Then cut about half of each tab off (it does not need to be exact) and cut a very small notch. These two steps will help as you assemble the box.

I decided to add a window to the top of my box, so I used the smallest oval in the Oval Framelits and then covered it with a small piece of a Window Sheet. I used glue dots to attach it to the box.
The next step is to add Sticky Strip to each of the places I’ve shown. Be sure it is right next to the score line. If you have Fast Fuse, that will work too!

The last step is to peel the Sticky Strip off and assemble your box. I finished it off by adding a cute little chick from the set For Peeps’ Sake. I masked off the chicks legs as I stamped him in Daffodil Delight. I took the tape off and colored his legs with a Pumpkin Pie Stampin’ Write marker, huffed on the stamp to reactivate the Daffodil Delight and stamped him onto Whisper White cardstock. My sentiment comes from the set From the Garden which I just stamped across the chick with Memento Ink. I colored his eyes and beak with Stampin’ Write markers. Not all of the Stampin’ Write Markers can be purchased individually, but the Basic Black and Pumpkin Pie are available this way.
As I mentioned, I used Designer Series Paper. The eggs are a bit heavy so I added a 2″ x 4″ piece of Daffodil Delight cardstock to place at the bottom of the box for a little more stability. Next time, I think I would make the bottom of the box using cardstock and DSP for the top.
This really is a pretty easy box to make. Give it a try and you’ll see what I mean!
Thanks for stopping by!
Product List- Click any item to be taken to my Stampin’ Up! online store
by Tracy | Feb 24, 2015 | Uncategorized
Starting on March 1st, there will be FOUR new Sale-a-bration items to choose from! This is the first time that Stampin’ Up! has introduced new products once Sale-a-bration has begun. As always, with each $50 purchase (before shipping/tax), you can pick a Sale-a-bration item. Spend $100, choose 2 items. There’s no limit!


Here are some cute projects with these new products.

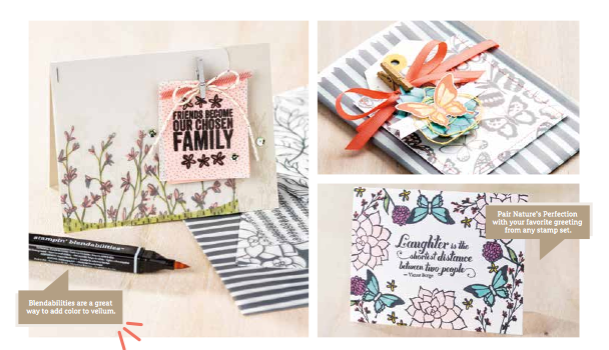
I think my favorite is the big THANKS in the set For Being You! Can’t wait to color it in with my Blendabilities!
It’s Tuesday and that means new Weekly Deals! Click on any item and you’ll be taken to my online store!

by Tracy | Feb 23, 2015 | Uncategorized
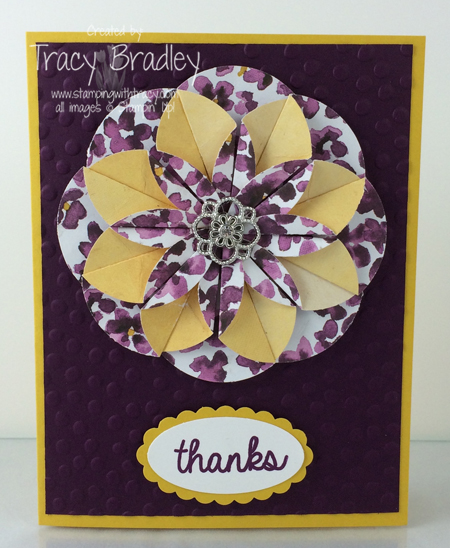

I had so many nice comments last week when I showed my Dahlia card during the Glitter Queens blog hop that I decided to make one more. They are actually quite addictive so I can guarantee that you’ll see more in the near future.
I used another sheet from the Painted Blooms DSP pack. One of the things that I love about Stampin’ Up! Designer Series Paper is that you’ll always know what colors coordinate with it. In the catalog, below the description, it lists all the color that will work beautifully. The colors can also be found on the back of the paper pack. I use this as a reference, all the time. In this particular pack it states that Daffodil Delight is one of the coordinating colors. I did try that for my card base but I wasn’t happy with it so instead opted to use Crushed Curry. I think both colors would work just fine though.
My cute sentiment cannot be purchased as it came in my Paper Pumpkin kit this month. I love getting new sentiments in my kit each month!
If you’d like to try your hand at making one of these flowers, I made a picture tutorial in a previous post that you can access here! If you make one, please feel free to email me with your creation. I would love that!
Thank you for stopping by my blog today!
Product List – Click on any item below to be taken to my Stampin’ Up! online store.
by Tracy | Feb 21, 2015 | Uncategorized
Thank you so much to everyone who left a comment on my blog during the blog hop. I can’t begin to tell you how much I appreciate every comment that I receive. Thank you!

And now on to the winner of the stamp set Best Day Ever and the Lucky Stars embossing folder. I put all your names into a bag and had my husband pull out the lucky name: The winner is:
Lynn Gauthier
Lynn said, “All your projects and cards are awesome. I really enjoyed learning the dahlia fold. I love flowers and I am going to try this technique this weekend. Your post it notes are awesome too!
Thanks so much for sharing with us!!!!”
Lynn, please email me (tracy@stampingwithtracy.com) your mailing address and I’ll mail your goodies off on Monday. Lynn will also receive the Dahlia card I posted!
Have a wonderful weekend! I hope you’ll stop by on Monday!


