A fun new product in the Stampin Up! Holiday Catalog are the Mini Pizza Boxes!! Oh my gosh, these are so cute and you can do so much with them!
The boxes measure 3-1/2″ x 3-1/2″ x 1″ and they’re food safe, so you can place a cookie inside. They’re also perfect for 3″ x 3″ notecards and envelopes! Stampin’ Up! retired these envelopes a few years ago but they’re back in the Holiday Catalog and just the right size for the Mini Pizza Boxes. Some other ideas for these boxes: earrings, bracelets, necklaces, candy, tea light candles, to name just a few.
I decorated my box with the gorgeous Painted Autumn Designer Series Paper and wrapped it up with our Linen Thread. I added a Garden Green and Vellum butterfly, made with the Move Me Thinlits.
Details and Measurements
Garden Green Cardstock 3-1/4″ x 3-1/4″
Painted Autumn Designer Series Paper 3″ x 3″
Here are more cute ways from Stampin’ Up! to dress up these boxes!
These boxes are just too cute! They are so easy to assemble and lay flat until you’re ready to use them so they take up very little space.
If you’d like to place an order for the Mini Pizza Boxes and/or the products I used to create today’s project, click on the items below and you’ll be directed to my Stampin’ Up! online store.
Welcome to Tool Time Tuesday! It’s that time of the week when I choose a tool in the Stampin’ Up! catalog to spotlight. This week’s tool is a must for every cardmaker – a bone folder!
When you create a card for someone, you want it to look its best and a bone folder will give your folds a crisp, clean look. If you’ve ever tried to fold card stock without one, as I’ve done on occasion when I’m not sure where I set my bone folder down, the fold looks cracked. I prefer attention to the front of my card, not on a fold that doesn’t look quite right.
One end of the bone folder is pointed and it can also be used in the groove of a paper cutter or scoring tool to score your card stock (another option for scoring is to use the Stampin’ Trimmer which comes with a scoring blade). Once you’ve created the score line, it’s easy to fold the cardstock. Use the flat edge of the bone folder to press down on the fold and achieve that crisp look!
Our linen thread is wrapped around a piece of cardboard in its packaging and sometimes there are kinks in the thread. Placing the bone folder against the thread, pull the bone folder towards you to straighten the thread out. (I did just that on the project I’ll be sharing tomorrow). When punching leaves or flowers out of cardstock, you can do this same thing with the bone folder. It will break down the fibers making the paper curl.
I think most stampers will agree that they’d be lost without a bone folder!
Several weeks ago in a Tool Time Tuesday installment, I talked about using Stampin’ Up! refills and the Baby Wipe Technique. Today’s card was made using that technique and I’d like to show you how easy it is to create your own stamp pad!
Choose your colors. I used Crushed Curry, Cajun Craze and Pumpkin Pie (these are my go to Fall colors).
Take 4-5 Baby wipes (it’s better if they don’t have a design on them) and fold them in half and then in half again. Take the lightest color, in my case, Crushed Curry, and add drops all over the wipe.
Next, add the next color (I used Pumpkin Pie) and start to fill in the area. Pretty easy so far, right?
And the last step is to take your remaining refill (Cajun Craze) and fill in all the white space. As you can see, I didn’t completely cover it up every last bit of space. This creates your stamp pad.
Now take your favorite stamp and ink it up with your faux stamp pad and stamp it on your paper! You’ll love the results and you’ll have a one of a kind card!
This card was made right after the one at the top of today’s post and you can see that it’s a bit lighter but no less beautiful.
Then, as an experiment, I spritzed the “stamp pad” and this was the result!
If you’re feeling inspired to give this a technique a try, I’d love to see what you create! You can email me or post it on my Stamping with Tracy Facebook page!
It’s the weekend! Yay! I hope you have something fun planned or you’re just taking the time to relax.
I have one more stained glass foil leaf card today. Creating these leaves is extremely addicting! My team leader, Dawn Griffith, issued a challenge to make a card using a layout she used to create a Christmas card and this was the card I created. I made quite a few changes from the original layout but kept the three panels and the foil behind them. I was on a roll making stained glass foil leaves so it was only natural that I’d make a fall card!
If you’re interested in knowing how I created the leaves, take a look at this post here.
Card Details
Start with a piece of Very Vanilla cardstock measuring 11″ x 4-1/4″ and score it at 5-1/2″
Attach a piece of Copper Foil measuring 3-7/8″ x 5-1/8″ to the front of the Very Vanilla cardstock using Fast Fuse (Snail isn’t a good choice with foil).
Attach three panels of Designer Series Paper to the foil measuring: 1-1/2″ x 5-1/8″, 1-1/4″ x 5-1/8″ and 7/8″ x 5-1/8″. I used Painted Autumn DSP from the Holiday Catalog.
Cut out two solid leaves from the Seasonal Layers Thinlits using Cardstock Vellum. Cut out two leaves with the detailed die using Copper Foil. I used Cajun Craze and Crushed Curry ink to create the stained glass look.
Attach glue dots to the back of your leaves near the edges. Be sure not to place them on the open areas of the vellum as you’ll be able to see them.
Stamp the sentiment in Memento Ink using the stamp set Bunch of Blossoms. Cut it out using the Stitched Shapes Framelits.
Attach the sentiment to a Copper Foil scallop using the Layering Ovals Framelits. Use Fast Fuse or Sticky Strip (Snail doesn’t work well with the foil).
Send your card off to someone special!
Enjoy the rest of your weekend! Even though my beloved San Francisco Giants have had an awful season, I’m still excited to see them play at AT&T Park tomorrow! I’ll be back on Monday!
Click on any item and you’ll head over to my Stampin’ Up! Online Store
There’s a brand new host set and it’s only available in September and October!
Merry Patterns Host Promotion Stamp Set
Available with any order of $300 or more.
You can receive this stamp set by placing your own personal order of $300, by October 31st, or by encouraging your friends and family to also place orders.
Here’s how it works:
Share your catalog with your friends & family and encourage them to place orders! If you don’t have a catalog yet, let me know and I’ll send one off to you!
I’ll create a host code just for you and your friends to use, with you as the host.
Each of your friends and family will place their own online order using the special host code JUST FOR YOUR GROUP. Everyone’s orders will ship directly to their home.
If all of the orders combined total at least $300, you’ll receive the stamp set free, plus you’ll receive at least $36 in Host Rewards!! You can order anything in the catalog with the Host Rewards, including Host stamp sets.
Contact me today if you’d like to set this up or if you have additional questions!
Enjoy this video from Stampin’ Up! showcasing the host set, Merry Patterns, yours for free with a $300 qualifying order before October 31st! If you’re reading this in an email, click here, to view the video.
If you have any questions about this promotion, don’t hesitate to contact me!
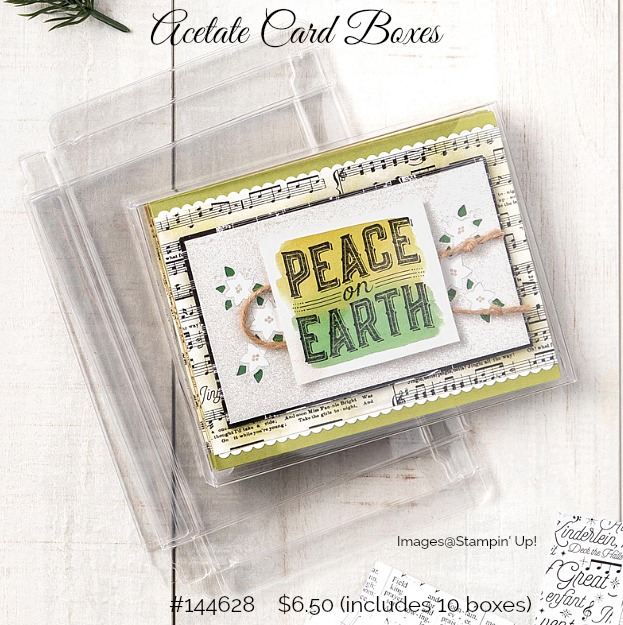
Have you seen the Acetate Card Boxes in the Holiday Catalog? If you’re not looking carefully, you might totally miss them! They’re clear acetate boxes and each box will hold five standard cards plus envelopes but I decided to use them in a different way! Sometimes, it’s really ALL about the candy!
As you can see, you can fit quite a lot of Reese’s Peanut Butter Cups inside. After making this and shooting photos of it, I noticed that I could have fit many more inside, which I did, and then photographed it again!! Gotta cram as many in as you can!
Box Details **Can be found in the Holiday Catalog
I wrapped the box up with the beautiful Vintage Crochet Trim.**
I stamped the sentiment using Very Vanilla cardstock, Memento Ink and a stamp from the set, Labels to Love**, which coordinates with the Everyday Label Punch.**
Our Black Rhinestone Jewels** on the tag finish the project!
What a quick and easy way to make a gift to give to someone special!
All of the products I used to make today’s project are listed below. Clicking on any of them will take you to my Stampin’ Up! online store!
I love hearing from you whether it’s a question or a comment about today’s project. Have a great day!
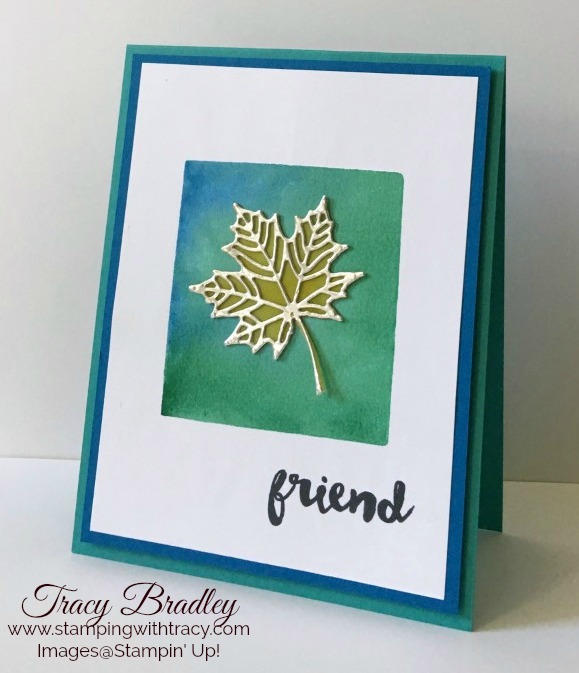
Earlier this week I shared a card with leaves made using copper foil and today I have one using silver foil. Just as beautiful, don’t you think?? It sure looks like gold in the pictures below but it really is silver.
Are you wondering how I created my blue/green rectangle? I used a clear stamp block (size D) and two stamp pads. Using Emerald Envy and Pacific Point stamp pads, I applied ink directly to my clear block and then using a spritzer, lightly misted the block. I placed the block onto Thick Whisper White card stock and let it sit for five minutes. I placed a book on top of it for just a small amount of pressure. When the five minutes was up, I carefully removed the block. Your results will be different with the amount of water you spritz on the block and you may have to try it a few times to get a feel for it.
My paper did warp a bit and I tried to flatten it out by placing quite a few heavy items on top of it after it had thoroughly dried. I also used my heat tool on both sides. As I’m writing this, I realize I could have taped my paper down with blue painters tape and that would have helped with the warping. It wasn’t too much of a problem but if you’re worried about it, I’d try taping it down. I wouldn’t suggest using regular Whisper White paper as it won’t accept the water very well. Watercolor paper or our Shimmery White are both other options.
The stained glass look of the leaf was created with vellum card stock. I explain how I created the leaf in Monday’s post and you can read all about it here. So easy and so pretty!
My sentiment comes from a stamp set that I reach for all the time and it’s included in the Oh Happy Day Card Kit. Unfortunately you can’t purchase the stamp set separately but the kit is filled with enough supplies to make 20 cards, a Basic Black Stampin’ Spot and a clear stamp block.
I went and took another pictures of my card and think this one shows that I used silver a bit better.
Stamping Supplies – Below you’ll find the list of Stampin’ Up! products I used to create today’s card. Click on any of the items and you’ll be directed to my Stampin’ Up! online store!
I always love hearing from you whether it’s a comment about today’s project or a question! Have a great day!
Having the right tools to clean your rubber stamps is a must and Stampin’ Up! has the perfect combination for this job – Stampin’ Scrub and Stampin’ Mist!
The Stampin’ Scrub has two removable scrub pads that each measure 7″ x 7″. On one pad you’ll spray Stampin’ Mist and rub your rubber stamp back and forth to get it nice and clean. On the other side, you’ll rub the stamp back and forth across the pad and it will dry your stamp. You’ll find a notch in one corner of each pad where you’ll see raindrops or a sun. You’ll spray the Stampin’ Mist only on the raindrop side and dry your stamp on the sun side. Not only does Stampin’ Mist clean your stamps but it also conditions them as well which is definitely a bonus as I know you want to protect the investment you’ve made!
To clean the pads, simply remove them from each tray and run them under the faucet. Continue to do this until the water runs clear. I like to stand them up against something to air dry them and I’ve found that I usually have to repeat this process a few times. You’ll think it’s clean but when you run it under the faucet a second time, you’ll see that ink is still trapped inside the fibers.
I love this product for cleaning my rubber stamps but I prefer not using it when cleaning my photopolymer stamps. I’ve found that the ink trapped in the pads tend to discolor my photopolymer stamps. Now, if this doesn’t bother you, go for it!
In case you were wondering, I use unscented baby wipes to clean my photopolymer stamps. The minus with this system is that my hands tend to get a lot of ink on them but hey, it makes me feel creative! An artist at work (says the person who never felt she was creative until using Stampin’ Up! products)!
These two tools can be purchased at my Stampin’ Up! online store. As of today, Stampin’ Scrub is on the low inventory list and may go on backorder soon so if you’re interested, I would place your order as soon as you can. Don’t forget to use the September Host Code to receive a gift from me!
I hope this information was helpful. If you have any questions, don’t hesitate to contact me!
I learned how to make these absolutely beautiful leaves and haven’t been able to stop. They are so easy but the results are over the top!
In the Seasonal Layers Thinlits, there are two leaf dies. One is detailed, the other is an outline and you’ll need both of them. The detailed one on my card is cut out using Copper Foil. It comes in a 2 sheet package and each one is 12″ x 12″. Before running it through the Big Shot, I adhered a small piece of a Multipurpose Adhesive Sheet to the foil to make the back sticky.
Next, the outline of the leaf is cut out using Vellum cardstock. To achieve that stained glass look, using a sponge dauber and a stamp pad, add color to the vellum. Attach the copper leaf to the vellum and you’ve got a gorgeous leaf! Can you believe how easy that is??!!
More Details
The sentiment comes from the stamp set Colorful Seasons (it can be purchased as part of the Colorful Seasons bundle or separately). It was inked up with Memento ink onto Very Vanilla cardstock and cut out with the Stitched Shapes Framelits.
The top layer of Very Vanilla cardstock was run through the Big Shot using the Pinewood Planks embossing folder.
The leaves were colored with ink daubers and cardstock vellum using Cajun Craze, Pumpkin Pie and Crushed Curry stamp pads.
The base of the card is Thick Very Vanilla cardstock and the second layer is Crushed Curry.
If you give these leaves a try, I’d love to hear from you!! Later this week I’ll share a leaf I made using Silver Foil. Just as beautiful!
Have a great day!
All of the products I used to create today’s card are listed below. Click on any item and you’ll be directed to my Stampin’ Up! online store.
Hurry!! Tomorrow is the last day to sign up for Paper Pumpkin and receive 50% off your first month!
If you’re short on time or don’t have a big space to craft, Paper Pumpkin is perfect for you! Heck, even if you have a lot of time to craft and a huge craft room, you’ll love Paper Pumpkin. Each month a box arrives at your door with all the supplies you’ll need to create cards or projects and everything you’ll need is included in the kit. You’ll receive an exclusive photopolymer stamp set and at least one Stampin’ Spot (a small stamp pad) in every kit. What a great way to start or add to your stamp collection! You’ll find instructions included in each kit and Stampin’ Up! always releases a video showing how to create the kit. Or you can do your own thing and create something different with the supplies! To receive 50% off, use the promo code: HALFOFF0917
As a subscriber, you also have the option to purchase refills, while supplies last. If this sounds like something you don’t want to miss out on, sign up here using the promo code HALFOFF0917. Also, once you subscribe you have the option to delay a shipment or cancel, if you feel it isn’t right for you. If you have any questions, don’t hesitate to contact me!
This past weekend one of the Demonstrator Facebook groups I’m a member of issued a challenge to make a Fall card using at least one item from our new Holiday Catalog. Today’s card is what I created and the new item is the strip of Painted Autumn Designer Series Paper. I can’t get enough of that paper!
Details of Today’s Card
My base is Very Vanilla with a layer of Crushed Curry on top,
The top layer is Very Vanilla that’s been embossed with the Layered Leaves embossing folder.
The color of the leaves are Crushed Curry, Cajun Craze and Pumpkin Pie. They were cut out with the Seasonal Layers Thinlits Dies but before running them through the Big Shot, I adhered the cardstock to a Multipurpose Adhesive Sheet. This adds a nice layer of glue to the back and makes it easy to attach to the card front.
The sentiment is from the stamp set Colorful Seasons and is stamped with Memento Ink. This stamp set and the Seasonal Layers Thinlits are part of the Color Theory Suite. Purchase both using the item #145348 and receive the bundle discount of 10%! It was cut out with the Stitched Shapes Framelits dies.
The sentiment sits on top of a Cajun Craze scalloped oval cut out with the Layering Ovals Framelits.
If you’d like to create today’s card, I’ve listed all of the products I used below. To purchase any of the supplies, just click on the product below. Be sure to use the host code when placing your order to receive a gift from me! Host Code: 3MCFHAPM
Don’t miss out!! Today’s the last day to receive the Thankful Thoughts Card Kit with any size order placed at my Stampin’ Up! online store using the Host Code S9H3JGWA I’ll cut, score, die cut and punch all the supplies you’ll need to create the three beautiful cards pictured below. You’ll just need to provide adhesive, ink and a stamp set. I used the set Thankful Thoughts but you could substitute it for a stamp set in your collection.
Thankful Thoughts (available in wood or clear) is a set that I turn to over and over again. If you give a lot of thank you cards, I think you’ll find this a great addition to your stamp collection. Click here to purchase Thankful Thoughts!
When placing your order, look for my name in the upper right hand corner. When you checkout, it’s easy to enter the host code (see diagram below). By using the host code, I’ll be alerted that you want to receive the Card Kit.
Here’s what you’ll receive when you place your online order using the host code S9H3JGWA
The Thankful Thoughts Card Kit, complete with all the supplies to make 3 beautiful thank you cards (you’ll need to supply ink, adhesive and a stamp set.
A 9-page PDF with photos, directions and supplies.
With every increment of $25 (before shipping/tax) earn Bradley Points. Collect 16 points and you’ll earn a free stamp set.