On Friday I shared this treat holder using the Scalloped Tag Topper punch. It’s super easy to make! (Click on the picture below if you’d like to see the post from last Friday with enlarged pictures of the projects).
To make the holder, you’ll need a piece of card stock measuring 2″ x & 7″. Score it at 2-7/8″ x 4-3/16″. Next, punch each end using the Scalloped Tag Topper punch.
I put several glue dots on the underside of the bunny to adhere him to the holder but I like to decorate the front before doing this step. I used Whisper White card stock and ran it through the Elegant Dots embossing folder. Another option is to use a piece of Designer Series Paper. Your piece will need to measure 1-3/4″ x 2″.
My sentiment comes from the set Circle of Spring. After stamping my sentiment onto Whisper White card stock, I used the 1 inch Circle Punch to cut it out. For the two bunnies pictured in the middle, I used the Layering Circle Framelits for the scalloped circle that the sentiment is layered on. For the bunny pictured on the right, I used the Stitched Shapes Framelits. Attach it to the holder using Fast Fuse or Snail.
I used our Organza and Sweet Sugarplum ribbon to thread through the openings at the top and tied it up with Whisper White Baker’s Twine.
I stamped my bunny using Memento Ink and then colored him in with Stampin’ Write Markers. I used Pink Pirouette (in the Subtles Collection), Tempting Turquoise (Brights Collection), and Sweet Sugarplum (In Color 2016-2018 Collection). The bunnies are attached to the holder using Stampin’ Dimensionals.
If you have any questions, please don’t hesitate to ask!
Product List – Click on any item below and you’ll be taken to my Stampin’ Up! online store. From there it’s easy to add an item to your cart. If your order reaches $50 before tax and shipping, you’ll be able to add a Sale-a-bration gift!
Happy St. Patrick’s Day! I really should have been a better planner and had a green project for today!!
Oh my gosh, aren’t these little bunnies ADORABLE!! The little guy comes from the stamp set, Basket Bunch AND there are matching Framelits. I love it when I don’t have to fussy cut little pieces. You can purchase the stamp set and Framelits separately but when you get them as a bundle, you save 10%!
When I saw these teeny tiny gold bunnies at Target, I knew I had to make something with them. One fits perfectly inside the holder (see the picture below).
Below you’ll find all of the products I used to make my holders and I’ll have the directions for these little guys on Monday! Have a great weekend and I’ll see you next week! (Edited to add: You can find the measurements here).
Product List – Click on any item below and you’ll be taken to my Stampin’ Up! online store. From there it’s easy to add an item to your cart. If your order reaches $50 before tax and shipping, you’ll be able to add a Sale-a-bration gift!
If you’re looking for a new technique to try, Stampin’ Up! just released a video called The Marbling Technique . When I used to teach elementary school, I’d have my kids clean their desks with shaving cream. They’d have so much fun and my classroom smelled great! The Marbling Technique uses shaving cream so it should be fun!
I’m having some problems getting the video to appear so you’ll find a picture of the video below. You just need to click on it and you’ll be directed to the Stampin’ Up! YouTube video.
I think you’ll have fun trying this technique. I personally haven’t tried it but it’s definitely one I want to try soon!
Yesterday I posted boxes I made with the Gift Card Envelope & Trims Thinlits. Included in this set are dies to make an envelope as well as pieces to make tags. My boxes used the envelope as the top of my box. Today I’m highlighting the tags!
I used the piece below to make my tags and it’s really easy to get a variety of looks!
To achieve the look above, I cut the tag out with Very Vanilla cardstock AND the Moroccan Designer Series Paper.
Then, I cut the DSP. There’s no right or wrong way to do this.
Next, I glued the DSP to the Very Vanilla Cardstock. You can stamp a sentiment as I did or write your own.
Here are a few other ways to decorate the tag without using Designer Series Paper.
The stamp set, B.Y.O.P. in the Annual Catalog coordinates with these Thinlits and many of the sentiments will fit inside the tags! This gives you lots of options!
Product List- Below are the Stampin’ Up! products I used. When you click on a picture, you’ll be taken to my online store where it’s easy to add it to your cart. Use the March Host Code and receive a gift from me with your thank you card!
I love it when I buy a product and I can do more with it than I originally thought! The top of my box is actually a gift card envelope!
You can make an envelope in no time at all with this die but it can also be used to cover a box!
These boxes are a nice size and would be perfect for a small gift or candy. Each box measures 4″ long, 2-3/4″ wide and 1-1/2″ deep. Lots of possibilities!
To make the top of the box, it’s as easy as choosing paper, placing the large die on top and running it through your Big Shot. Fold on all of the score lines and it’s ready to place on top of your box!
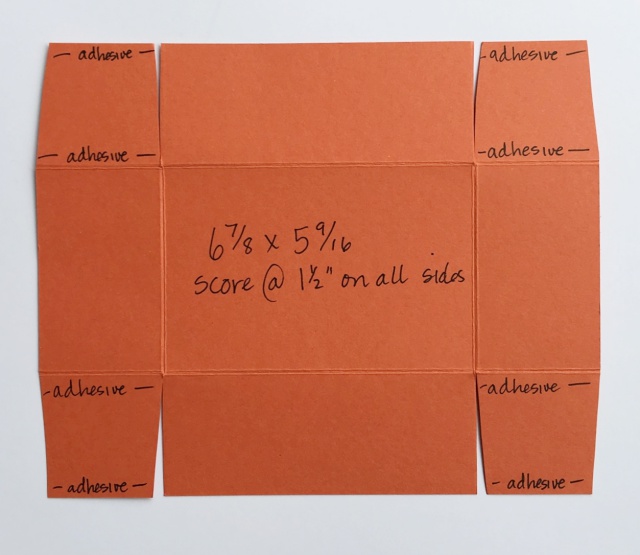
To make the box, choose a coordinating cardstock. Cut the cardstock to 6-7/8″ x 5-9/16″ and score it at 1-1/2″ on all sides. Next, cut on the score lines shown in the picture below.
The next step is to cut a small amount off of each flap. This helps the box to fold up with less bulk but if you skip this step, it’s fine. In the picture below I have trimmed the flaps and shown where you’ll add adhesive. Please note that this is the front side of the box.
Bring the flaps up to begin creating the box. My fingers are on the flaps that have adhesive on them.
Here’s how it looks with the sides adhered. Do this again on the other side and your box is done!
Place your lid on the box and then wrap it up with your favorite ribbon! The die also comes with extra pieces to create tags, which is what I used to create mine. I added a glue dot at the top of the tag and slipped it under the ribbon.
I love to see your creations so if you make your own box, I’d love to see it!
Below you’ll find a video from Stampin’ Up! showing how to make the box. I made the bottom of the box just a little bit different so choose which one works for you. If you’re reading this in an email, click here to head over to the Stampin’ Up! YouTube channel.
Product List – These are the products I used to create my boxes. They are shown along with their item number and price. When you click on the picture, you’ll be taken to that item in my Stampin’ Up! online store. From there it’s easy to add it to your cart. Choose a FREE item from the Sale-A-Bration Catalog for every $50 you spend (before tax/shipping).
MARCH HOST CODE: UAWUUQG4
Use this code when placing your online order and you’ll receive a gift with your thank you card!
It’s Sale-a-bration time! Choose a FREE item for every $50 you spend (before tax/shipping). Click the catalogs below to take a look at what you can choose from!
Today I have two bags that were made using the Sale-A-Bration paper, Carried Away. Since we are in the final weeks of Sale-A-Bration, all FREE items are while supplies last. You can earn this paper with a $50 order (before shipping/tax).
This is an easy box to make. You need to start with a 6″ x 12″ piece of paper. Score on the long side at 4″, 5-1/2″, 9-1/2″ and 11″. Turn and score at 4-1/2″. Fold on all of the score lines. On the end with the 1″ panel, you’ll cut the small piece as indicated below.
Before adding adhesive, fold the box to see how it will come together once you add adhesive. The picture below shows where you’ll add Fast Fuse or Tear and Tape (it will fall apart with Snail). This is the front side of your bag.
Turn the paper over and add adhesive to the flap shown below.
You’ll bring the sides together and then fold your bottom flaps in being sure to fold down the one with adhesive LAST.
For one of the bags, I made the hole at the top with a 1/2″ punch and the other one is just held together with a clip.
All of the products I used are listed below. Click on any of the pictures to shop at my Stampin’ Up! online store!
Sale-a-bration is the most anticipated time of the Stampin’ Up! year and it’s almost over. There are 21 more days to go BUT, all of the Sale-a-bration gifts are while supplies last! Unfortunately the Card Tin has already sold out but there are still many more gifts available for every $50 in product that you order (before shipping/tax). If you’ve had your eye on some of the great gifts, please place your online order as soon as possible. I don’t want you to be disappointed!
I placed an order earlier this week and it arrived yesterday. My free gift was the Glimmer Paper. Oh my, but it is GORGEOUS! If you like glitter and sparkle, you will love it! If you are reading this from my blog, click on the two Sale-a-bration catalogs on the right side of my blog to look inside. If you’re reading this is an email, click here and here.
My card today uses the Sale-a-bration gift, Avant Garden and the sentiment comes from the set All Things Thanks. I actually stamped the flower and stem weeks ago and it’s been sitting on my craft table because I wasn’t quite sure what I wanted to do with it. Because Sale-a-bration is almost over, I was spurred into action to create and I’m happy with the simplicity of it.
As I mentioned above, I used All Things Thanks for my sentiment. I used the middle sentiment that says “thanks for joining us.” I just wanted the word thanks for my card so I used my Rose Red Stampin’ Write marker and just colored the part I wanted. You do have to be careful that you don’t touch any of the other letters while doing this but it’s a great way to get more mileage out of a stamp set.
All of the products I used to create my card can be found below. Click on any of the pictures and you’ll be taken to my Stampin’ Up! online store. Once there, it’s easy to add an item to your cart. If your total reaches $50, you’ll be prompted to enter your Sale-a-bration free gift item number. If you have any questions, don’t hesitate to ask! Use the Host Code UAWUUQG4 and you’ll receive an extra surprise with your thank you card!
Measurements:
Whisper White: 8-1/2″ x 5-1/2″ scored @ 4-1/4″ 3-3/4″ x 5″ 2-1/4″ x 3-3/4″ scrap for sentiment
This was such a fun and easy card to make and guess what I used? One of the dies in the Window Box Thinlits!
You can make gorgeous boxes with these Thinlits and the candle die that I used is meant to decorate the sides of the box but isn’t it great that it can also be the focal point of a card??
I had a watercolor piece sitting on my desk and I wasn’t quite sure what I wanted to do with it. Since it had some yellow at the top, I thought of the flame on the candles.
Here’s another card using Sweet Sugarplum, Garden Green and Daffodil Delight.
For the candles I adhered strips of cardstock to the back . The flames are a piece of vellum that I colored but I found that a piece of Daffodil Delight cardstock really worked just as well.
If you’d like more information about the Window Box Thinlits Dies, below you’ll find a video from Stampin’ Up! If you’re reading this in an email, click here to go directly to YouTube to view it.
If you purchase the Window Box Thinlits & the Window Shopping stamp set together as a bundle, you receive a 10% discount.
Product List– Below you’ll find a list of the Stampin’ Up! products I used to create my cards. When you click on the picture, you’ll be taken to that item in my Stampin’ Up! online store. From there it’s easy to add it to your cart. Choose a FREE item from the Sale-A-Bration Catalog for every $50 you spend (before tax/shipping).
If I had to choose one item in my craft room that I couldn’t do without, it would have to be my Big Shot! I love it and use it daily. Anyone who has ever crafted with me knows that my Big Shot gets a workout!
What can you do with it?
Use embossing folders to add texture to your paper.
Create boxes, bags and bows.
Cut out stamped images with coordinating dies
Cut out shapes such as squares, ovals, circles, butterflies, letters, numbers, and so much more.
This might sound a bit melodramatic but a whole new world opens up when you craft with a Big Shot. Below you’ll find a video from Stampin’ Up! that will show the Big Shot in action. Holly, from the home office says that it will change your life! So true!
If you’ve had your eye on one, this is the best time to purchase it from Stampin’ Up! I realize that you can buy one at a big box store with a coupon but there are some perks when you buy it from my Stampin’ Up! online store.
You’ll get to pick out TWO Sale-a-bration gifts!
You get me! If you have any questions about your new machine, I am just an email or phone call away. You won’t be left alone to figure it out on your own.
I’ll send you an embossing folder of your choice!
If this sounds great, click hereto order one at my Stampin’ Up! online store (but read on first). Once I receive notification of your order, I’ll contact you about choosing your free embossing folder!
At this point, I do have to tell you that there’s an even better way to get a Big Shot into your craft room. Join Stampin’ Up! When you do it during Sale-A-Bration, your Starter Kit can include the Big Shot! The Starter Kit is $99 but you get to choose $125 worth of product AND TWO FREE STAMP SETS of your choice (bundles and kits can’t be selected). PLUS, Stampin’ Up! pays shipping on your Starter Kit.
Joining Stampin’ Up! is completely risk free, really! Once you order your Starter Kit you can start placing orders as a demonstrator. You never have to host a party or collect orders from others, unless you want to. If you decide in a few months that being part of the Stampin’ Up! family isn’t for you, you still get to keep your Starter Kit, no questions asked. If you have more questions, I’d be happy to answer as many as you have. If you’d like to join now, click hereto get started!
Here’s the video I promised you! Take a look and see all that you can do with a Big Shot!
If you are reading this in an email, click HERE to view the video over on the Stampin’ Up! YouTube channel.
If you have any questions, please email me at: tracy@stampingwithtracy.com
Just a quick update to let you know that the Sale-A-Bration Card Tin is no longer available as the supply has been exhausted. All of the remaining gifts are while supplies last so place your order early so you aren’t disappointed!
Click HERE to head on over to my Stampin’ Up! online store!
I love cats which is so surprising because years ago I really didn’t like them. I grew up in a house full of dogs and whenever I went to a house where they had cats, it was immediately obvious that I was allergic to them. Years later my parents had two cats and I was shocked to realize that my eyes weren’t itching and closed shut.
When my daughters were younger they wanted a pet (what kid doesn’t). We decided that having a dog wouldn’t work because we were gone most of the day so we went to the pound and got two adorable (a brother and sister) kitties to bring home. They instantly stole our hearts, even my husbands, who definitely was NOT a cat person. We lost Misty when she was 14 and Joey lived to be 19. I still miss them.
Twenty years ago my parents started feeding feral cats on their property. My mom caught many of the girls and took them to the vet to be spayed. We are still feeding three of them and all of their friends in the neighborhood. The word got out that there’s free food. The three regulars are so cute and they keep their eyes on me from outside when I’m crafting at my mom’s.
Now you know why there’s no way I could pass up a kitty stamp set as cute as Pretty Kitty in the Occasions catalog.
I stamped the kitty on watercolor paper with Staz-On and used Watercolor pencils and an Aqua Painter to color her in. Here are two more cards that I made with the set!
All of the Stampin’ Up! products I used to create all three cards are listed below. They are shown along with their item number and price. When you click on the picture, you’ll be taken to that item in my Stampin’ Up! online store. From there it’s easy to add it to your cart. Choose a FREE item from the Sale-A-Bration Catalog for every $50 you spend
I have another butterfly card to share with you. I sent this card to a friend who recently lost her dad. Having lost my own father in 2009, I know how heartbreaking it is to lose a parent. There are no words to comfort but I hope my card helped her to know that my thoughts are with her.
All the supplies used to create this card are Stampin’ Up! They are shown below along with their item number and price. When you click on the picture, you’ll be taken to that item in my Stampin’ Up! online store. From there it’s easy to add it to your cart. Choose a FREE item from the Sale-A-Bration Catalog for every $50 you spend (before tax and shipping).