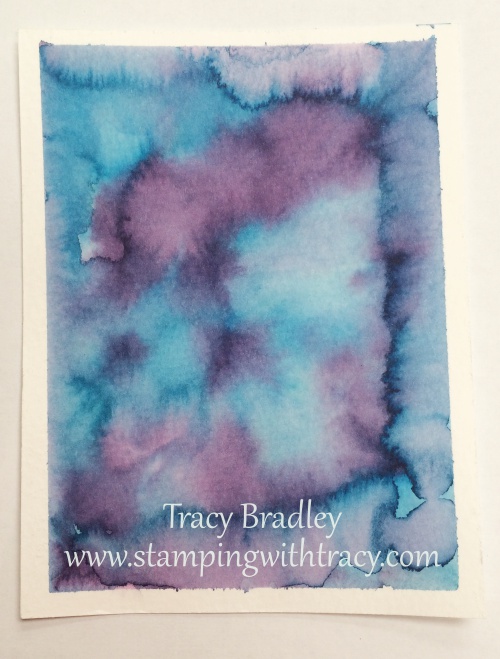
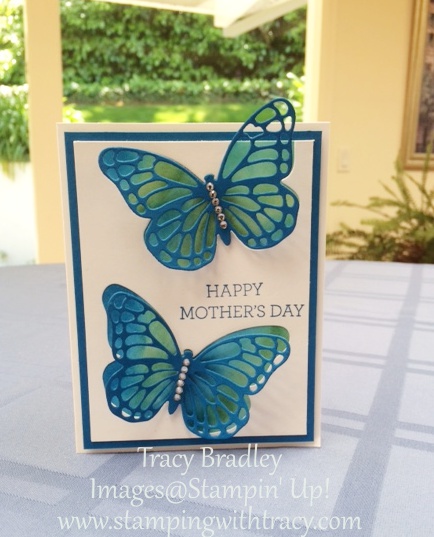
I wasn’t sure that I would have a post for today. I’ve been staying with my mom for the past week as she hasn’t been feeling well. Unfortunately she was hospitalized yesterday afternoon but we are hoping that she will be back home in a few days. She is right where she should be and I know she’s getting excellent care. I’ll be spending the day at the hospital but before I go, I wanted to post a card that I made a week ago. You’ll notice that it’s very similar to the card I posted on Monday. This time though, my background for the butterflies was made using watercolor paper, my Stampin’ Up! ink pads and an Aqua Painter (you can see the background below).
I did my watercoloring a few months ago and its been sitting on my desk all this time. I just haven’t known what to do with it until the idea for this card popped into my head (which I actually made before the one I posted Monday). When I adhered the butterflies, I used my 2 Way Glue pen. On the Mother’s Day card I posted on Monday (you can see it HERE), I used Stampin’ Dimensionals and I prefer having them popped up rather than completely flat in that area. Does that make sense?
I hope to have a post on Saturday, but we’ll see how things are progressing with my mom. Thank you for stopping by today.
Product List – Click on any item below to visit my Stampin’ Up! online store.
The Weekly Deals are here! These prices are good until Monday, May 18th or while supplies last! Click on any item below to be taken to my Stampin’ Up! online store!
Retirement List: Be sure to check out all of the retiring items from the 2014-2015 Stampin’ Up! Idea Book. Many products on the list are discounted! Everything except stamp sets are while supplies last. The last day to order stamps that are retiring is May 26th! The lists are updated daily – you’ll find a small x on the right hand side if a product has sold out.
I have been visiting my mom for the past week. I brought some of my Stampin’ Up! supplies with me so that I could do some creating. I made this card yesterday for my sister for Mother’s Day. I didn’t think I had a Mother’s Day sentiment in any of the sets that I brought so I was happy when the set Crazy About You had just what I wanted!
I started out with a piece of Whisper White cardstock. Using my sponge daubers and the colors Pacific Point and Garden Green, I randomly applied color. Although I starting sponging off of my paper first, I still got some of the circles of color that you see. It doesn’t really matter with this card because that won’t be seen – just the beautiful shades of color.
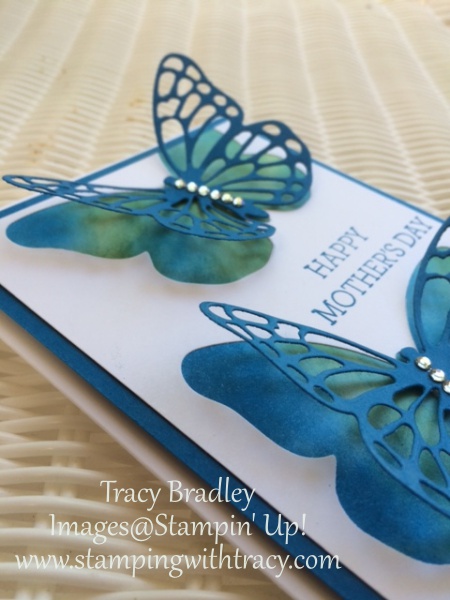
Using another piece of Whisper White, I cut out two butterflies using the Butterflies Thinlits (in the Occasions catalog) and then stamped my sentiment. I glued this piece to my colored piece using a 2 way glue pen so that I could really get glue around the outline of the butterflies. I cut two more butterflies out of Pacific Point and adhered them to the card with pieces of Stampin’ Dimensionals down the center of each one. The rhinestones added a nice amount of sparkle.
I forgot to bring envelopes with me so I left the top butterfly as is. If I had needed to send the card, I would have trimmed it off but I think it looks nice “flying” off the card.
Enjoy the rest of your day!
Product List – Click on any item below to go directly to my Stampin’ Up! online store!
Last night there was a live stream Paper Pumpkin May Kit Sneak Peek (you can view it below). If you’ve thought about joining My Paper Pumpkin, now is the time to do it!
For the next few hours you can receive your first month for $5.00 – this includes shipping (this offer is only for new subscribers)! If you decide that it isn’t for you, you can cancel the next kit. If you love it, it will continue to be delivered to your door each month for $19.95. This offer expires TONIGHT at 6:50 PM (Mountain Time)!
Thank you for visiting my blog today! For those of you who follow regularly, I’m sorry that my posts have been sporadic. Due to personal reasons, its been a bit challenging to post or create in my craft room. I hope to be back posting on my regular schedule very soon!
Here are the Weekly Deals for this week! These prices are good until Monday, May 11th or while supplies last! If you would like to more information about these products, click on the pictures!
Today I have a video showing you how to make a scallop flower using the 2-3/8″ Scallop Circle Punch. I’ve used the Brights Designer Series Paper Stack in the colors Real Red, Bermuda Bay and Rich Razzleberry. This paper is on the retired list and available while supplies last.
I used DSP from Painted Blooms (in the Occasions catalog) for the flower below.
If you have any questions, don’t hesitate to ask! Product List – To purchase an item below or for more information, click on the picture.
The Weekly Deals are here! These prices are good until Monday, May 4th or while supplies last! To purchase an item, click on the picture and you’ll be taken to my Stampin’ Up! online store!
I sat down at my craft table to create a project with our Polka Dot Tag a Bag Gift Bags and I saw a flower sitting on my desk that I made months ago. I tried using it to create a card many times but it just never worked for me but I think it looks pretty cute, front and center on my bag. The bag is big enough that lots of different treats would fit inside. This is a very quick project to make and who wouldn’t enjoy a little surprise like this to start off their day?
As I mentioned, I used the Polka Dot Tag a Bag Gift Bags (#135503). These are currently on the Retired List as I write this and they are discounted. The bags are 5″ x 8-1/4″ and come 10 to a package. Normally they are $3.95 but they are 50% off and just $1.98! The Chevron Tag a Bag Gift Bags (#131370) are also on the retiring list and they are discounted 40%. I will post both in my product list but please note that the sales price is not reflected on this list.
Are you wondering how I made the flower? I used the 2-3/8″ Scallop Circle punch and did some folding! I will either make a picture tutorial or a video in the next few days and show you how I did it!
I used Stampin’ Dimensionals to adhere the flower to the doily and tucked the sentiment behind. I went back and forth about whether to attach the doily to the bag but in the end I decided not to and used a clothespin to keep the bag closed.
All accessories on the retired list (which includes the bags in this project) are while supplies last. All stamp sets will be available until May 26th! Here’s the updated lists!
I’ve always loved Elegant Eggplant and Rose Red together but it’s a combination I haven’t used recently until today! I stamped one of the four flowers available in the stamp set, Petal Potpourri, with black Staz-On ink on watercolor paper. I love watercoloring but it really does take some time to master, at least for me. I wasn’t completely happy with the way the flowers turned out but I drive myself crazy with how picky I can be!
I put some ink from my stamp pad onto my clear block and picked up the color with my Aqua Painter. I felt the center of my flowers needed a little pizzazz so I added some glue with the 2 Way glue pen and then sprinkled some Dazzling Diamonds glitter – first time I’ve used glitter in a long time!
On the product list below, please note that if you are interested in purchasing the stamp set AND punch, a bundle is available at a 15% discount!
Items are going quickly on the Retired List, especially accessories which are while supplies last! The lists are updated daily so that you can check and see what’s still available!
Enjoy the newest video from the Stampin’ Up! Technique Series!
The Retiring List came out on Tuesday. Many products are selling out fast, especially embellishments. Check out the lists to see what’s still available! These lists are updated daily!
And here’s a video showcasing some of the products that are retiring!
Place an order using the Hostess Code below and I will send you a thank you card and a 3×5 notepad to thank your for choosing me as your demonstrator! Click here to place your order!
The retiring products list is out! The retiring stamps and accessories from the 2014-2015 catalog will be available while supplies last until June 2; however, due to high demand for retiring stamps, Stampin’ Up! will keep producing retiring stamps through May 26 (not accessories-accessories are only while supplies last). Some of these products have discounts up to 50 percent off retail, so don’t miss out!
There are definitely items on the list that I am sad to see leaving such as the Perfect Polka Dots embossing folder. I LOVE that folder and use it ALL. THE. TIME!! Be sure to check out the list and purchase items that you’ve had your eye on!