I hope everyone had a nice holiday! It’s a very rainy day here in California for which I’m grateful because we haven’t had rain in a very long time. It’s nice and cozy inside the house!
I wanted to make a New Years card for several friends but realized I didn’t have much in my crafting supplies to make one. I’ll be honest, I’ve never made a New Year’s card! This is what I came up with.
Normally I don’t share projects with retired product but it was only after I made my card I realized Snowflake Splendor Designer Series Paper is no longer available. If you were one of the lucky ones to snag a package before it sold out, you can find this pretty background, that almost looks like a starry night.
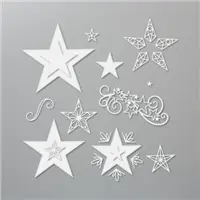
I used our Stitched Stars Dies and Playful Alphabets Dies to create my card. The stars were cut out of Silver Foil and the numbers out of Night of Navy cardstock. Before cutting out the stars or numbers, I added an adhesive sheet to the cardstock so that adhesive would be on the back of each piece after running them through the Stampin’ Cut & Emboss Machine. What a lifesaver!
Whisper White Cardstock Update: Whisper White in 8-1/2″ x 11″ has sold out but I’ve not heard an updates on when the Basic White will be available. I will let you know when I know more.
Supply List
If you need any stamping supplies, I’d love to be your demonstrator! You can place an order by clicking any of the images below to go to my Stampin’ Up! online store.If you have questions about products you’re considering purchasing or ones you’ve already purchased, I’m just an email away (click the Email Me button on the sidebar of my blog).
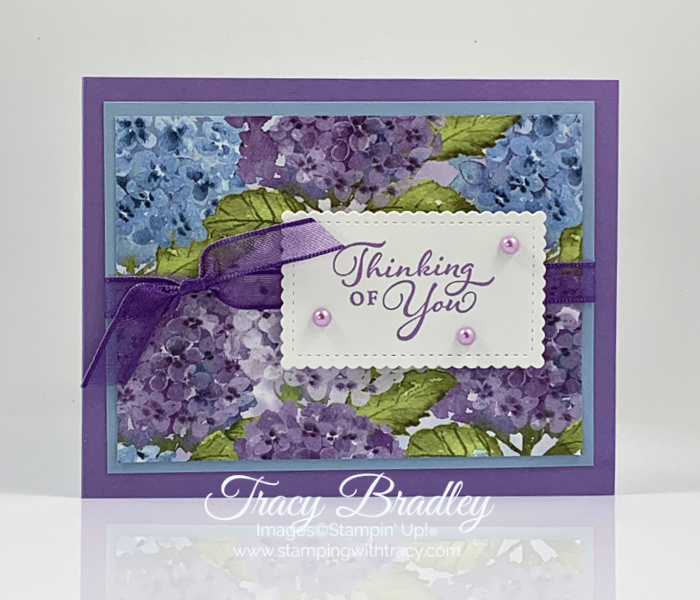
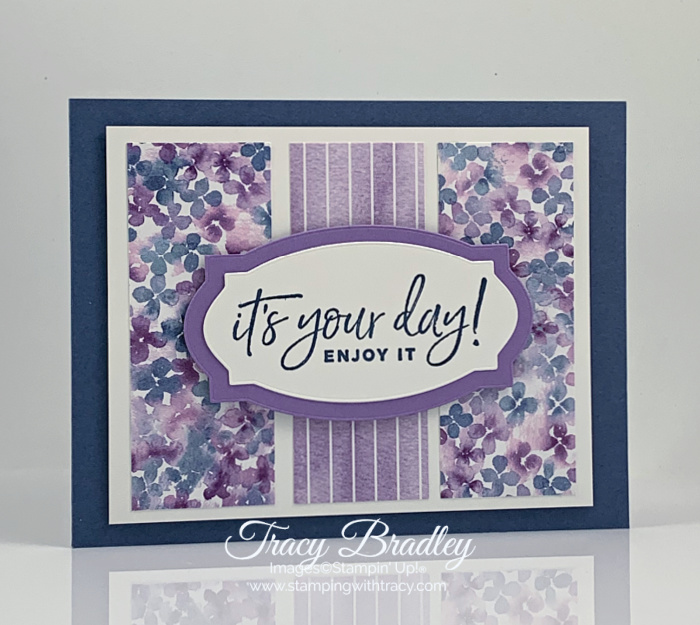
I can’t wait for the January-June 2021 Mini Catalog to go live on January 5th because you’ll then be able to purchase Hydrangea Hill Designer Series Paper (#154570) and all the coordinating products in the suite. I have four new products on my sneak peek card today: Hydrangea Hill Designer Series Paper, 3/8″ Gorgeous Grape Sheer Ribbon, Pastel Pearls and the stamp set, Happy Thoughts.
I started with a base of Highland Heather cardstock and then added a layer of Seaside Spray cardstock and Hydrangea Hill Designer Series Paper. Before adhering the Seaside Spray/Designer Series Paper layer to the card base, I wrapped our 3/8″ Gorgeous Grape Sheer Ribbon (#154572) around it and tied a bow. Purple is my favorite color so this ribbon is going to be a favorite of mine!
The sentiment was stamped in Highland Heather ink onto Whisper White cardstock using the stamp set, Happy Thoughts (#154507). I cut it out using the Stitched So Sweetly Dies, added Stampin’ Dimensionals to the back and adhered it on top of the ribbon. To complete the card, I added three Pastel Pearls (#154571) in Highland Heather (the other colors in the package are Gorgeous Grape, Rococo Rose and Seaside Spray).
If you don’t want to wait until January 5th to purchase these products, the Starter Kit is available for $99. You’ll choose $125 worth of products (you can include new January-June 2021 Mini Catalog products or the MINI Stampin’ Cut & Emboss Machine) and it will ship FREE! Once you purchase the Starter Kit, you’ll be able to preorder any new products that haven’t gone live yet as well as current ones, and receive at least a 20% discount. Continue to purchase just for yourself or start sharing the love of Stampin’ Up! products. It’s your choice. If you’d like to join my team, click hereto get started! If you have questions, feel free to email me (I had lots of questions when I considered joining almost 12 years ago). For more information, click here.
Supply List
You’ll find only currently available products in my Supply List today.
If you need any stamping supplies, I’d love to be your demonstrator! You can place an order by clicking any of the images below to go to my Stampin’ Up! online store.If you have questions about products you’re considering purchasing or ones you’ve already purchased, I’m just an email away (click the Email Me button on the sidebar of my blog).
I know Christmas is right around the corner but I couldn’t resist playing with Feels Like Frost 6″ x 6″ Designer Series Paper one last time. Since this paper debuted last year, it’s been one of my favorites. One side is silver foil and the other depicts photographic imagery. Especially at this time of year, I’m very drawn towards silver foil and it pairs so beautifully with silver embossing. It’s really difficult to photograph cards with foil and be able to properly show how pretty it is. This beautiful paper is retiring (and on sale) and will be available while supplies last.
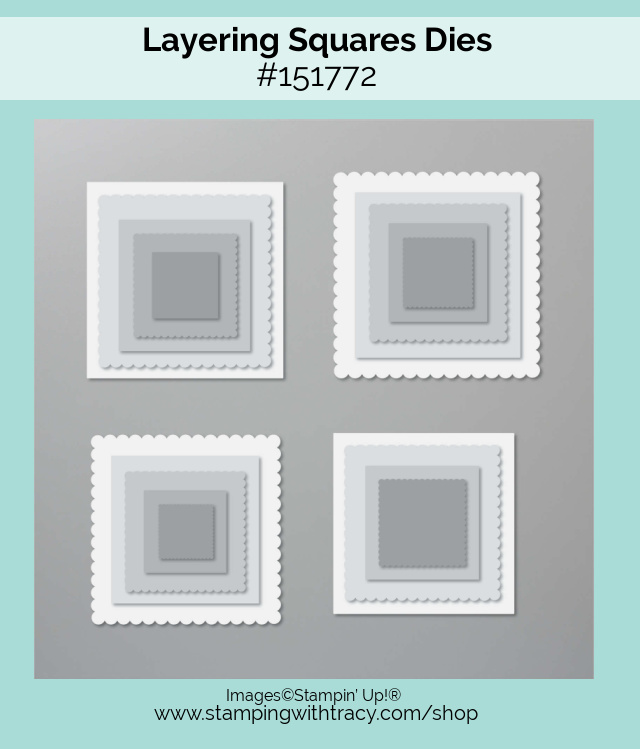
The base of my card is Shaded Spruce cardstock and I added a layer of Whisper White cardstock that I embossed using the Winter SnowEmbossing Folder (also retiring and on sale – available while supplies last). I cut a square of Feels Like Frost Designer Series Paper using the Stitched Shapes Dies(you can get four squares out of one sheet) and cut a larger square out of Whisper White cardstock using the Layering Squares Dies. The Stitched Shapes Dies coordinate with our Layering Squares Dies, Layering Ovals Dies and Layering Circles Dies! I layered the two squares together and then added Stampin’ Dimensionals to the back and adhered it to the embossed Whisper White cardstock.
I stamped the sentiment onto Whisper White cardstock using the stamp set Itty Bitty Christmasand Versamark ink (you can find directions for heat embossing below). I cut the sentiment out using the Stitched Shapes Die and adhered it to the foil square. Normally I would have added Stampin’ Dimensionals to the back before adhering it to the card but because I was planning to mail this card, I only wanted one layer of dimension to keep the mailing cost down.
How to Heat Emboss
Prepare your cardstock by rubbing an anti-static pouch (Stampin’ Up! no longer carries this product but it’s a must when embossing) over the surface as it helps keep away stray particles of embossing powder. Stamp your sentiment or image using a Versamark pad. This is very sticky ink and your embossing powder will stick right to it. Sprinkle embossing powder over the stamped image. Shake off any excess. Before applying heat to your paper, heat the Heat Toolfirst so the paper won’t warp (about 10 seconds). Direct the heat over your image and watch as your sentiment is transformed!
If you’d like to make today’s card, you can find the measurements I used below the supply list.
Supply List
If you need any stamping supplies, I’d love to be your demonstrator! You can place an order by clicking any of the images below to go to my Stampin’ Up! online store.If you have questions about products you’re considering purchasing or ones you’ve already purchased, I’m just an email away (click the Email Me button on the sidebar of my blog).
Today’s card is another sneak peek from the January-June 2021 Mini Catalog which debuts on January 5, 2021. The gorgeous paper I used is called Hydrangea Hill (#154570) and it’s one of nine new packages of Designer Series Paper in the new catalog! I love playing with new paper!
I started with a base of Misty Moonlight cardstock and then added a layer of Whisper White cardstock. The Designer Paper was almost too pretty to cut, but I did! I cut three strips and then layered them onto the Whisper White cardstock (you can find the measurements I used below the Supply List).
I stamped the sentiment in Misty Moonlight ink onto Whisper White cardstock using the stamp set, Happiest of Birthdays. Then I cut it out using the Hippo & Friends Dies. I cut another, larger layer, using Highland Heather cardstock. After layering the two pieces together, I added Stampin’ Dimensionals to the back and adhered it to the front of the card. This is such a quick and easy card to make!
Supply List
If you need any stamping supplies, I’d love to be your demonstrator! You can place an order by clicking any of the images below to go to my Stampin’ Up! online store.If you have questions about products you’re considering purchasing or ones you’ve already purchased, I’m just an email away (click the Email Me button on the sidebar of my blog).
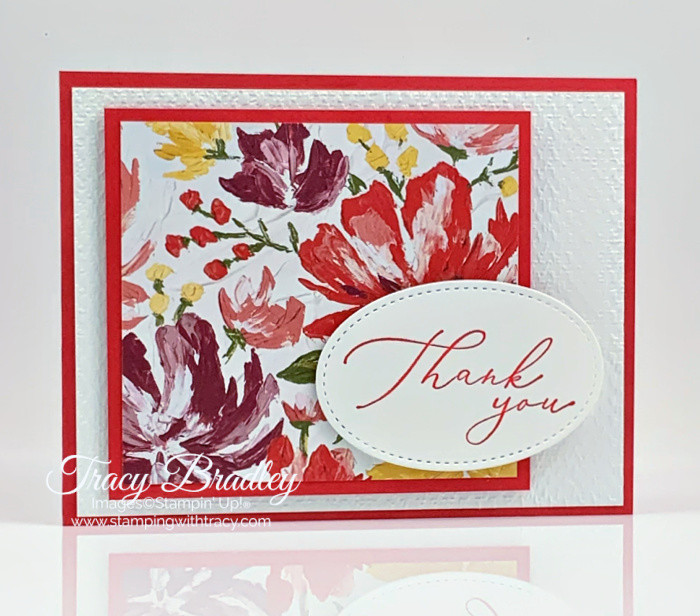
Today’s card is a sneak peek of a brand new product, Fine Art Floral Designer Series Paper, from the upcoming January-June 2021 Mini Catalog (the catalog goes live on January 5, 2021). So many fun new products to look forward to!!!
I started with a base of Poppy Parade cardstock and then added a piece of Whisper White cardstock that I ran through the Stampin’ Cut & Emboss Machine using the Tasteful Textile 3D Embossing Folder. I added another layer of Poppy Parade cardstock and adhered a panel of Fine Art Floral Designer Series Paper (154558). If you don’t want to wait to get your hands on all the new products in the upcoming catalog, you might want to consider joining my team and purchasing the Starter Kit. The Starter Kit is $99 and you’ll select $125 worth of product that ships FREE. You can choose from any Stampin’ Up! products, even the new Mini Stampin’ Cut & Emboss Machine. This new machine will be available on January 5, 2021, but if you purchase the Starter Kit, you can add it to your order! For more details about the Starter Kit, please click here. If you have questions, don’t hesitate to contact me.
If you don’t recognize the sentiment I used it’s because it’s a brand new stamp set called Heal Your Heart and will be one of the FREE Saleabration gifts you can earn with a $50 order beginning January 5th! I stamped the sentiment in Poppy Parade ink and cut it out using the Stitched Shapes Dies. If you’d like to make this card, you can find the measurements below the Supply List.
Supply List
If you need any stamping supplies, I’d love to be your demonstrator! You can place an order by clicking any of the images below to go to my Stampin’ Up! online store.If you have questions about products you’re considering purchasing or ones you’ve already purchased, I’m just an email away (click the Email Me button on the sidebar of my blog).
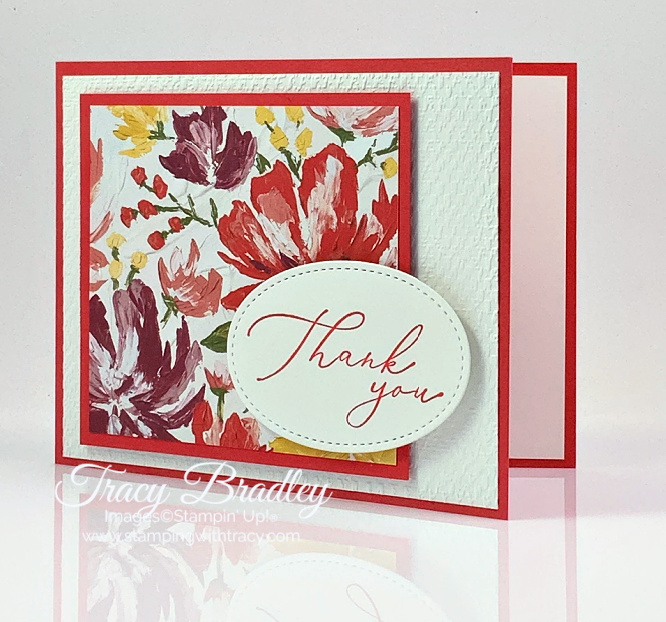
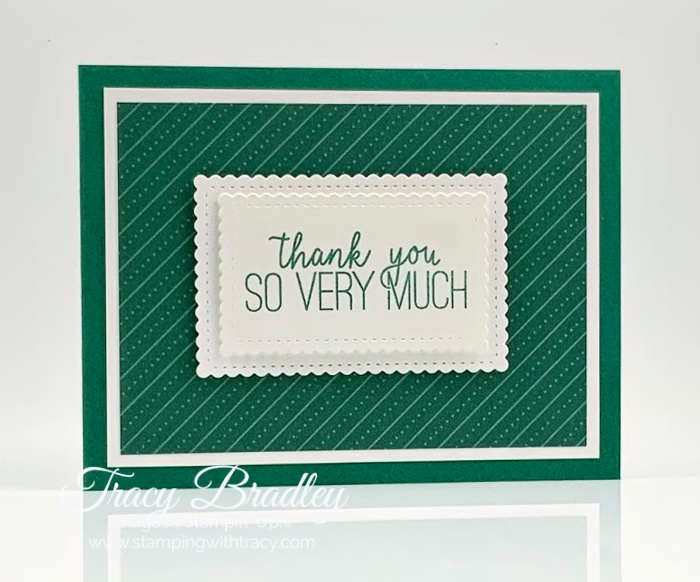
Today I have two thank you cards featuring ‘Tis the Season 6″ x 6″ Designer Series Paper. We all need thank you cards at this time of year, so I looked through this package of paper for designs that could be used in other ways besides holiday cards. This beautiful paper is retiring, on sale and available while supplies last!
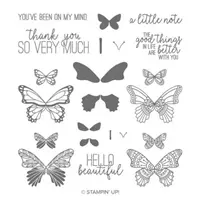
The first card has a base of Cherry Cobbler cardstock and the second one is made with Shaded Spruce cardstock. I used the stamp set, Butterfly Gala, for the sentiment and cut it out using the Stitched So Sweetly Dies. I really like the look of two Whisper White stitched rectangles layered together with Stampin’ Dimensionals. If you’d like to make today’s card, you can find the measurements below the Supply List.
Supply List
If you need any stamping supplies, I’d love to be your demonstrator! You can place an order by clicking any of the images below to go to my Stampin’ Up! online store.If you have questions about products you’re considering purchasing or ones you’ve already purchased, I’m just an email away (click the Email Me button on the sidebar of my blog).
Cherry Cobbler or Shaded Spruce cardstock: 11″ x 4-1/4″ scored at 5-1/2″
‘Tis the Season Designer Series Paper: 4-3/4″ x 3-1/2″
Whisper White cardstock: 5″ x 3-3/4″
Whisper White cardstock (inside): 5-1/4″ x 4″
Whisper White cardstock (large rectangle): 3-1/4″ x 2-1/4″
Whisper White cardstock (small rectangle): 3″ x 1-3/4″
Have you heard the news that Whisper White will be leaving the Stampin’ Up! lineup? Unfortunately the supplier’s mill producing our Whisper White cardstock has permanently closed due to impacts from the COVID-19 pandemic (my heart goes out to all the people who have lost their jobs to this closure). Stampin’ Up! has dedicated many hours to source and test alternative cardstock options from several suppliers to find the perfect fit that still maintains the Stampin’ Up! quality you know and trust. The new cardstock will be called, Basic White and you can watch the video below for more information! While Basic White is not yet available, if you’d like all the product information, you can access the Basic White flyer, here.