I’m almost a bit embarrased to include this as a tip but it works for me so I should share, right?
I really am a fan of photopolymer stamps. Why? Because I want stamping to be stress free and I love that I can see right through the stamp to my paper, ESPECIALLY when I’m stamping a sentiment.
When I use clear or wood stamps, I always use Stampin’ Mist with my Stampin’ Scrub to get them nice and clean. But when I use photopolymer, the Stampin’ Scrub seems to add more ink to the stamps and I prefer to use a baby wipe.
While I’m busy creating on my craft table, I’m always looking for somewhere to set the used wipe down because I can continue to use it during a craft session multiple times. I was rummaging through one of my drawers and found the container below. I smacked myself on the forehead and thought, of course, why didn’t I think to just put it into some sort of bowl??? So simple.
While I’m at it, I’ll share the container that I got on Amazon for the wipes. It is GREAT! If you don’t open it for weeks, the wipes do not dry out. The weighted plate makes it easy to grab one wipe at a time. I have another one that I use when I change my grandson’s diapers. If you’d like more information about this wonderful wipes dispenser, I’ll put a link at the end of the post.
As I mentioned, Stampin’ Mist and Stampin’ Scrub are both great for cleaning your clear and wood mount stamps!
Do you need a little bag for a gift card or a sugary treat? The Mini Treat Bag Thinlits Dies will help you to quickly make one in a matter of minutes!
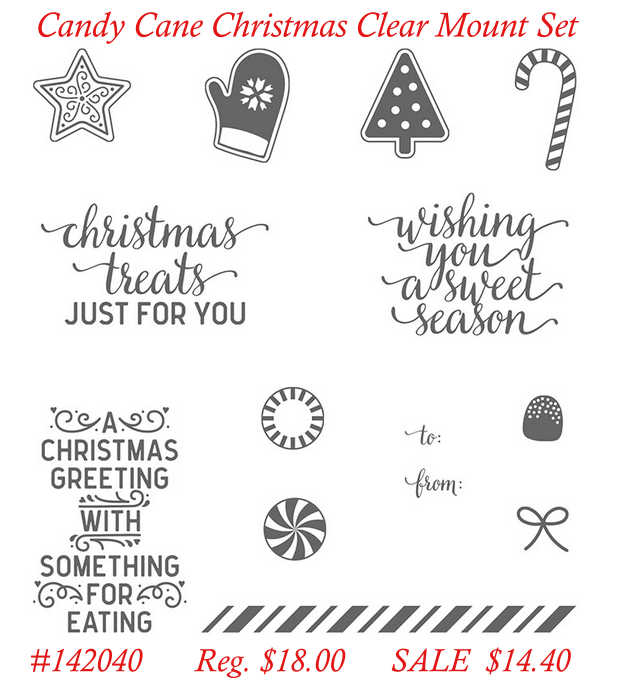
Three of the items I used to make my project are currently on sale right now!
Please note: Candy Cane Christmas also comes in wood but the clear set is the only one that’s on sale.
My Card Details
Cut your DSP using the Mini Treat Bag Thinlits. If you’d like to see how to assemble the bag, check out the video below. You’ll also see another sized bag to make with this same die!
Glue a Metallic Foil Doily to the front of the bag.
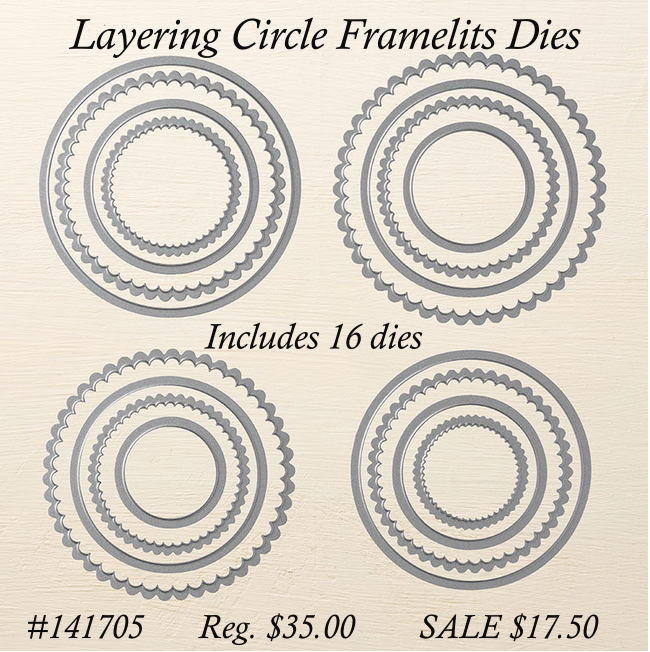
Cut a piece of Cherry Cobbler using the Layering Circles Framelits.
Stamp your sentiment on a piece of Whisper White cardstock with Emerald Envy ink. Cut it out with the Layering Circles Framelits.
Add some bling with the Metallic Enamel Shapes
You’re done!
Product List- All of the items I used to make my bag are listed below. For the items on sale, the sale price will show up when you click on it and go to my online store.
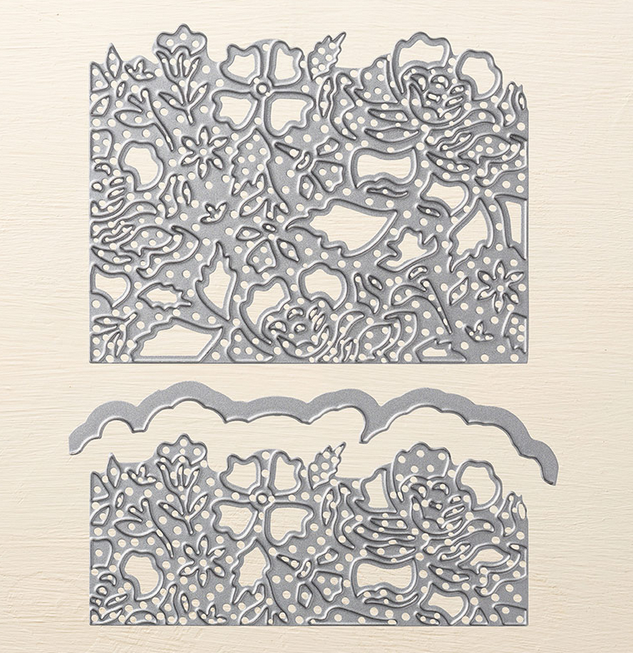
Today I wanted to let you know about another great product on sale during the Stampin’ Up! Year-End Closeout Sale – the Detailed Floral Thinlits Dies! They normally sell for $29.00 but you can purchase them for $14.50! That’s 50% off! I own these dies and you can really make gorgeous cards with them. Be sure to watch the video below to find out all about them! (If you’re reading this in your email program, be sure to click on over to my blog to watch the video).
Detailed Floral Thinlits Dies #141482
Here are two cards I made using this die!
Click hereto check out this product at my Stampin’ Up! online store!
The Stampin’ Up! Year-End Closeout Sale started yesterday! As the information was released early yesterday, I tried to read all of the information about it as quickly as I could so I could get a blog post out as soon as possible. I will be the first to admit that a lot about the sale was a bit confusing. Lots of great information but a lot to take in.
There are several things going on at once during the Year-End Sale and not everything is on sale but many products are!
Retiring Holiday Products
Many products in the Holiday Catalog are retiring, some of which are on sale! The list is updated Monday – Friday with items that have sold out. Click here to see the Holiday Product Retiring list. This list contains all items from the 2016 Holiday Catalog that are retiring and will no longer be available for purchase after January 3, 2017. If it’s easier, check out this post to see what isn’t retiring. Please note:
Retiring stamp sets are guaranteed available until December 21, after which they will be only available while supplies last.
Retiring accessories will only be available while supplies last.
You’ll find all of these items under Year-End Closeouts.
You’ll find:
In the Bundles section not all of the items are retiring BUT the bundle package price will no longer be available (10% off).
In the Everything Else section, you’ll find lots of products! PLUS you’ll see items from the Annual Catalog that are on sale because Stampin’ Up! has a big inventory of those products. (Be sure to click ALL so that everything shows up!!!!)
The Layering Circles Framelit Dies are in this section! Normally $35.00 but now on sale for $17.50!! That is just too good to pass up!! I use these all the time!!! Click here to see them in the store.
I hope I’ve cleared up any confusion. If you have any questions, do NOT hesitate to contact me! tracy@stampingwithtracy.com
Another sale and just in time for gift giving (or giving to yourself)! All of the details were released this morning such as what’s on sale, what items in the Holiday Catalog are sticking around and what items are on the closeout list
Retiring stamp sets are guaranteed available until December 21, after which they will only be available while supplies last.
Retiring accessories will only be available while supplies last.
Retiring items will only be available while supplies last. All retiring items will be discontinued after January 3, 2017.
Click here for the list of items in the Holiday Catalog that are retiring.
Below you’ll find the Carryover List (items that aren’t retiring). If the list is too small, click on each section (there are three) and it should enlarge in a separate window.
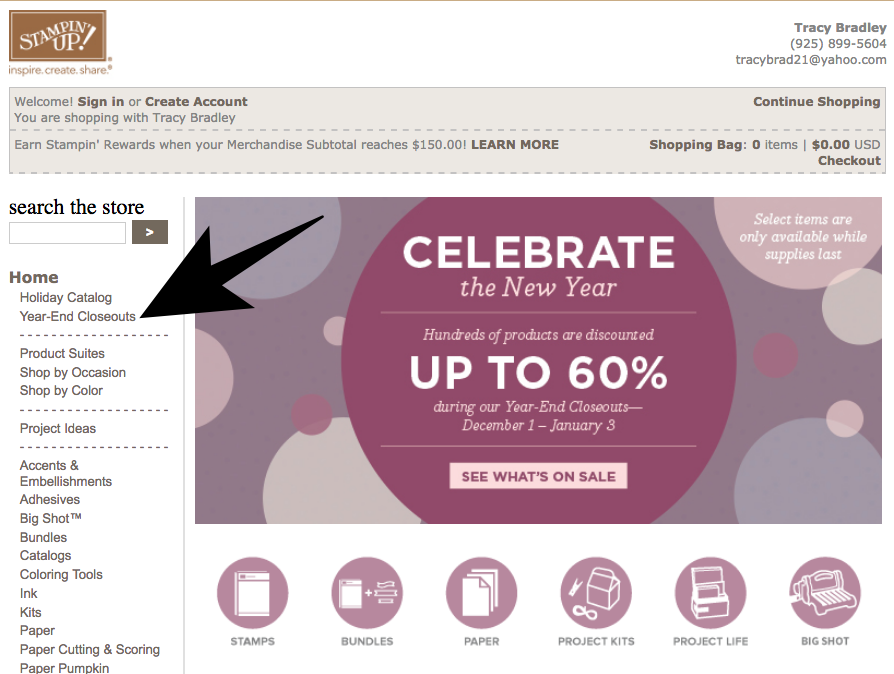
Once you’re at my Stampin’ Up! online store, the arrow shows you where to find the Year-End Closeouts.
Don’t make the mistake I did, be sure to select ALL when you are on each list.
Click here to head over to my Stampin’ Up! online store to see what’s on sale!
As always, if you have any questions, don’t hesitate to ask!
Are you ready for a sneak peek into the Occasions catalog that debuts on January 4th, 2017?
Watercolor Pencils are coming back!!!!! I can’t wait!!! Several years ago our watercolor pencils were retired and I was really disappointed. I couldn’t be happier that they are making a comeback .
One of the perks of being a demonstrator is that you can order new products a month early! I put my order in today and these pencils were at the top of my list!! I can’t wait to receive them early next week!!!!
I hope you enjoy watching the video showcasing the pencils and seeing some tips and tricks along the way!
I made another card using the stamp set Bella & Friends! It’s a different size than I usually make – it measures 4-1/4″ x 4-1/4″. The great thing is that it will still fit in our Medium Envelopes!
When I was growing up we had 5 poodles. We started with a little boy named Brandy and then we got him a playmate, a cute girl who loved my dad, named Tootsie. When Tootsie became pregnant my mom told my sister and I that we wouldn’t be keeping the puppies. Once my dad took a look at them, he was a goner. And so, five dogs (we named the puppies Zippy, Honey and Amber)! They were all so cute and we had such fun with them. I really missed all of them when I went off to college. Little Bella reminds me of all those doggy memories.
Here’s all the details of my card with Bella!
Start off with an 8-1/2″ x 4-1/4″ piece of Real Red cardstock. Score at 4-1/4″.
Use a scrap piece of Real Red and die cut a square using the Layering Squares Framelit Dies
Use a scrap piece of Whisper White for the square that you’ll make with the Stitched Shapes Framelits (these are currently on backorder, sorry).
Stamp Bella on the Whisper White square and color her. I used colored pencils (non-Stampin’ Up!) along with my blender pen. Color her collar with a Stampin’ Write marker (I used Real Red).
Stamp your sentiment.
Glue all your layers. I used Stampin’ Dimensionals behind the Real Red square.
Product List- Below are the products I used to make my card. If you click on any of them, you’ll be taken to my Stampin’ Up! online store. If you have any questions about my card today or the products I used, don’t hesitate to contact me!
Today I have a tip for you that I learned from Kristina Werner. If you don’t have a sink in the area where you craft (or even if you do), these little bottles are great.
I fill the blue bottle with water so that it’s easy to reach for while I’m crafting. If my Aqua Painter runs out of water, I can quickly fill it up with the dropper that comes with the bottle and then continue on. If you are anything like me, you get up and go in the other room to get water and then get sidetracked by something else! Has that ever happened to you?
I asked my husband to model adding water to the Aqua Painter just in case you’re asking yourself, what the heck is an Aqua Painter??? It’s a great tool for watercoloring! It has a reservoir for adding water and then you screw on the brush (they come in a set – one with a medium brush tip and one with a large brush tip).
Aqua Painters #103954
The bottles are also great to take with if you’re traveling! They are made of glass though so you do need to be careful with them. I found them on Amazon (here’s the link if you’d like to check them out).
If you’re interested in the Aqua Painters , you can see them hereover at my Stampin’ Up! online store.
Would you like to receive a 2017 Occasions Catalog and a Sale-a-bration brochure? If so, please log in to your Stampin’ Up! online account to make sure that all of your mailing information is correct and that I am listed as your demonstrator. If you’ve shopped with me within the last 6 months, I’ll automatically send both of these catalogs to you.
Click here to log into your account to double check your information. Stampin’ Up! will be mailing the catalogs directly to you in several weeks but I have to finalize my order tomorrow (November 30th) so that they will be sent to you. The catalogs will arrive in a few weeks and you’ll be able to begin ordering on January 4, 2017.
It’s so much fun when a new catalog comes out with so many fun new products! Plus Sale-a-bration is almost here — a time to earn free products for every $50 you spend! I can’t wait!!
As a demonstrator, I will be able to start ordering from the Occasions catalog on December 1st. If this sounds like a perk that you would enjoy, why not consider joining the fun?
Here’s how it works!
Purchase the Starter Kit for $99.
Then choose $125 worth of Stampin’ Up! products! You’ll even receive free shipping! When I joined I could only choose from a select group of products but you can choose ANYTHING, even a Big Shot!!! When you sign up, you definitely want your catalogs in front of you!
It’s that easy!
Answers to Questions You Might Have
Do I earn a discount on the products I purchase?
Yes! As a demonstrator, you will automatically receive a 20% discount off all Stampin’ Up! products, even Clearance Rack items. There are opportunities for an even larger discount.
What’s the Commitment?
The only commitment you need to make IF you want to remain a demonstrator is $300 in sales per quarter and your own personal purchases count towards sales! If your sales are below $300 after your first full quarter, then you are dropped. No pressure! If it doesn’t work for you, you still have $125 in Stampin’ Up! product!
What If I Only Want to Purchase For Myself?
That’s ok!! In the beginning, I was my best customer!
If you’re ready to become a Stampin’ Up! demonstrator, click here!
Be sure my name is in the upper right hand corner. Scroll down the page and click the blue link that says Join Now.
Read and agree to the Independent Demonstrator Agreement
Purchase your Starter Kit. The online form will prompt you to choose up to $125 in products!
Wait for your order to arrive!
If you have more questions, email me (tracy@stampingwithtracy.com) and I’d be happy to answer any questions you might have. I had a million before I joined!
I hope you had an enjoyable holiday weekend! We were out of town for the week visiting in Northern California. Our daughter, Erin, and our two grandchildren were able to come with us but we missed having our older daughter, Jenny, there with us too. Here we are at my mom’s. Brick wasn’t too happy about sitting for a picture but we were determined to get a photo!
Today’s the last day of annual Online Extravaganza! There are four products on sale just for today. You can see pictures of these items here!
Download a flyer of all of the other on sale items here! To see pictures of everything on sale, click here (scroll down past the items that were only on sale last Monday).
I’m giving away some free gifts with your order today and when you use the November Host Code: 6FMDZ9QH!
$25 (before shipping and handling): a package of Stampin’ Dimensionals
$50 (before shipping and handling): a package of Stampin’ Dimensionals AND a package of Basic Rhinestones or Pearls
$100 (before shipping and handling): a package of Stampin’ Dimensionals AND a package of Basic Rhinestones or Pearls AND an embossing folder (you’ll be able to choose from a selection I have)
$150 (before shipping and handling): a package of Stampin’ Dimensionals AND a package of Basic Rhinestones or Pearls AND an embossing folder (you’ll be able to choose from a selection I have) AND choose from a wide variety of brand new stamp sets that I have. DO NOT USE THE HOST CODE for this option. You will earn Stampin’ Rewards at checkout and will be able to choose free products from the catalog!
If you’re on my mailing list, you’ll receive another gift from me with your order today! Click here to join my list!
The last day of the Online Extravaganza is tomorrow and starting at 12:01 am (MT), these items will be available at a special price until 11:50 pm (MT).
Bell Punch
Playful Palette Pack
You’ll have to wait until tomorrow to purchase the 24-hour sale items but many more crafting supplies are available now!
When I saw these cute little mini pinecones in the Holiday Catalog, I just knew I had to get them. I had no idea how I’d use them but knew I was going to order them as soon as possible. Do you see one of them nestled among the larger pine cones? Cute, isn’t it???
My inspiration for this card came from Tamara Grenier, an Australian Stampin’ Up! demonstrator. I thought her card was gorgeous. I made a few minor changes to my version.
Card Details
I ran my 4-1/2″ x 2-3/4″ of Whisper White through the Softly Falling Embossing Folder and glued it to a 3″ x 4-3/4″ piece of Copper Foil.
Using the Pretty Pines Thinlits Dies (you can see all of the pieces in the set below), I cut out two pinecones and the larger bow in the set with the Copper Foil.
I cut three pine needles using Whisper White.
I adhered the pine needles onto the card using our multipurpose liquid glue.
I also used multipurpose glue to adhered the pine cones and bow together.
I looped the mini pinecone through the Baker’s Twine and then tied my bow and attached it with a glue dot.
My sentiment was stamped with Memento Ink. I used the stamp set Embellished Ornaments.
Pretty Pines Thinlits Dies #141851
There’s a stamp set that coordinates with the Pretty Pines Thinlits called Christmas Pines (see below). It is on sale until November 30th. It’s normally $35.00 but on sale it’s $26.25.
Christmas Pines #142049
All of the products I used to make my card are listed below!