by Tracy | Jul 10, 2024 | Happy Birthday Card
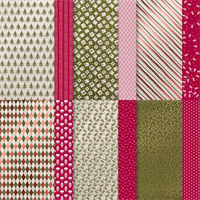
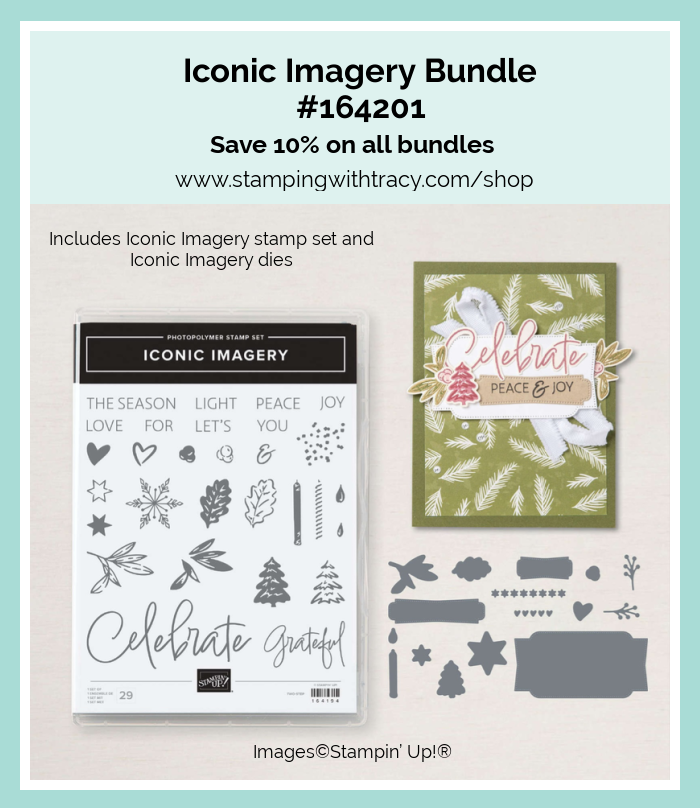
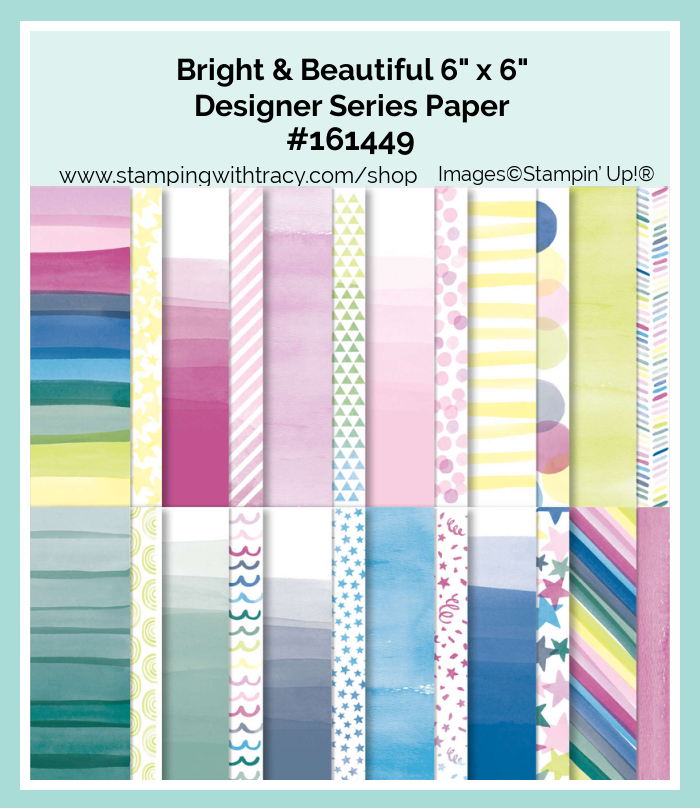
Today I’m sharing a card that was made with a new Online Exclusive, the Iconic Imagery Bundle. I also used Bright & Beautiful Designer Series Paper and Tinsel Gems Four-Pack.
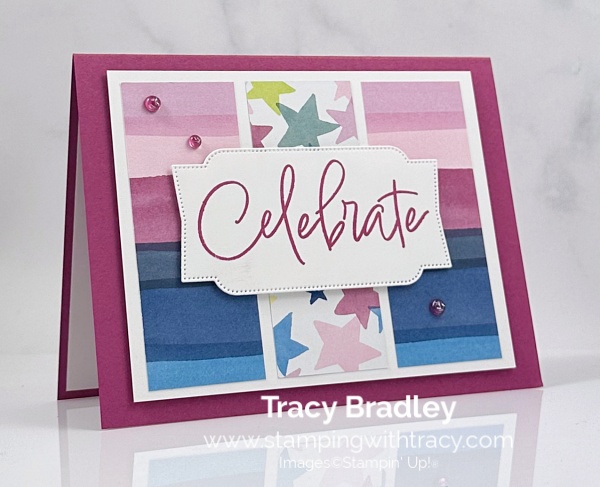
I started with a Berry Burst cardstock base. Then I cut a piece of Basic White cardstock (you can find the measurements I used below the Supply List) and adhered three strips of Bright & Beautiful Designer Series Paper (I used two different designs). Next, I added Stampin’ Dimensionals to the back and adhered the panel to the front of the card.
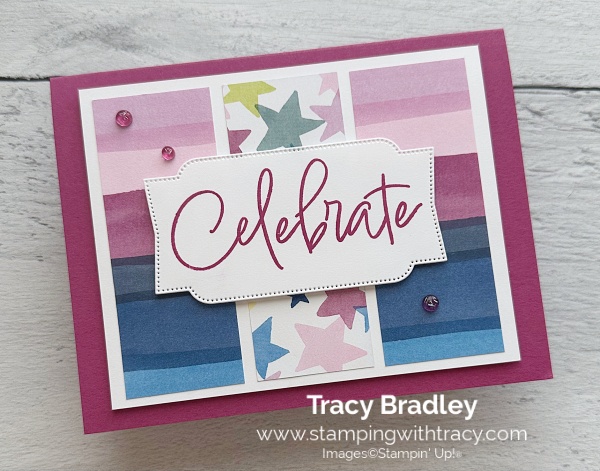
I stamped the sentiment onto Basic White cardstock using the Iconic Imagery stamp set in Berry Burst ink. I cut the sentiment out using the Iconic Imagery Dies. I added Stampin’ Dimensionals to the back and adhered it to the center of the card.
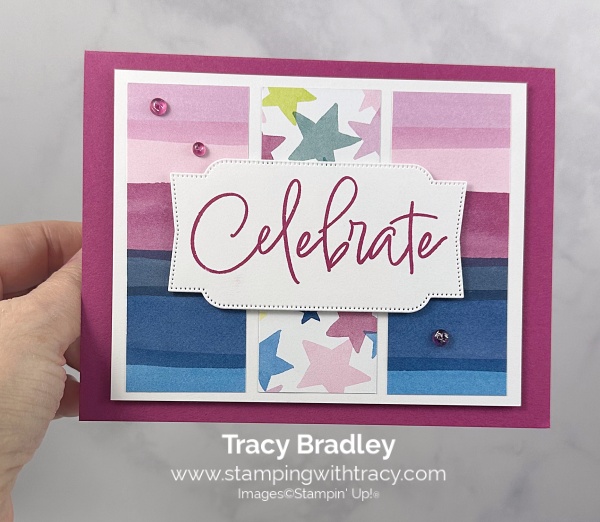

To complete my card, I added a piece of Basic White cardstock to the inside and added three Tinsel Gems in Berry Burst.
Supply List
Below you’ll find all the Stampin’ Up! supplies I used for today’s card. If you need any stamping supplies, I’d love to be your demonstrator! You can place an order by clicking any of the images below to go to my Stampin’ Up! online store.
Measurements
- Berry Burst cardstock: 8-1/2″ x 5-1/2″ score at 4-1/4″
- Basic White cardstock: 4-3/4″ x 3-3/4″
- Basic White cardstock (sentiment): approx. 3-3/4″ x 2-1/4″
- Basic White cardstock (inside card): 5-1/4″ x 4″
- Bright & Beautiful Designer Series Paper: (3) 3-1/2″ x 1-3/8″
New Online Exclusives are now available. Click here to shop!

Bonus Days July 3-31
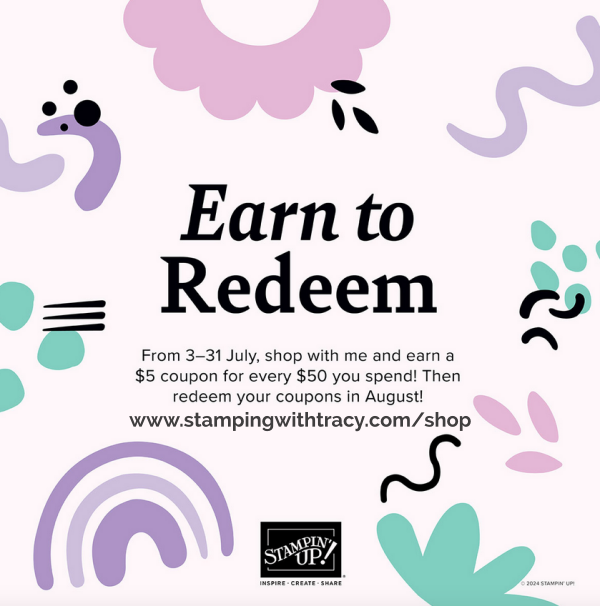
What are Bonus Days?
- Earn a $5 coupon for every $50 spent (before shipping and tax).
- All coupon codes will be emailed right after a qualifying purchase has been made. Customers must have a customer account with a valid email address to earn coupons when they shop. Be sure to set up an account before Bonus Days begin.
- If a shopper earns multiple codes from a single order, they will receive one email with multiple codes. If they earn multiple codes from multiple orders, they will receive separate emails for each code earned. Be sure to save these codes because Stampin’ Up! cannot retrieve them for you!
- Orders started before the promotion begins will not count toward earning coupon codes. For example, if you add items to your cart before 3 July and wait to purchase until that date or later, then those items will not qualify towards earning coupons. You must add items to your cart and complete your purchase during the earning period.
- There is no limit to the number of coupon codes shoppers can earn per order or throughout the duration of the earning period.
- Customers must use a valid email address during checkout in order to receive their coupon code. If a customer places an order over the phone, they must still provide a valid email address to receive their coupon code.
- Starter Kit orders are excluded from this offer. All other order types qualify.
Redemption Period: 1–31 August 2024
- There is no limit to the number of coupon codes shoppers can redeem on an order during the redemption period. If using multiple codes, they must be separated by a space.
- Coupon codes may be redeemed one time only. They cannot be redeemed after August 31st.
- Bonus Days coupon codes can be applied to month-to-month Paper Pumpkin subscriptions and new prepaid subscriptions.
Stampin’ Glass Mat Studio
The Stampin’ Glass Mat Studio is now available in Online Exclusives!

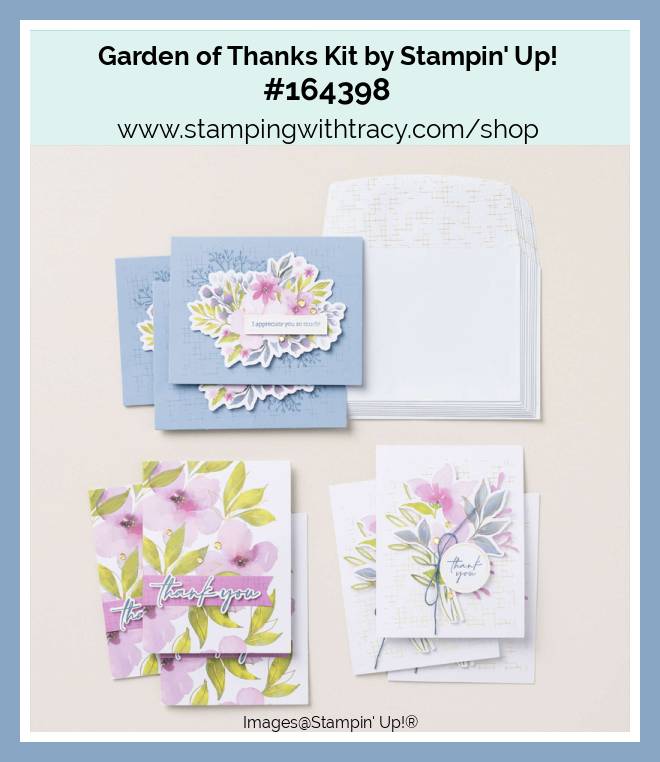
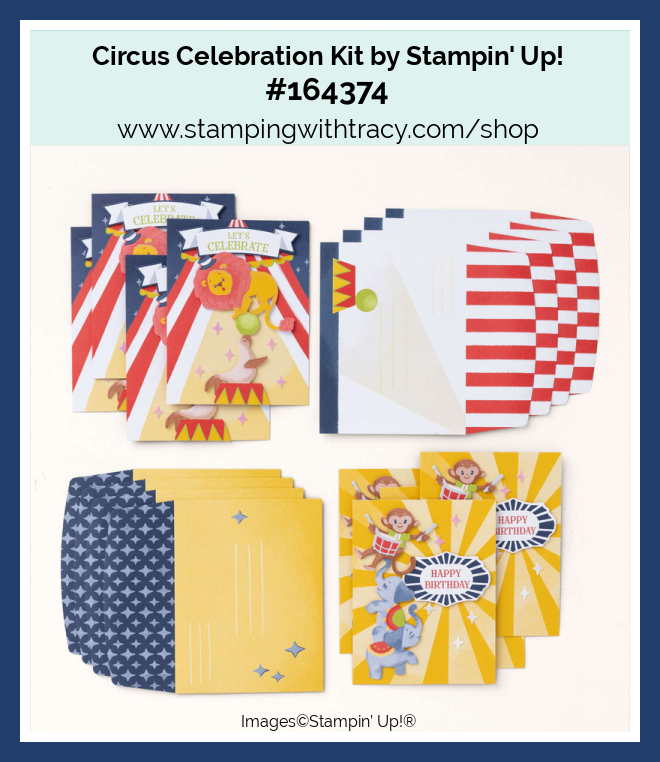
New Kits by Stampin’ Up!
Click each image below to get more information about the kits.
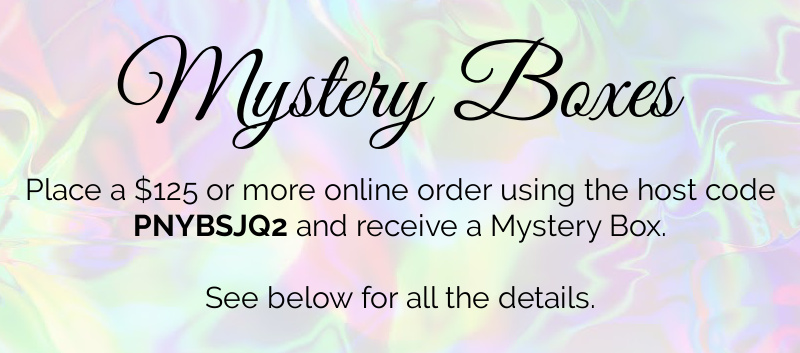
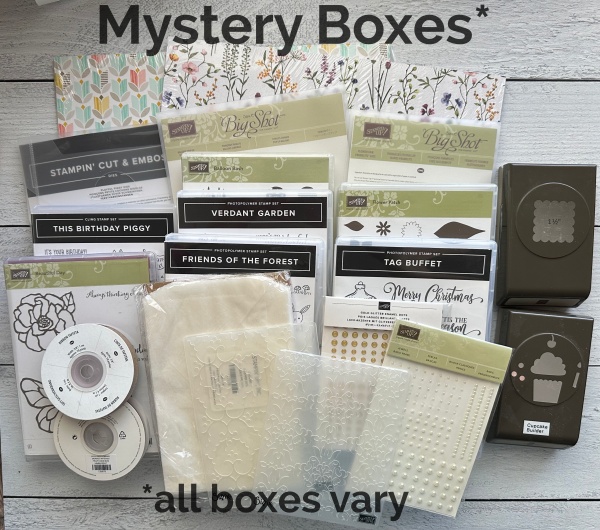
Mystery Boxes
What’s a Mystery Box?
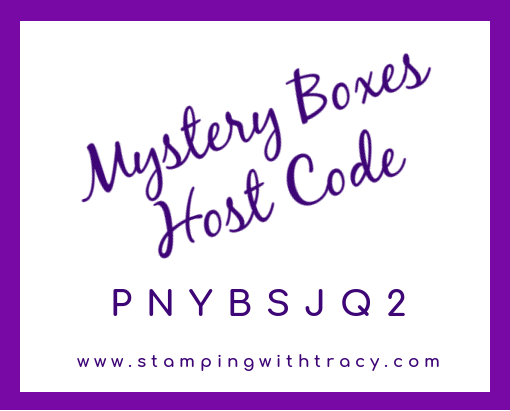
I have a new host code for my Mystery Boxes (I have to change the host code every thirty days).
A Mystery Box is filled with retired products that I’d like to give to a new home. I’ve been a demonstrator for 15 years so you can just imagine how much I have! I have Medium Rate Flat Rate USPS shipping boxes stuffed with retired Stampin’ Up! product.The boxes contain stamps, dies, ribbon, embellishments and more! The boxes are already sealed and every box will be different and a mystery as to what’s inside! The value of each box is well over $200.
All of the products in the Mystery Boxes have retired but some have never been used, some are used and all are “as is”. Some of the stamp sets are wood mount.
You can place an order HERE.
There are two ways to get a Mystery Box
- Place a $125 or more order (before shipping/tax) at my Stampin’ Up! online store using the host code PNYBSJQ2 and I will send a Mystery Box to you as a free gift and I’ll even pay the postage! Using the host code will alert me that you want a Mystery Box. If your order is $150 or more, please DO NOT use the host code so you can receive Stampin’ Rewards (free product) directly from Stampin’ Up!. After you’ve placed your order (only if your order is $150 or more), please email me that you’d like a Mystery Box (click “Email Me” on the sidebar).
- If you don’t want to place an order, you can purchase a Mystery Box for $80 plus $18.00 postage (postal rates have gone up and I had to raise the price). Email me that you want a box and I’ll send you a PayPal invoice (click “Email Me” on the sidebar).
More Information
- You must use the host code PNYBSJQ2 when placing your order (if your order is over $150, do not use the host code – see above)
- $125 order must be before tax/shipping amount
- One box per order
- Using the host code will let me know you want a Mystery Box
- You’ll receive at least TWO Bradley Points with your order
- No refunds or exchanges.
- Each box will be different and a mystery! The boxes are already sealed up and I’m unable to take requests for the contents of the boxes.
- All of the original Mystery Boxes are gone but I’m boxing up more!
- Feel free to email me before placing an order to see if I have boxes available.
.
Painted Petals Paper Pumpkin Kit – Today’s the Last Day to Order
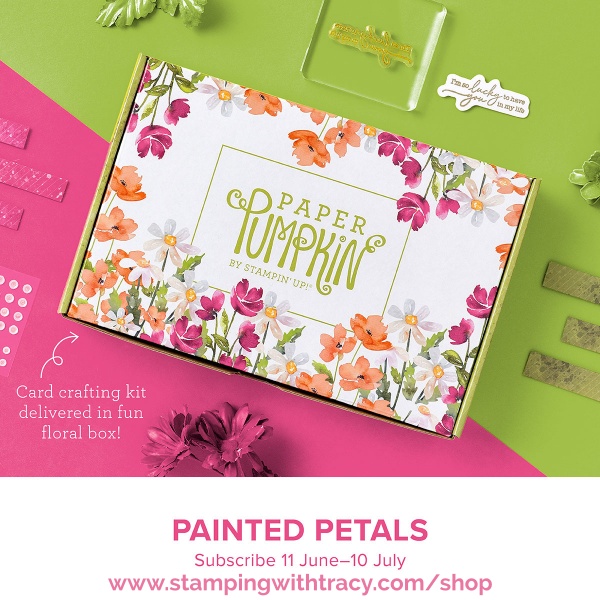
Click here to order the Painted Petals Paper Pumpkin Kit and learn how Paper Pumpkin words. An additional add on is available but only for Paper Pumpkin subscribers.

Thank you for stopping by today!
by Tracy | Apr 10, 2024 | Uncategorized
I was really disappointed when I saw the Scalloped Contours Dies were retiring. This has been a much loved staple in my craft room. They are normally $35.00 but until April 30th, they are 30% off with a price tag of $24.50. I thought I’d share some cards, which you can see below, using the Scalloped Contours Dies. If you want more information about the card, simply click the image of the card and you’ll be taken to that blog post. I’ve created many more cards with these dies but I’m only showing ones with current and retiring product.

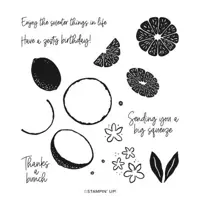
For this card, I also used the Sweet Citrus stamp set (20% off) and the Sweet Citrus Hybrid Embossing Folder and Dies (50% off) which are both retiring and both on sale.

This card was created with the Stripes & Splatters embossing Folders (they have sadly already sold out) and Fresh as a Daisy Designer Series Paper which is retiring and 20% off.

This card was created also using the Stripes & Splatters Embossing Folders (sold out) and Bright & Beautiful Designer Series Paper which is not retiring.

This card was made using the Darling Details stamp set which is retiring and Delightfully Eclectic Designer Series Paper which is retiring and 50% off!

This card was already created with the Darling Details stamp set which is retiring and Fresh as a Daisy Designer Series Paper which is retiring and 20% off.

Supply List
Sale: $24.50
Price: $35.00
Sale: $18.40
Price: $23.00
Sale: $16.50
Price: $33.00
Sale: $10.00
Price: $12.50
Sale: $15.00
Price: $30.00

What’s a Mystery Box?
I offered Mystery Boxes last year but I still have SO MUCH retired Stampin’ Up! product in my home and I’d like to give it all to a new home. I’ve been a demonstrator for almost 15 years so you can just imagine how much I have! I have Medium Rate Flat Rate USPS shipping boxes stuffed with retired Stampin’ Up! product.The boxes contain Designer Series Paper, stamps, dies, ribbon, embellishments and more! The boxes are already sealed and every box will be different and a mystery as to what’s inside! The value of each box is well over $200.
All of the products in the Mystery Boxes have retired but some have never been used, some are used and all are “as is”. Some of the stamp sets are wood mount.

There are two ways to get a Mystery Box
- Place a $125 or more order (before shipping/tax) at my Stampin’ Up! online store using the host code HS2RTGAS. I will send a Mystery Box to you as a free gift and I’ll even pay the postage! Using the host code will alert me that you want a Mystery Box. If your order is $150 or more, please DO NOT use the host code so you can receive Stampin’ Rewards (free product) directly from Stampin’ Up!. After you’ve placed your order (only if your order is $150 or more), please email me that you’d like a Mystery Box (click “Email Me” on the sidebar).
- If you don’t want to place an order, you can purchase a Mystery Box for $80 plus $15.00 postage. Email me that you want a box and I’ll send you a PayPal invoice (click “Email Me” on the sidebar).
More Information
- You must use the host code HS2RTGAS when placing your order (if your order is over $150, do not use the host code – see above)
- $125 order must be before tax/shipping amount
- One box per order
- Using the host code will let me know you want a Mystery Box
- You’ll receive at least TWO Bradley Points with your order
- No refunds or exchanges.
- All boxes have two Designer Series Paper packages, at least three die bundles, an additional four stamp sets and other goodies added in.
- Each box will be different and a mystery! The boxes are already sealed up and I’m unable to take requests for the contents of the boxes.
- Once all the boxes are gone, I’ll update this page.
- Feel free to email me before placing an order to see if I have boxes available.
- Only available while supplies last.

Stampin’ Up! Has Released Two New Papercrafting Kits
For more information about these kits, click on the images below
.

Price Increase
Stampin’ Up! will be raising prices in the new Annual Catalog. Prices will go up on May 1st but some products may become unavailable before that. Here’s a few of the products that will see a price increase:
- Solid Color cardstock (price will increase $1.50)
- Basic White & Very Vanilla cardstock (price will increase $2.50)
- Basic White Thick Cardstock (will increase $2.25)
- Basic White Medium Envelopes (will increase $2.50)
- Ink Refills (will increase .50)
- Mini Glue Dots (will increase $1.50)
- Stampin’ Blends (will increase $1.00)
- Multipurpose Liquid Glue (will increase .50)
- Glue Dots (will increase $1.50)
- Stampin’ Cut & Emboss Machine Standard Size (will increase $2.00)
- Stampin’ Cut & Emboss Plates Standard Size (will increase $1.00)
- Punches (will increase $1.00)
- Watercolor Pencils #1 (will increase $2.00)
- Watercolor Pencils #2 (will increase $1.50)
- Blender Pens (will increase $1.00)
- Embossing Paste (will increase $1.00)
- Heat Tool (will increase $1.00)
- Paper Snips Scissors (will increase $1.00)
- Paper Trimmer (will increase $2.00)
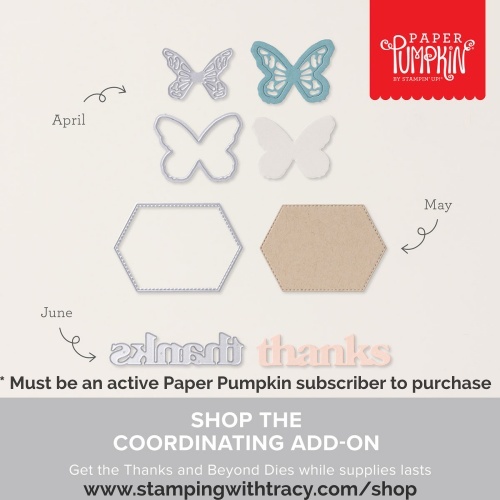
Delicate Wings Paper Pumpkin Kit
The last day to subscribe to the Delicate Wings Paper Pumpkin Kit is today!

Purchase the coordinating Thanks & Beyond Dies (only available to active Paper Pumpkin subscribers).
Thanks for stopping by today!
by Tracy | Sep 22, 2023 | Uncategorized
Today’s card is a variation of one I shared earlier this week and you can see it here. Instead of using one piece of Bright & Beautiful Designer Series Paper, I used two. I used the stamp set, Darling Details, Tinsel Gems Four Pack, 3/8″ Sheer Ribbon Combo Pack and All That Dies.

I started with a piece of Thick Basic White cardstock for the base of my card. Then, I adhered a piece of Bright and Beautiful Designer Series Paper to a piece of Bubble Bath cardstock and then adhered it to the front of the card (you can find the measurements I used below the Supply List).
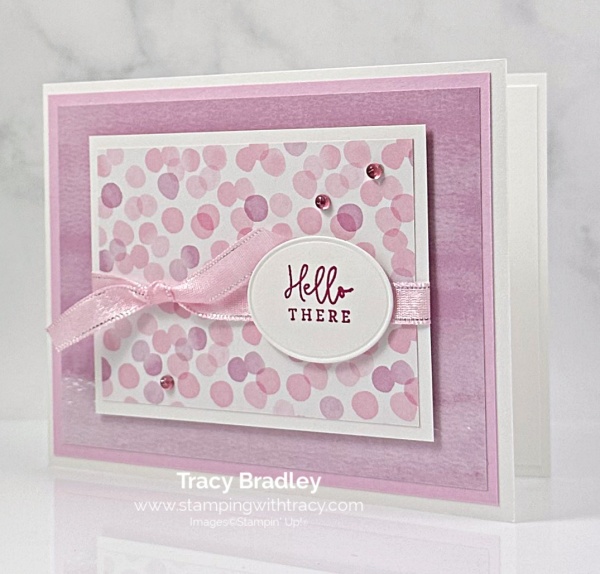

Next, I cut a piece of Basic White cardstock and adhered another piece of Bright & Beautiful Designer Series Paper to the front. I wrapped a piece of Sheer Ribbon around the piece and tied a knot over to the left. I added Stampin’ Dimensionals to the back and adhered it to the front of the card.
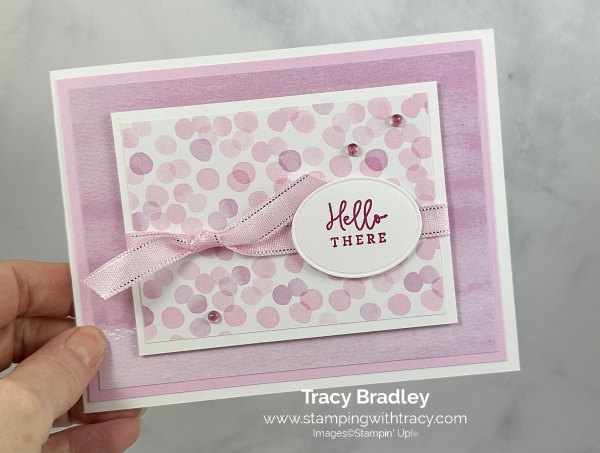

I stamped the sentiment onto Basic White cardstock using the stamp set, Darling Details, using Berry Burst ink. I cut it out using the All That Dies and then added Stampin’ Dimensionals to the back and adhered to the front of the card.To complete my card I added three Tinsel Gems in Berry Burst to the front of the card and added a piece of Basic White cardstock to the inside.
Supply List
Below you’ll find all the Stampin’ Up! supplies I used for today’s card. If you need any stamping supplies, I’d love to be your demonstrator! You can place an order by clicking any of the images below to go to my Stampin’ Up! online store.
Measurements
- Thick Basic White cardstock: 11″ x 4-1/4″
- Bubble Bath cardstock: 5-1/4″ x 4″
- Basic White cardstock: 4″ x 3″
- Basic White cardstock (sentiment): approx. 2″ x 1-1/2″
- Basic White cardstock (inside): optional 5-1/4″ x 4″
- Bright & Beautiful Designer Series Paper: 3-3/4″ x 2-3/4″
- Bright & Beautiful Designer Series Paper: 5″ x 3-3/4″
Host Code
Use the host code WPWWQYXW to receive a package of Blooming Pearls (in the Mini Catalog) with your $50 or more order BUT if your order is $150 or more do NOT use the host code so you can receive the Stampin’ Rewards. After you place your order, email me (only if your order is $150 or more) and let me know you’d like the Blooming Pearls.

Newest Additions to the Online Exclusives
These papers are only available while supplies last!!
Christmas Everywhere Kit
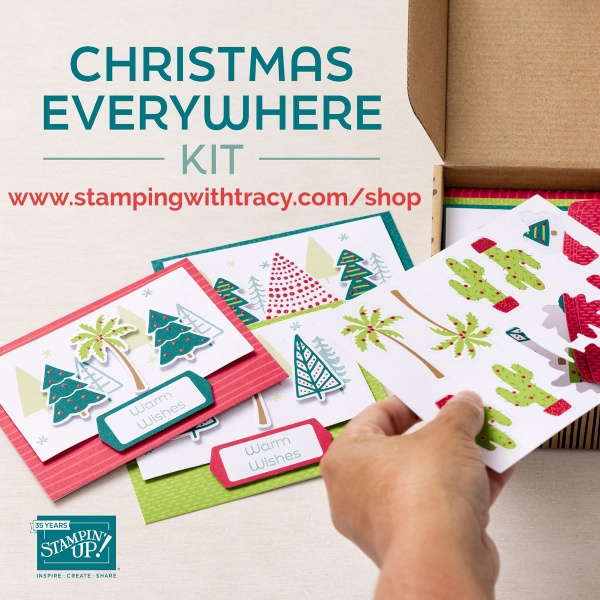
This kit includes:
- Enough supplies to create 9 cards—3 each of 3 designs
- 9 coordinating envelopes
- Christmas Everywhere photopolymer stamp set
- One Lost Lagoon Ink Spot
- Printed card bases, printed die-cut labels and images with red glitter, adhesive, and a clear block
- Finished card size: 5-1/2″ x 4-1/4″ (14 x 10.8 cm)
- Coordinating colors: Granny Apple Green, Lost Lagoon, Pecan Pie, Pretty Peacock, Real Red
Click here to purchase this new kit!
Home for the Holidays Paper Pumpkin Kit
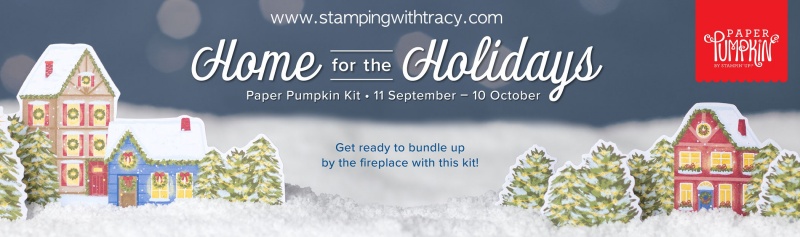
This kit includes:
- All the supplies you’ll need to create 8 sparkly and dazzling Christmas cards—4 each of 2 designs—and eight coordinating envelopes.
- A coordinating photopolymer stamp set with endearing holiday sentiments and festive designs.
- A Real Red Stampin’ Spot
- A bottle of Glitter Glue
- Beautiful Christmasy-themed precut pieces
Finished folded card size: 4-1/4″ x 5-1/2″
Coordinating Stampin’ Up! colors: Balmy Blue, Blueberry Bushel, Cherry Cobbler, Crumb Cake, Crushed Curry, Daffodil Delight, Lemon Lolly, Mossy Meadow, Night of Navy, Old Olive, Pecan Pie, Real Red
Click here to purchase this month’s Paper Pumpkin kit.
Thank you for stopping by today!
by Tracy | Sep 19, 2023 | Uncategorized
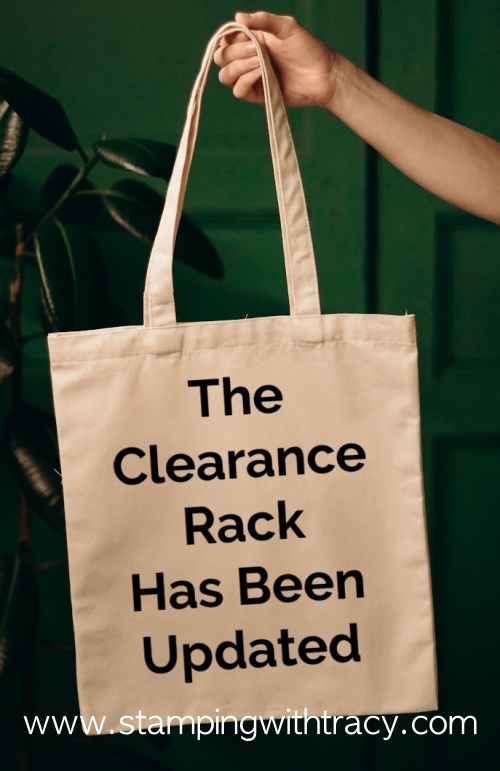
Edited to Add: I found out this morning that the Clearance Rack has been updated! You can shop the Clearance Rack HERE
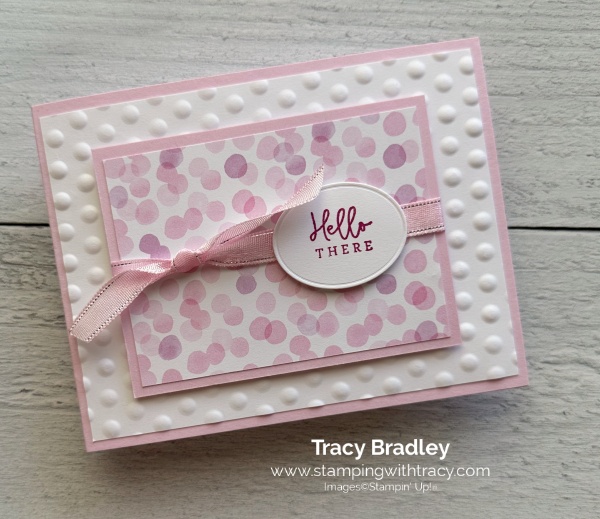
I have two cards to share with you today that were created using Bright & Beautiful Designer Series Paper. I also used the Darling Details stamp set, two of the Basics 3D Embossing Folders and our Sheer Ribbon Combo Pack. They are both variations of the same card.


For this first card, the base of the card is Bubble Bath cardstock. I then embossed a piece of Basic White cardstock using one of the Basics 3D Embossing Folders and adhered it to the card base. I cut another piece of Bubble Bath cardstock and adhered a piece of Bright & Beautiful Designer Series Paper to the front. I then wrapped a piece of 3/8″ Sheer Ribbon around this piece and tied a knot. I absolutely love this ribbon. It’s so pretty and it comes in three colors: Bubble Bath, Azure Afternoon and Lemon Lolly. I added Stampin’ Dimensionals to the back and adhered it to the embossed cardstock.

I stamped the sentiment onto Basic White cardstock using the stamp set, Darling Details, in Berry Burst ink and cut it out using the All That Dies. I added Stampin’ Dimensionals to the back and placed it on the ribbon. To complete my card, I added a piece of Basic White cardstock to the inside.
For this second card, the base is Lemon Lolly cardstock. I added a piece of Basic White cardstock to the front and a piece of Berry Burst cardstock that I embossed using the Basics 3D Embossing Folder. I cut another piece of Lemon Lemon Lolly cardstock and a piece of Bright & Beautiful Designer Series Paper and adhered them together. I wrapped Lemon Lolly sheer ribbon around it and tied a knot. I added Stampin’ Dimensionals to the back and adhered it to the front of the card. Just as I did for the first card, I stamped the sentiment in Berry Burst ink onto Basic White cardstock using the stamp set, Darling Details and cut it out using the All That Dies.
To complete my card, I added three Tinsel Gems to the front of the card and a piece of Basic White cardstock to the inside.
Supply List
Below you’ll find all the Stampin’ Up! supplies I used for today’s card. If you need any stamping supplies, I’d love to be your demonstrator! You can place an order by clicking any of the images below to go to my Stampin’ Up! online store.
The Specialty Plate is used with 3D Embossing Folders.
Measurements
First Card
- Bubble Bath cardstock: 11″ x 4-1/4″
- Bubble Bath cardstock: 4″ x 3″
- Basic White cardstock: (2) 5-1/4″ x 4″
- Basic White cardstock (sentiment): approx. 2″ x 1-1/2″
- Bright & Beautiful Designer Series Paper: 3-3/4″ x 2-3/4″
Second Card:
- Lemon Lolly cardstock: 11″ x 4-1/4″
- Lemon Lolly cardstock: 4″ x 3″
- Berry Burst cardstock: 5″ x 3-3/4″
- Basic White cardstock: (2) 5-1/4″ x 4″
- Basic White cardstock (sentiment): approx. 2″ x 1-1/2″
- Bright & Beautiful Designer Series Paper: 3-3/4″ x 2-3/4″
Host Code
Use the host code WPWWQYXW to receive a package of Blooming Pearls (in the Mini Catalog) with your $50 or more order BUT if your order is $150 or more do NOT use the host code so you can receive the Stampin’ Rewards. After you place your order, email me (only if your order is $150 or more) and let me know you’d like the Blooming Pearls.
Newest Additions to the Online Exclusives
These papers are only available while supplies last!!
Christmas Everywhere Kit
This kit includes:
- Enough supplies to create 9 cards—3 each of 3 designs
- 9 coordinating envelopes
- Christmas Everywhere photopolymer stamp set
- One Lost Lagoon Ink Spot
- Printed card bases, printed die-cut labels and images with red glitter, adhesive, and a clear block
- Finished card size: 5-1/2″ x 4-1/4″ (14 x 10.8 cm)
- Coordinating colors: Granny Apple Green, Lost Lagoon, Pecan Pie, Pretty Peacock, Real Red
Click here to purchase this new kit!
Home for the Holidays Paper Pumpkin Kit
This kit includes:
- All the supplies you’ll need to create 8 sparkly and dazzling Christmas cards—4 each of 2 designs—and eight coordinating envelopes.
- A coordinating photopolymer stamp set with endearing holiday sentiments and festive designs.
- A Real Red Stampin’ Spot
- A bottle of Glitter Glue
- Beautiful Christmasy-themed precut pieces
Finished folded card size: 4-1/4″ x 5-1/2″
Coordinating Stampin’ Up! colors: Balmy Blue, Blueberry Bushel, Cherry Cobbler, Crumb Cake, Crushed Curry, Daffodil Delight, Lemon Lolly, Mossy Meadow, Night of Navy, Old Olive, Pecan Pie, Real Red
Click here to purchase this month’s Paper Pumpkin kit.
Thank you for stopping by today!
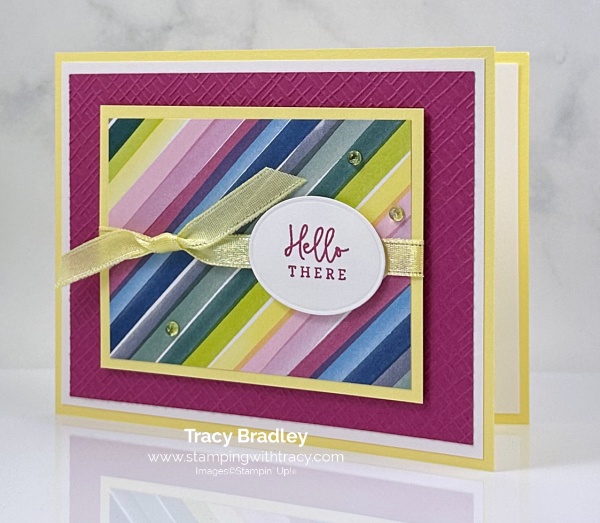
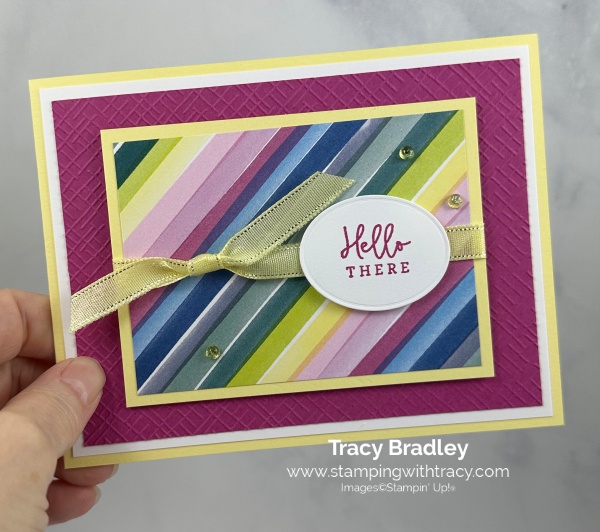
by Tracy | Aug 12, 2023 | Happy Birthday Card
Thanks so much for your understanding as to why I haven’t been posting. I arrived home a few days ago after being at my mom’s house for four months but I plan to go back in a few weeks. My Mom lived in her home for 53 years! We contacted a realtor and will be selling our family home. My sister and I have been working hard each day to go through all of our mom’s things, which has been excruciating. She loved Christmas and decorated her house so that it was a magical place. Last week we went through her Christmas decorations and I will be bringing quite a lot of them home with me (so many memories!!). Since my dad passed away first, we didn’t have to take the house apart and I really didn’t understand how very hard it is to disassemble someone’s life. My heart goes out to everyone who’s already done this.
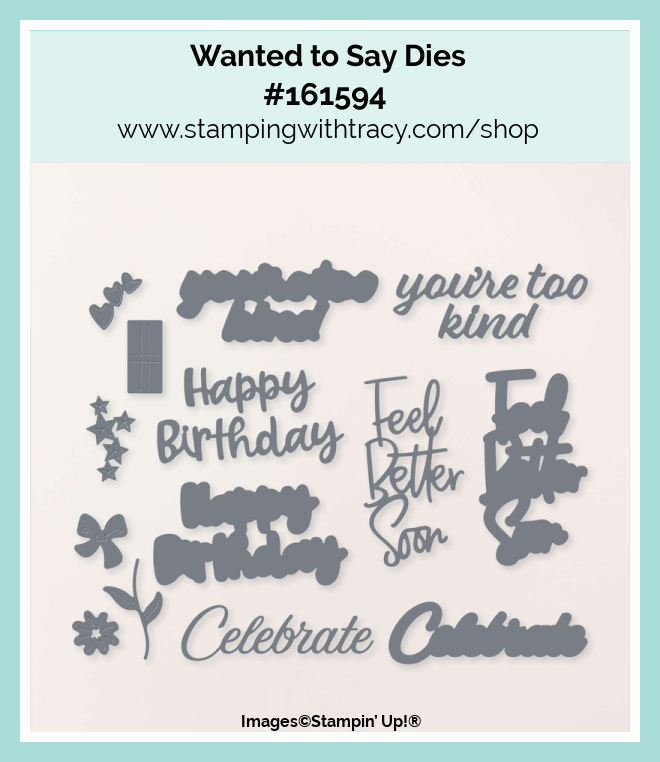
I still won’t be posting every day but today I do have two cards to share that I made a few weeks ago. They both use the same products but I used different Designer Series Paper for each one. Both cards were made with the Wanted to Say Dies, Scalloped Contours Dies and one of the Stripes & Splatters 3D Embossing Folders.
For this first card, the base of my card is Bubble Bath cardstock. Then I added a piece of Fresh as a Daisy Designer Series Paper to the front of the card. I used the Scalloped Contours Dies to cut a piece of Basic White cardstock and then cut another piece of Basic White cardstock to fit on the scalloped rectangle but first I ran it through one of the Stripes & Splatters Embossing Folders. I added Stampin’ Dimensionals to the back of the scalloped rectangle and adhered it to the front of the card.


Next, I used the Wanted to Say Dies to cut the words, Happy Birthday. I used Bubble Bath for the background piece and Basic White for the actual words. I adhered the two pieces together and then added Stampin’ Dimensionals to the back to adhere it to the card front.
To complete my card, I added a piece of Basic White cardstock to the inside.

For this next card, I used Bright & Beautiful Designer Series Paper and Berry Burst cardstock.


Supply List
Below you’ll find all the Stampin’ Up! supplies I used for today’s card. If you need any stamping supplies, I’d love to be your demonstrator! You can place an order by clicking any of the images below to go to my Stampin’ Up! online store.
The Specialty Plate is used with 3D Embossing Folders.
Measurements
- Bubble Bath or Berry Burst cardstock: 8-1/2″ x 5-1/2″ score at 4-1/4″
- Bubble Bath cardstock (background for words): approx. 3-1/2″ x 2-1/4″
- Berry Burst cardstock (Happy Birthday): approx. 3-1/4″ x 2″
- Berry Burst (embossed): 3-3/4″ x 2-1/2″
- Basic White (scalloped rectangle): approx. 4-3/4″ x 3-1/2″
- Basic White cardstock (embossed): 3-3/4″ x 2-1/2″
- Basic White cardstock (Happy Birthday): 3-1/4″ x 2″
- Basic White cardstock (background for words): approx. 3-1/2″ x 2-1/4″
- Basic White (inside): 5-1/4″ x 4″
- Fresh as a Daisy or Bright & Beautiful Designer Series Paper: 5-1/4″ x 4″
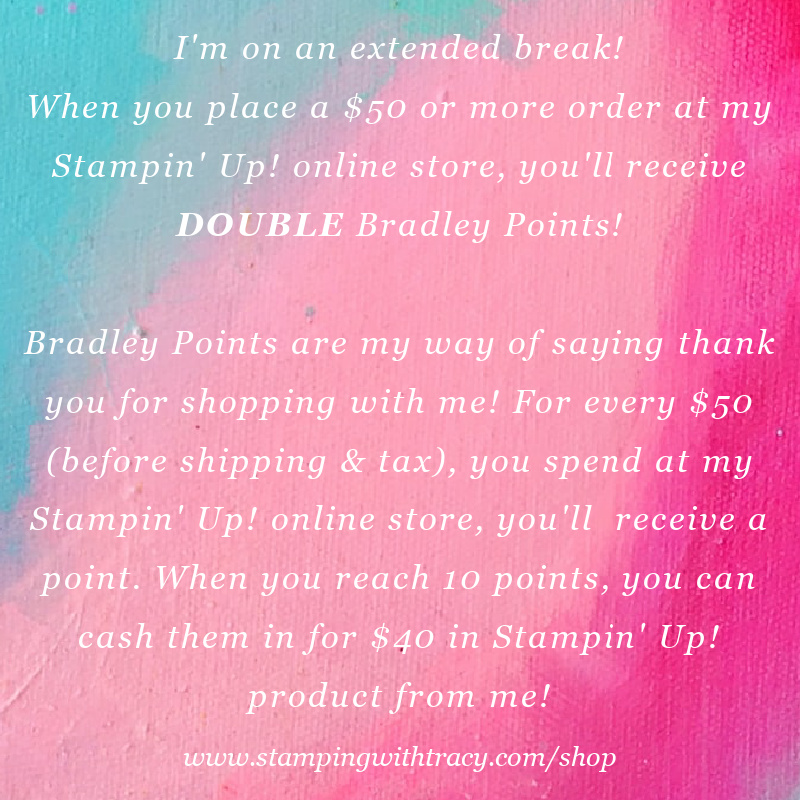
Until I’m back posting regularly, I’m still offering Double Bradley Points for orders $50 or more!
With Love & Gratitude Paper Pumpkin Kit

This kit includes:
- 8 treat packages
- 8 note cards
- 8 coordinating envelopes
- 1 photopolymer stamp set
- 1 Lost Lagoon Ink Spot
- Specialty gold foil, precut embellishments
- Adhesives
- Finished treat packaging: 3-1/2″ x 5″ x 2″ (8.9 x 12.7 x 5.1 cm)
- Final card size: 3-1/2″ x 3-1/2″ (8.9 x 8.9 cm)
- Coordinating Stampin’ Up! colors: Copper Clay, Crumb Cake, gold foil, Lost Lagoon, Mossy Meadow, Pebbled Path
Click HERE to order this month’s Paper Pumpkin Kit!
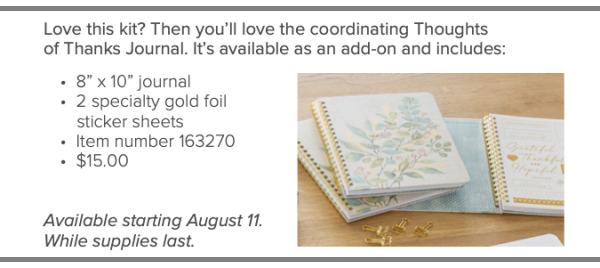
You must be an active Paper Pumpkin subscriber to order the Thoughts of Thanks Journal.
Click here to order the Thoughts of Thanks Journal
Kits Collection Sale
The Stampin’ Up! Kits Collections are on sale this month. You can save up to 30%! Click here to shop the Kits Collection (check out the new kit below)!

New Kit – Festive Tags

This kit includes:
- Enough supplies to create 15 gift tags—3 each of 5 designs
- Printed tags, printed die cuts and stickers, adhesive, and embellishments
- Includes printed sentiments in English, French, German, and Dutch
- Finished tag size range: 1-1/2″ x 2″ (3.8 x 5.1 cm) to 2-1/2″ x 3″ (6.4 x 7.6 cm)
- Coordinating colors: Basic Black, Flirty Flamingo, Garden Green, Lost Lagoon, Pool Party, and Real Red
Click here to shop the Festive Tags Kit
Bonus Days
It’s time to redeem the coupons you earned in July!


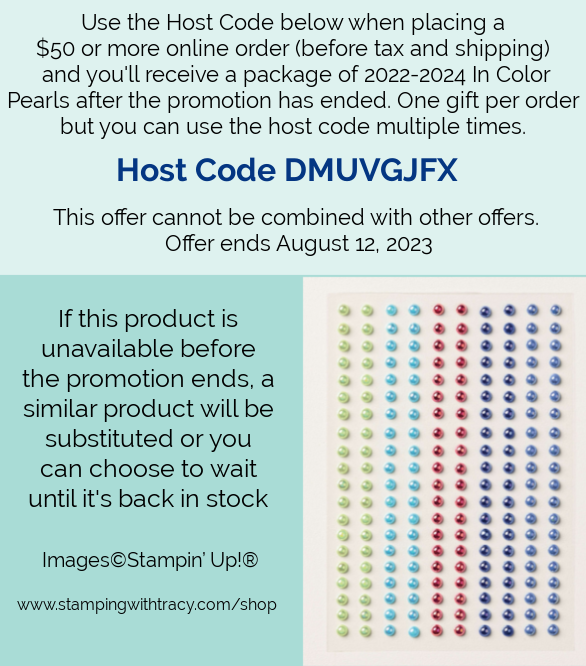
Host Code
This is the last day to use the host code DMUVGJFX to receive a package of 2022-2024 In Color Pearls with your $50 or more order.
Thanks so much for stopping by today!