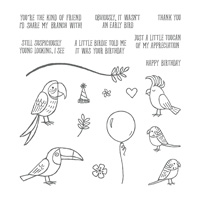
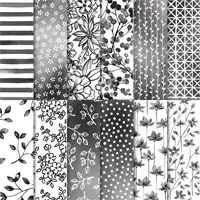
Bird Banter is quickly becoming one of my favorite stamp sets in the Occasions catalog! It comes with 5 cute birds, a branch, party hat, heart, balloon and cute sentiments. Because the stamps are photopolymer, which means you can see right through them, it’s easy to get perfect placement of the heart. I used Stampin’ Blends to color the bird and heart but you could easily use colored pencils or Stampin’ Write markers. I like using the Stampin’ Blends because you can’t see your coloring lines. That’s a big plus to me! My card also uses Petal Passion Designer Series Paper which is a very popular item in the Occasions catalog.
This card is included in my thank you this month! Place a minimum $50 order using my host code (2GWMTTXZ) and you’ll receive all of the materials to make today’s card along with two other cards and you’ll receive a paper sampler! All of the paper in your kits will already be cut, scored, embossed and die cut. Pull out your own ink, adhesive and stamp set and you’ll be all set to create! Don’t have Bird Banter? Purchase it for $17.00 (see supply list below) or substitute with a stamp set of your own. Don’t forget that with every $50 purchase, you can choose a Free Sale-A-Bration gift.
Here’s what you’ll receive with your minimum $50 purchase using the Host Code:
It’s the most fun time of the year to make a Stampin’ Up! purchase! Click hereto place your order online!
Below you’ll find all of the Stampin’ Up! supplies I used to create today’s card! Click on any of the images and you’ll be taken to my Stampin’ Up! online store.
I was instantly drawn to the Lots of Happy Card Kit the first time I saw it at On Stage in November. It was one of my first purchases from the Occasions catalog and when it arrived, wow! I was shocked at how much product was included! There are card bases, envelopes, vellum leaves, ribbon, four full-sized Watercolor Pencils, a clear block, 7 photopolymer stamps, a Black Archival Stampin’ Spot and so much more. You’ll have enough materials to make 20 different cards. All you need to provide is adhesive (although it does include Stampin’ Dimensionals). How great is that??
A refill is also available which comes with everything except the stamp set, clear block, ink spot and watercolor pencils (#145605).
This video from Stampin’ Up! shows you exactly what you’ll get in the kit and tips for assembling the cards. As mentioned in the video, a blender pen (not included in the kit) can be used to make your coloring look more even.
If you’d like to purchase the Lots of Happy Card Kit, click here and you’ll be directed to my Stampin’ Up! Online store.
With a $50 purchase, you’ll be able to choose a Sale-A-Bration gift right when you place your order. Use my February Host Code (2GWMTTXZ) and you’ll receive my February Thank You – 3 Card Kits and a Paper Sampler. You’ll just need to supply ink, adhesive and the Bird Banter stamp set(or something already in your stamp collection). Click here to place your order today!
Are you ready for the Treat Holders Glitter Queen Blog Hop? We have some treat holders that are sure to send you rushing to your crafting area! My project is small and holds a little something for someone special.
I used the beautiful Painted with Love Speciality Designer Series Paper. Although the paper is on a page in the Occasions Catalog associated with Valentine’s Day, it could really be used for any occasion.
My sentiment comes from Seasonal Chums which is a carryover stamp set from the Holiday Catalog. You can’t find it in a current catalog but it is available here!
I made a video showing how to make these cute little holders and I have to apologize for the abrupt end of the video (although the project is finished when it stops). Every single problem that you could have while filming, happened. The final product was about my tenth try and I just went with it. Sometimes you just have to laugh rather than get upset! So please scroll down to the end of the post for the video and you’ll also find a supply list there as well!
I hope you’ll continue through our hop! Next up is Davette, who always has the most gorgeous projects!Here’s the list of all the hopping Glitter Queens!
To purchase any of the products used to make today’s treat holders, simply click any of the images and you’ll be directed to my Stampin’ Up! online store.
It’s a brand new month which means a brand new host code and a brand new thank you!
But before I tell you about my February Thank You, I’d like to announce a winner! Several times throughout January, I announced that anyone who left a comment on my blog would have their name entered in a contest to win some Stampin’ Up! goodies. The winner is: Lesa (I don’t have a last name)! Congratulations Lesa! Please email me your address and I’ll send your goodies out to you! (Find the rose on the right hand side of my blog that says Email Me).
February Thank You
Place a minimum $50 order this month using the host code 2GWMTTXZ and I’ll send you all the materials to make the three cards below. Everything will be all ready for you to create and you’ll just need to supply ink, adhesive and stamped images (per Stampin’ Up!, I cannot send stamped images). I used the adorable stamp set Bird Banter to create all three cards. You can purchase the set if you don’t already have it or use what you already own. Click hereto place an order!
In addition, when you place a $50 order, you’ll also receive a Sale-a-Bration gift from Stampin’ Up! Simply add your choice at the bottom of the order form.
As a way to thank everyone who places an order through me at my Stampin’ Up! website, all orders will receive a handmade thank you card and handmade gift. Happy Mail!
Another Glitter Queens Blog Hop will take place tomorrow! We will actually post tonight (Thursday) but we work on any broken links that we might have so by the time you visit Friday morning everything should be up and ready! I hope you’ll join us!
Sale-A-Bration is so much fun because with each $50 purchase (before shipping/tax) you earn a FREE gift. This year there are $50 AND $100 rewards. If your order reaches $100, you can choose two $50 items or one $100 item. The two $100 items are the last two products in my list below: Celebrate You Thinlits Dies and Happy Wishes stamp set. The Celebrate You Thinlits are a product that WILL be in the new 2018-2019 catalog but you can now earn them free! You can see a project I made with the Thinlits here.
It’s always nice to see products in action so be sure to check out the videos below!
It’s Monday! Did you have a nice weekend? Yesterday I was able to visit with family that I haven’t seen in a while so that made my weekend extra special.
Today I have a quick and easy lollipop holder! I’m so in love with the Painted with Love Speciality Designer Paper. It is so pretty in person and I love the gold foil accents on one side of each sheet.
I also used the Love Mini Tinsel Trim Combo Pack to make my bows. It comes in Gold and Powder Pink and it comes packaged with both colors! I love the sparkle and it’s so pretty that you really don’t need to add anything else to the holder. But, I did add a sentiment to the one on the left. It sits on top of a scalloped gold foil circle and a Metallic Enamel star in gold adds even more sparkle. The sentiment is from the stamp set Seasonal Chums which debuted in the Holiday Catalog. It’s a carryover item and can still be purchased (you’ll find it in the supply list below). (more…)
Isn’t this little panda adorable?? He’s one of three pandas in the stamp set Party Pandas and it’s one of the FREE items you can earn during Sale-a-bration! Place a $50 order (before tax and shipping) and you can add these pandas to your order. There are 12 other choices and you can see them here in the Sale-a-bration catalog.
I had so much fun stamping with this little guy and used my Stamparatus for the first time. I was able to get one early because I was on a team that helped to develop this wonderful new tool. If you preordered one back in November, you should have received an email that yours will be shipping mid February. I wanted to get good coverage of the panda with black ink which was why I stamped him using the Stamparatus. Because it comes with strong magnets to hold your paper in place, you can stamp over and over again until you get the kind of coverage you want. You’re going to love this tool! If you weren’t able to preorder it, they will be available in the new Annual catalog which debuts in June. (more…)
Have you started thinking about Valentine’s Day treats? Can you believe how fast January is whizzing by?
Today I have a quick and easy treat bag that you can seriously make in just a few minutes!
Start with a 9″ x 2-7/8″ piece of Painted with Love Designer Series Paper and score it at 1″, 3″ and 7-3/4″. Fold on the score lines.
Insert your paper into a 3″ x 6″ Gusetted Cellophane Bag. The 1″ & 3″ score lines will go into the bag first and create the bottom.
Add our Sweet Soiree Ready Shreddie (crinkle-cut paper) to the bag along with some yummy candy.
Fold the top fold over to close the bag and staple it shut. Another option is to add a clip at the top.
Just like that, your bag is done! All that’s left is to add a sentiment but it isn’t absolutely necessary. I used the Layering Ovals Framelits and a stamp set that you can get FREE now, during Sale-a-bration with a $100 purchase (before tax/shipping). It’s called Happy Wishes and comes with 16 stamps! Watch the video below to see the set in action!
Here’s the same bag with a banner at the top which is a die in the Lots to Love Box Framelits Dies.
All of the supplies I used to make my bags are listed at the end of the post. When you’re ready to shop, just click any of the images and you’ll head over to my Stampin’ Up! online store. For every $50 you spend, you get to choose a Sale-A-Bration gift and this year, several items are available with a $100 purchase. For more information about Sale-a-bration, click here and to view the Sale-a-bration Catalog online, click here.
Place any size order this month using the Host Code BCDR6NRJ and receive:
All the materials to make all three cards in my January Card Kits (you’ll need to supply your own adhesive, ink and stamps).
A PDF with pictures, measurements and supply lists.
A handmade thank you gift.
A handmade thank you card
Bump your order up to $50 and you’ll also receive:
A free Sale-A-Bration gift from Stampin’ Up! (in fact, you’ll receive a free gift for EVERY $50)
An extra thank you gift from me!
Bradley Points for every $50 you spend before tax/shipping. Read all about Bradley Points here!
IMPORTANT: Don’t forget to use the host code BCDR6NRJ when placing your order, BUT if your order is over $150, please DO NOT use the host code. You’ll be eligible for Host Rewards from Stampin’ Up! (at least $15 in free product). If you use the host code, you won’t be eligible for these rewards. All orders over $150 will still receive all the goodies I’ve listed above.
After I receive notification from Stampin’ Up! that you’ve placed your online order, I’ll start working on your Happy Mail package. You’ll receive your order directly from Stampin’ Up! along with any eligible Sale-A-Bration rewards you earned and your January Card Kits and extra goodies will come to you, from me.
Today’s card is a fun one because it’s a pocket card! The folds create a little pocket where the Whisper White cardstock slips in. It would be easy to add a gift card with glue dots and when the cardstock is lifted out of the pocket, ta da!, a gift card!
This card is one of the ones featured in my January Card Kits. When you place an order with me in the month of January using the host code BCDR6NRJ, you’ll receive all of the supplies to make today’s card along with two other cards (you need to provide adhesive, ink and stamps). All of the paper will be cut, scored, punched, die cut and ready for you to assemble! A PDF will also be included with pictures, measurements and supply lists. If you aren’t sure how to use the Host Code, click here for directions.
This month, there’s no minimum order needed to receive the January Card Kits and PDF and if you bump your order to $50, in addition to receiving a Sale-a-bration item from Stampin’ Up!, you’ll also receive an extra goodie from me in your thank you package. Click here to start shopping!
Sale-a-bration is the most fun time of the year! Why? FREE PRODUCT!! My card today was made using the Lots of Lavender stamp set, one of the free sets you can pick out with a $50 order. In fact, you can pick something different with every $50 you spend (before shipping/tax).
I made my first Stampin’ Up! purchase nine years ago during Sale-a-bration! I placed my order online and was shocked at all the free goodies I received. My order was over $150 so I received 3 Saleabration items plus the Hostess Rewards. I fell in love with the products (especially the color coordination) and purchased the starter kit the very next month. My only intention was to get a discount on all my future purchases. That was it! But then I started gathering my friends together to stamp because I wanted to share with them the fun I was having. Then I started several clubs and one thing led to another. BUT, I could have just been my only customer if that’s what I wanted.
When I bought the Starter Kit, Stampin’ Up! chose what was in it. Today, you can pick what YOU want! The kit is $99 but you pick $125 worth of product PLUS during Sale-a-bration, you can choose 2 extra stamp sets! If you love the product and know you’ll be purchasing in the future, why not get the Starter Kit? There’s no pressure to sell, unless you want to. If you purchase the Starter Kit during Sale-a-bration, you’ll have until then end of June to reach the quarterly minimum of $300 plus you’ll receive 20% off of all your own purchases. Sounds fun, doesn’t it? If you’d like to join, click here or please, feel free to email me with any questions you might have!
Back to my project! I created this card as part of a challenge from my team leader, Dawn, using the sketch below. I changed it up a little bit but the sketch gave me something to start with!
Calypso Coral: 11″ x 4-1/4″ scored at 5-1/2″ 3/4″ x 2-1/4″ for banner
Gold Foil Sheet: 3/4″ x 4-1/4″ 3-1/4″ x 2-1/2″ scrap for scalloped circle 3/4″ x 2-1/4″ for banner
Painted with Love Specialty Designer Series Paper: 4″ x 4-1/4″
Whisper White: 3″ x 2-1/4″ scrap for sentiment 3/4″ x 2-1/4″ for banner
I colored my flowers with Stampin’ Blends and used Memento Ink. I also used Memento Ink for the sentiment.
I wanted to give you an exact measurement for the banners but they can be shorter than 2-1/4″. The white one on my card is 2-1/4″ but the others could definitely be shorter. It all depends on how you want them to look on your card.
I used two Stampin’ Dimensionals on the right side only of the gold scalloped circle. The gold foil that the flowers are adhered to also have Stampin’ Dimensionals on the back, so the left side will already be raised.
All of the products I used are listed below. For easy shopping, just click on any of the pictures and you’ll be taken to my Stampin’ Up! online store. Use the host code and receive a package in the mail from me with 3 card kits: BCDR6NRJ
Valentine’s Day is just around the corner and this little treat bag is quick and easy to make! I always include a little handmade gift in my thank you packages when anyone places an order and this month you’ll receive one of these treat bags!
I used the gorgeous Painted with Love Specialty Designer Series Paper, new in the Occasions Catalog. This paper is packaged with (12) 12″ x 12″ sheets and six of the sheets have gold foil accents – so pretty! It’s ideal for Valentine’s Day but it can used for any occasion as only two of the designs actually have hearts on them.
Painted with Love Designer Series Paper: 9-1/2″ x 3″ scored at 1-1/4″ & 5-1/2″
3″ x 6″ Gusseted Bag: cut bag down to 4″ or you can just fold over the excess
Powder Pink 3/8″ Shimmer Ribbon: approximately 13″
All of the supplies I used will be listed below. Click any of the pictures in the list and you’ll be directed to my Stampin’ Up! online store. If you have any questions, don’t hesitate to email me.
Add a strip of Tear and Tape at the top of the cellophane bag and attach it to the inside of the treat bag. Then add your treat inside.
Attach Stampin’ Dimensionals to the back of the Powder Pink 1-3/8″ scallop and attach to the front of the treat bag.
Wrap the Shimmer Ribbon around the treat bag in the middle of the top flap. This will keep the bag shut. No adhesive needed!
When you purchase the Starter Kit for $99, you’ll choose $125 in product from the Annual and Occasions Catalogs (had your eye on a Big Shot?). Plus during Sale-a-bration, you can choose two additional stamp sets – a value of $101 (bundles, kits and Sale-a-bration stamp sets are excluded). For more information, feel free to contact me or click here!
I really love hearing from you! Leave a comment or question in the month of January and your name will be entered to win some Stampin’ Up! goodies from me! Come back on February 1st to see who the winner is!
Today’s card uses the beautiful Sweet Soiree Specialty Designer Series Paper. Because it’s a speciality paper, the paper is heavier than our regular designer series paper and this packager has silver foil accents on one side. It’s really pretty!
Stampin’ Up! makes it so easy to coordinate their paper and cardstock! On each package of designer series paper, all of the colors that will beautifully match are listed on the back. Sweet Soiree coordinates with: Berry Burst, Calypso Coral, Daffodil Delight, Flirty Flamingo, Marina Mist, Olive Olive, Powder Pink, Rich Razzleberry, Whisper White and our Silver Foil.
Marina Mist: (base of card) 11″ x 4-1/4″ scored at 5-1/2″ scrap for scalloped square
Rich Razzleberry: 5-1/4″ x 4″ scrap for scalloped square
Sweet Soiree Designer Series Paper: 5″ x 3-3/4″
Whisper White: scrap for square with sentiment
Vellum: scraps for 4 leaves
Attach Stampin’ Dimensionals to the back of the Marina Mist scalloped square.
You can add a small amount of adhesive to the vellum leaves or simply attach them to the Stampin’ Dimensionals already on the back of the square.
Stamp your greeting first and then die cut it using the Stitched Shapes Framelits.
Finish the card by adding two enamel shapes on both sides of the sentiment.
If you have any questions about this card, please don’t hesitate to email me! I’m happy to help!
Don’t forget that you’ll receive free product for every $50 purchase now during Sale-a-Bration! One of the most popular items in the catalog are the cute Party Pandas.
All of the products I used to make my card are listed below. To purchase any of these products, click on any of the pictures and you’ll be taken to my Stampin’ Up! online store. For orders under $150, please use the current host code: BCDR6NRJ


 Scallop Circle Punch")
 Scallop Circle Punch")


 Shimmer Ribbon Pack")


