by Tracy | Aug 5, 2020 | Designer Series Paper, Die-Cutting, Treat Holder
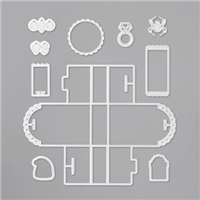
The August-December 2020 Mini Catalog is filled with so many brand new products! One of the first products to catch my eye was the Little Treat Box Dies. It makes a treat box that’s SO easy to make and no adhesive is needed!
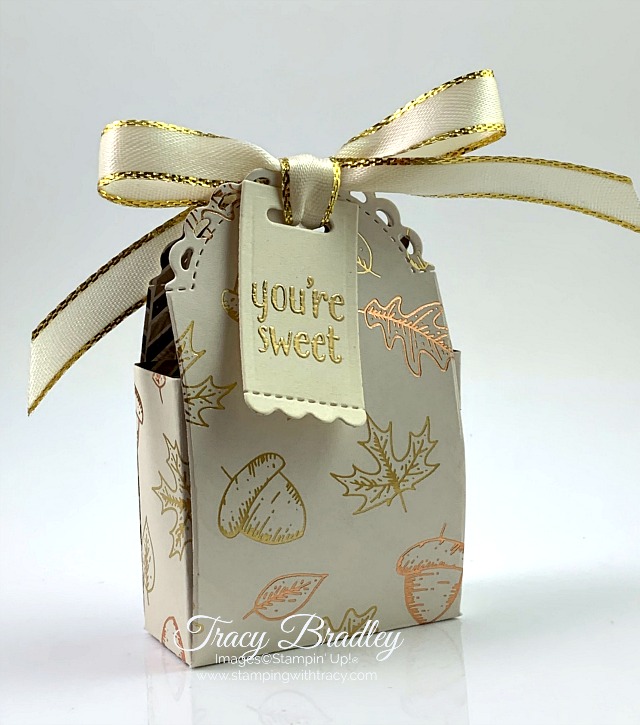
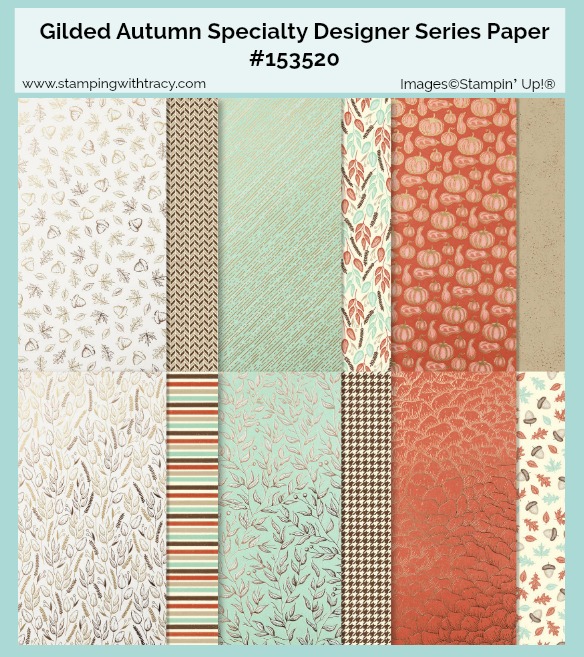
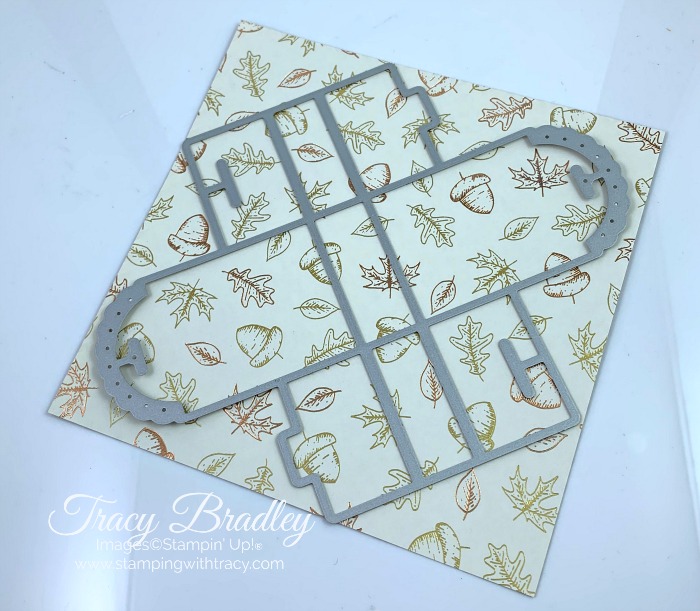
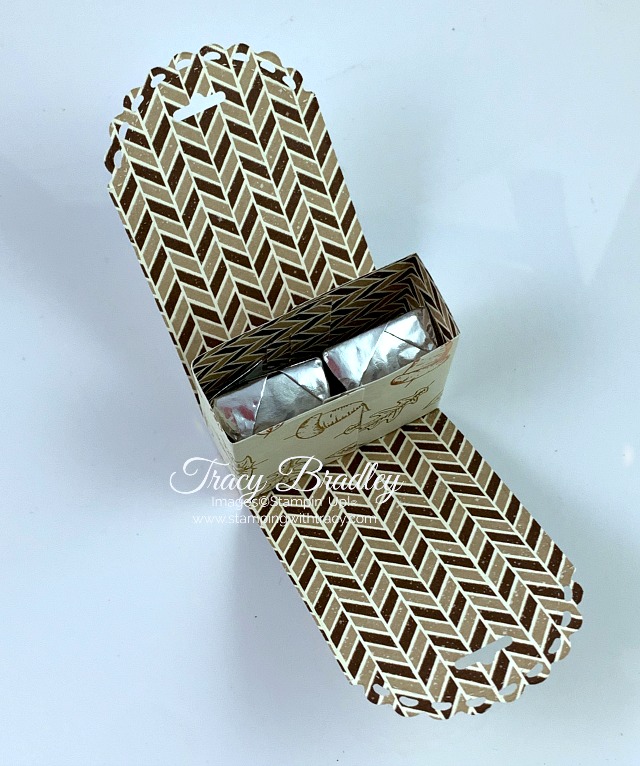
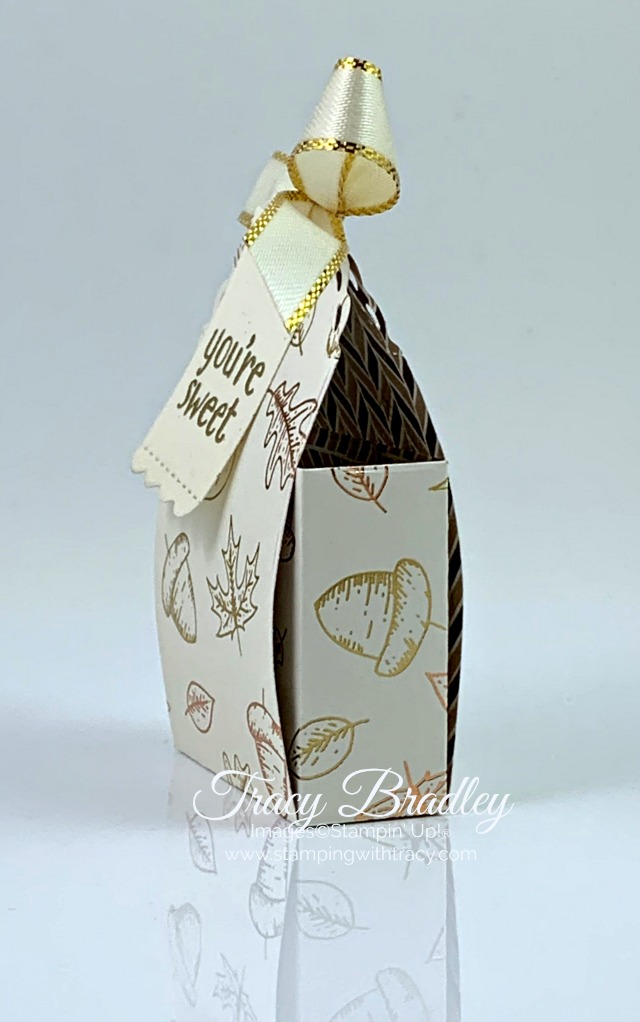
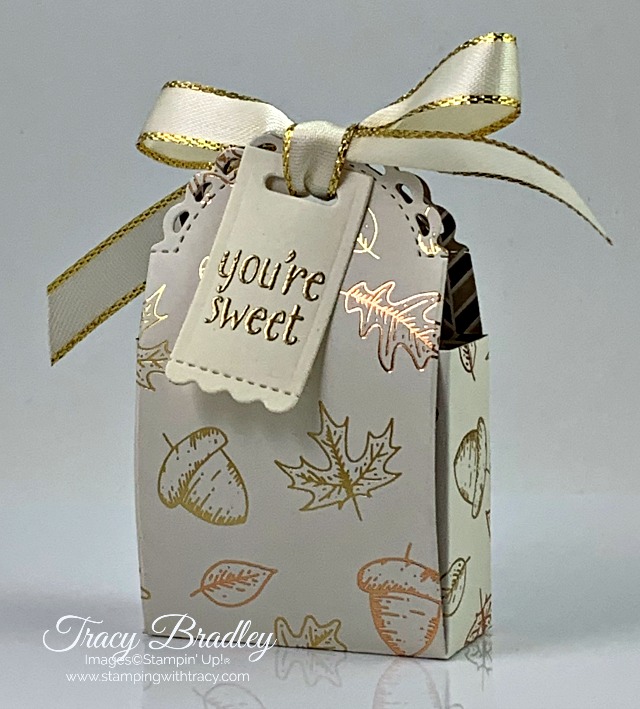
My treat box was made using another new product, Gilded Autumn Specialty Designer Series Paper. The design I used has beautiful copper and gold foil designs.
The largest die in the set is what you’ll use to make the treat box and the die will fit onto a piece of 6″x 6″ piece of paper (see the photo below for placement). The die set also includes several tags and embellishments. It pairs beautifully with the Little Treats stamp set (I didn’t use this stamp set on today’s project) and is available as a bundle (I have a picture of the bundle farther down in the post).
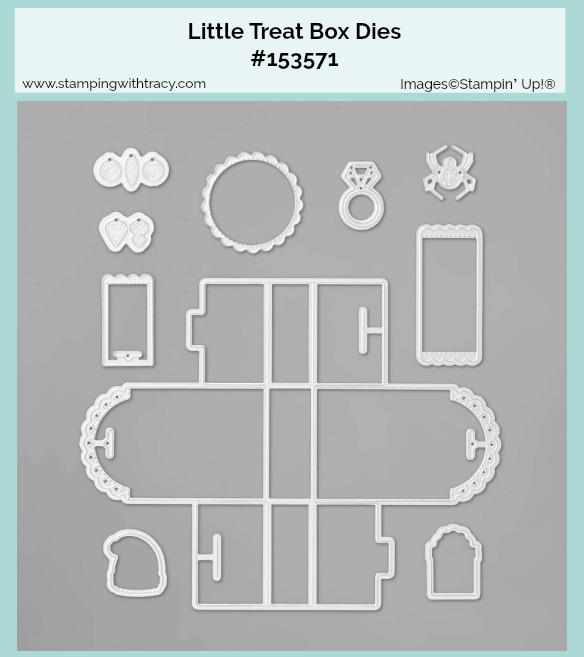
As I mentioned, the box is so easy to make and no adhesive is necessary. When you run the die through your die-cutting machine, it creates score lines as well as two slits and tabs which makes it a breeze to put together. If you need to make a lot of treat holders, you’ll be able to do it easily with the Little Treat Box Dies!


To give you an idea as to the size of the treat box, I have two Hershey’s Nuggets inside. I’m sure you’ll be able to come up with lots of other ideas to tuck inside.
The sentiment, from the stamp set, Banner Year, was stamped onto Very Vanilla cardstock using Versamark ink and then was embossed with Gold Embossing Powder. It was cut out using one of the tag dies in the Little Treat Box Dies.
There are so many possibilities with this set of dies!
Bundle Alerts


I’ve had a chance to look around the beautiful new Stampin’ Up! website and become familiar with it. When you’re shopping with me, you’ll either see my name in the top left corner. Or, if you see three horizontal lines in the top left corner, click them and you’ll see “Shopping with Tracy Bradley” down towards the bottom of the column.
Supply List
If you need any stamping supplies, I’d love to be your demonstrator! You can place an order by clicking any of the images below to go to my Stampin’ Up! online store. If you have questions about products you’re considering purchasing or ones you’ve already purchased, I’m just an email away (click the Email Me button on the sidebar of my blog).

Click here to place an order
Thanks for stopping by!
by Tracy | Aug 3, 2020 | Designer Series Paper, Die-Cutting, Embossing Folders, Punches
Hello, Friends! I have a card to share with you today but first I want to pass on some important information. Not only will you be able to begin ordering from the new 2020 Mini Catalog tomorrow BUT Stampin’ Up! will also be unveiling a brand new online store with many new features and improvements! Everything should run smoothly but there are several things I want to point out:
When placing your first order on the new site, your password will be recognized but only if you manually enter it. If your browser automatically enters it for you, it will think you’re on a brand new site and won’t know your information. So please manually enter your password the first time on the new site and if you use “bookmarks”, create a new one for the new site. If you’ve forgotten your password, you can click the “Forgot Password” link and reset your password.
When shopping with me, please make sure my name is at the top of the page.
Some of the links I have on my blog may not work and might be “broken”. Once the new store is live, I’ll be checking to make sure any links you click are in fact going to the new site.
At midnight tonight (Mountain Time) the Stampin’ Up! online store will go offline. The new site will launch at 7:00 am (Mountain Time) and you’ll be able to start ordering from the new catalog!
Reminder: Today’s the last day to earn Bonus Days Coupon Codes! With every $50 purchase, you’ll earn a $5.00 Bonus Coupon that you can apply to an order starting tomorrow (August 4-31).
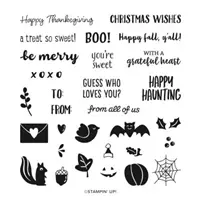
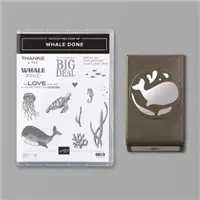
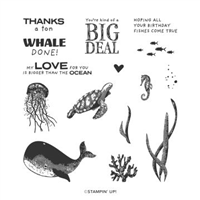
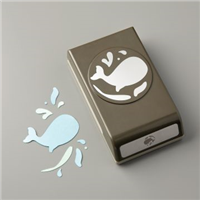
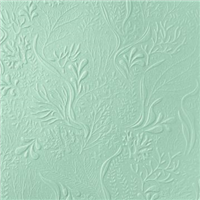
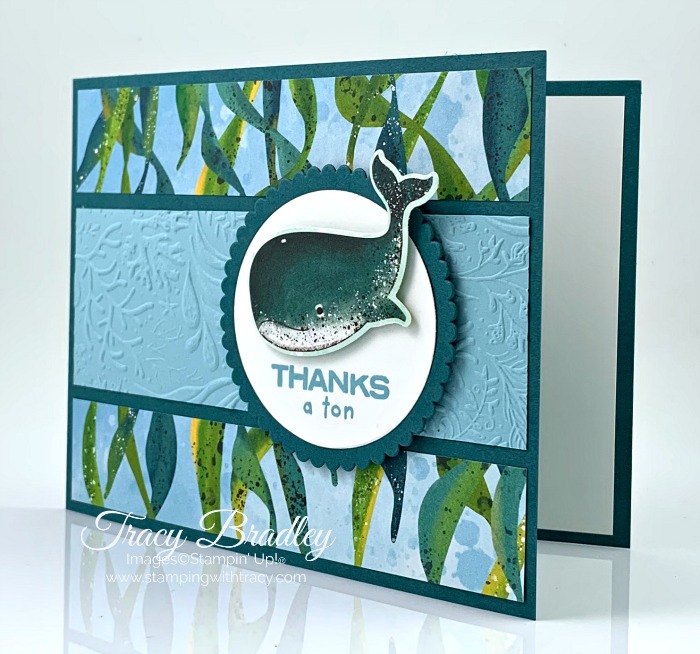
It’s time for a card! I used the Whale Done Bundle to create today’s card which includes the Whale Done stamp set and the Whale Builder Punch (you can find all the products I used in the Supply List below). I started with a base of Pretty Peacock cardstock and then ran a piece of Balmy Blue cardstock through my die-cutting machine using the Seabed 3D Embossing Folder and adhered it to the center of my card base.
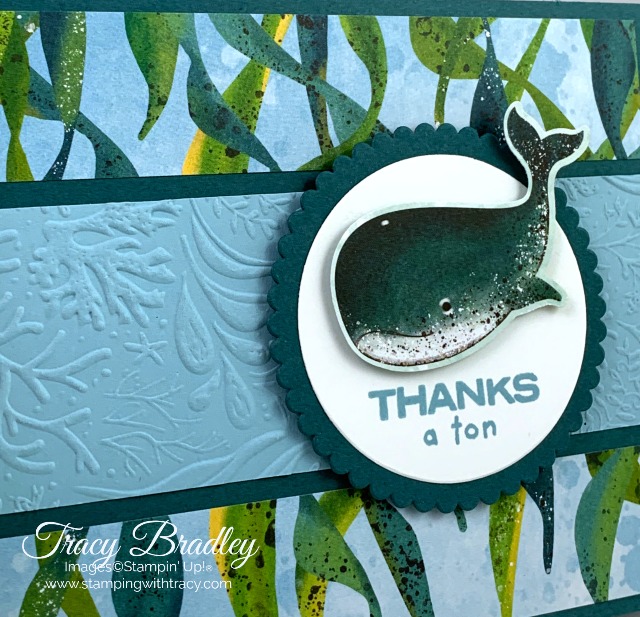
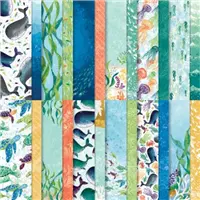
Next, I cut two pieces of Whale of a Time 6″ x 6″ Designer Series Paper into 1″ strips (you can find all the measurements I used below the Supply List) and placed them above and below the embossed Seabed piece.

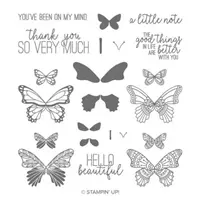
The sentiment was stamped onto Whisper White cardstock using the stamp set, Whale Done, in Balmy Blue ink. I cut it out using the Layering Circles Dies and cut another larger circle using Pretty Peacock cardstock. The whale was cut out of the Whale of a Time Designer Series Paper using the Whale Builder Punch (so easy, right?). I used Stampin’ Dimensionals on the back of the whale and the Pretty Peacock scalloped circle.


Supply List
If you need any stamping supplies, I’d love to be your demonstrator! You can place an order by clicking any of the images below to go to my Stampin’ Up! online store. If you have questions about products you’re considering purchasing or ones you’ve already purchased, I’m just an email away (click the Email Me button on the sidebar of my blog).
Supply List
- Pretty Peacock cardstock: 11″ x 4-1/4″
- Pretty Peacock cardstock: scrap for scalloped circle
- Balmy Blue cardstock: 5-1/4″ x 1-3/4″
- Whale of a Time Designer Series Paper: (2) 5-1/4″ x 1″ and whale
- Whisper White cardstock: 5-1/4″ x 4 (inside)
- Whisper White cardstock: scrap for sentiment
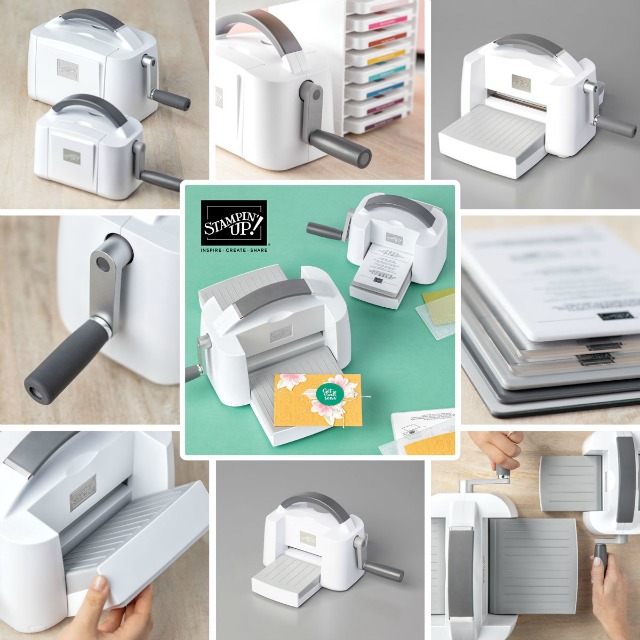
The New Stampin’ Cut & Emboss Machine (the larger one) will be available on September 1, 2020! The smaller machine will be available later in the year.
Thanks for stopping by!
by Tracy | Jul 31, 2020 | Designer Series Paper, Die-Cutting, Embossing Folders, Heat Embossing, Rectangle Stitched Dies
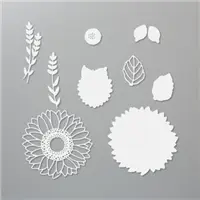
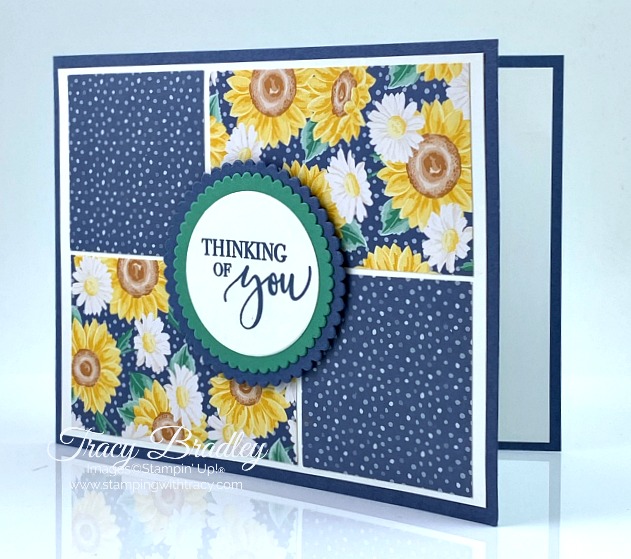
Today’s card features the Sunflowers Dies and the Tasteful Textile 3D Embossing Folder.

I used Thick Whisper White cardstock for the base of my card. For the next layer, I embossed a piece of Whisper White cardstock using the Tasteful Textile 3D Embossing Folder. To that piece I added a piece of Playing With Patterns 6″ x 6″ Designer Series Paper and then wrapped a piece of Whisper White Faux Linen Ribbon (one of the ribbons in the Flowers For Every Season Ribbon Combo Pack) around the middle and secured it in the back with adhesive. After adhering that piece to the card base, I went to work on the sunflower.
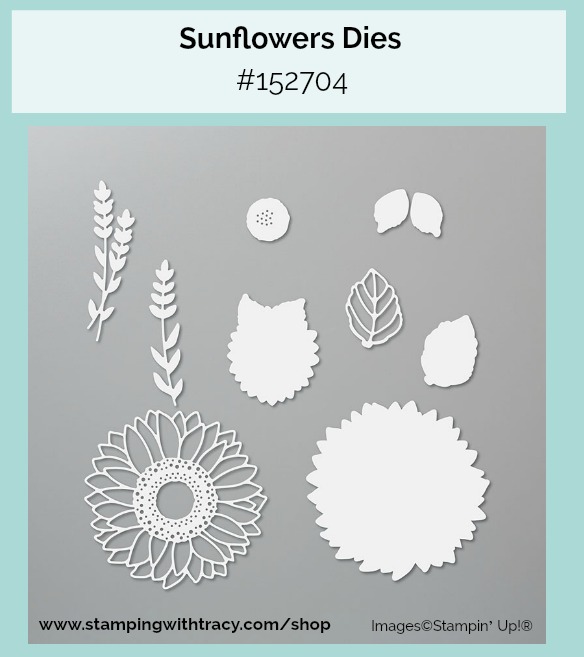
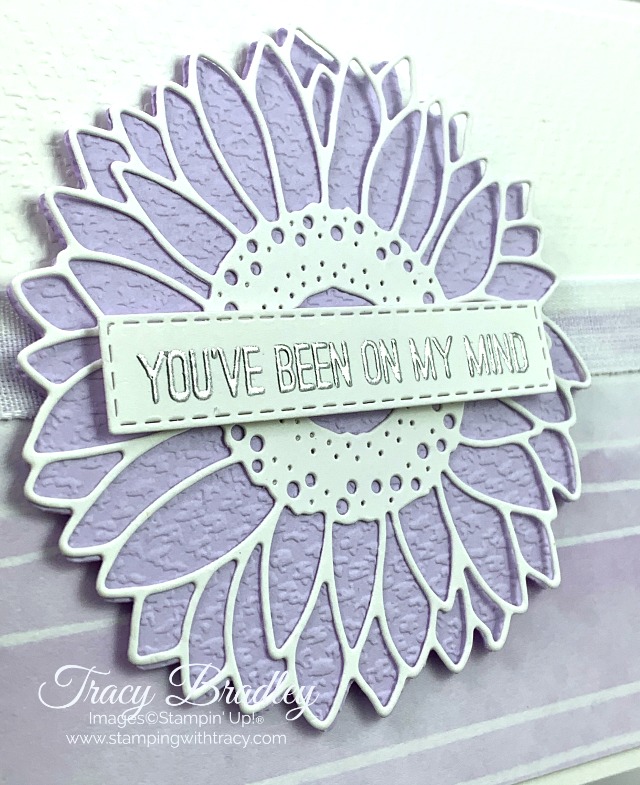
As you can see in the photo of the dies, above, there are two pieces that can be used to create the sunflower, a backing and then the actual sunflower. I cut the backing out of Purple Posy cardstock and then embossed it with the Tasteful Textile Embossing Folder. Then I cut the sunflower out of Whisper White cardstock. I added some Multipurpose Glue to the middle of the sunflower and placed it on top of the backing. I did lift some of the areas of the sunflower to try and add more adhesive but as you can see, those areas are very narrow. Next time, I’ll try running the sunflower through my die-cutting using one of our adhesive sheets so that the entire sunflower is secured. But, I may end up liking it better not completely adhered to the backing. I added Stampin’ Dimensionals to the back of the sunflower before attaching it to the front of the card.
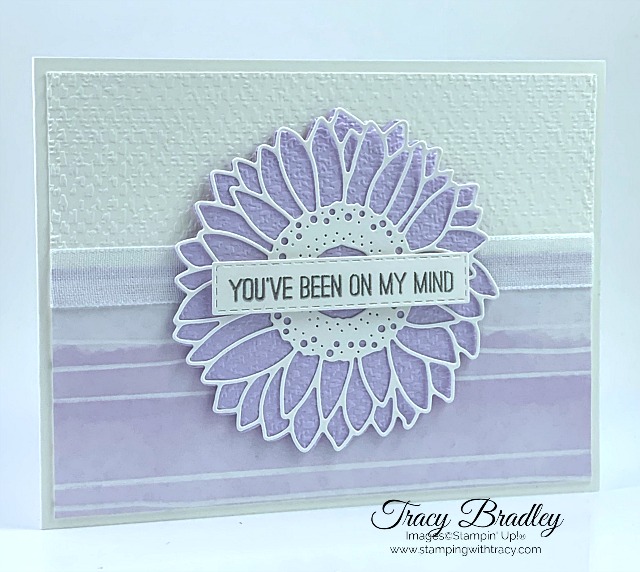
I used the stamp set, Butterfly Gala, for the sentiment and embossed it using Silver Embossing Powder. It was cut out using the Stitched Rectangle Dies and I added Stampin’ Dimensionals to the back before adhering it to the card.
Bundle Alert: The Sunflowers Dies can also be purchased as part of a bundle.

Supply List
If you need any stamping supplies, I’d love to be your demonstrator! You can place an order by clicking any of the images below to go to my Stampin’ Up! online store. If you have questions about products you’re considering purchasing or ones you’ve already purchased, I’m just an email away (click the Email Me button on the sidebar of my blog).
Measurements
- Thick Whisper White cardstock: 11″ x 4-1/4″
- Playing with Patterns 6″ x 6″ Designer Series Paper: 5-1/4″ x 2-1/4″
- Whisper White cardstock: 5-1/4″ x 4″
- Whisper White cardstock: scrap for sunflower
- Whisper White cardstock: scrap for sentiment
- Purple Posy cardstock: scrap for sunflower backing
Click here to place an order
Coming September 1st: The Stampin’ Cut & Emboss Machine (the smaller machine will be available later in the year)
Tracy’s Quick Links
Place an Order
My Customer Rewards
Bradley Points
$99 Starter Kit
Clearance Rack
2020-2021 Annual Catalog
Paper Pumpkin
Thanks for stopping by!
by Tracy | Jul 30, 2020 | Designer Series Paper, Layering Circles Dies
The sentiment on today’s card is a sneak peek of the stamp set, Life is Beautiful. It will be available on August 4th (next week!!!) when the new Mini Catalog goes live! If you’ve placed an order with me in the past six months, you should have received your complimentary copy of the Mini Catalog! There’s nothing like the excitement of a new catalog!
The base of the card is Misty Moonlight, one of the new In Colors. Both designs of patterned paper are from Flowers For Every Season Designer Series Paper and I love how these two designs look together!

The sentiment was stamped onto Whisper White paper using Misty Moonlight ink. It was cut out using the Layering Circles Dies along with the Just Jade and Misty Moonlight scalloped circles. If you’d like to make today’s card, you can find the measurements below the Supply List.

Supply List
If you need any stamping supplies, I’d love to be your demonstrator! You can place an order by clicking any of the images below to go to my Stampin’ Up! online store. If you have questions about products you’re considering purchasing or ones you’ve already purchased, I’m just an email away (click the Email Me button on the sidebar of my blog).
Measurements
- Misty Moonlight cardstock: 11″ x 4-1/4″
- Misty Moonlight cardstock: scrap for scalloped circle
- Whisper White cardstock: (2) 5-1/4″ x 4″
- Whisper White cardstock: scrap for sentiment
- Just Jade cardstock: scrap for scalloped circle
- Flowers For Every Season Designer Series Paper: (2) 1-7/8″ x 1-7/8″
- Flowers For Every Season Designer Series Paper: (2) 3″ x 1-7/8″
Click here to place an order!
Paper Pumpkin
Order by August 10th to start receiving the little red box delivered to your mailbox each month. I’m also a subscriber and never know what’s inside until it lands in my mailbox. My oldest grandson will be entering Kindergarten in a few weeks but he’s already reading like a pro. When I saw the August Paper Pumpkin kit, my first thought was that I’d send him a card congratulating him on his new skill!
- Kit contains enough supplies to create nine cards and coordinating envelopes.
- Card size: 4-1/4” x 5-1/2” (10.8 x 14 cm)
- Envelope size: 4-1/2” x 5-3/4” (11.4 x 14.6 cm)
- Coordinating Colors: Bumblebee, gold, Mint Macaron, Pacific Point, Soft Suede, white
- The kit’s stamp set includes Distinktive stamps
- You can skip a month or cancel at any time
Click here to start your Paper Pumpkin subscription with the August kit!
Stampin’ Cut & Emboss Machines
You’ve seen it in the new Annual Catalog and on September 1st, the Stampin’ Cut & Emboss Machine will be available to order (unfortunately the Mini Stampin’ Cut & Emboss Machine and its replacement plates have experienced delays due to the impact of the COVID-19 pandemic). Demonstrators will be able to preorder the Stampin’ Cut & Emboss Machine (the larger machine) in August so I’ll be purchasing one and cashing in my Bonus Days coupons! I’ll be ready to share my thoughts with you and I have to say, I can’t wait to give it a try.
If you’d like to order one early too, simply purchase the Starter Kit! You’ll receive $125 worth of Stampin’ Up! product (that you choose) for $99 plus it ships free. The Starter Kit is absolutely risk free, honest! Click here to purchase your Starter Kit and join my team!
by Tracy | Jul 28, 2020 | Designer Series Paper, Die-Cutting, Embossing Folders, Free Tutorial, Uncategorized

These days I’m having a difficult time keeping track of which day it is but I always know when it’s Tuesday! You’ll find a free tutorial for today’s card below the Supply List!

I used Playing with Patterns 6″ x 6″ Designer Series Paper to create today’s card along with the Tasteful Textile 3D Embossing Folder. Below is a Purple Posy/Calypso Coral version of the card.

There are so many possibilities with this very versatile paper!

Supply List
If you need any stamping supplies, I’d love to be your demonstrator! You can place an order by clicking any of the images below to go to my Stampin’ Up! online store. If you have questions about products you’re considering purchasing or ones you’ve already purchased, I’m just an email away (click the Email Me button on the sidebar of my blog).

July Mini Card Sampler
The last day to earn three card kits with a minimum $35 order is tomorrow! Click here for all the details!

Tracy’s Quick Links
Place an Order
My Customer Rewards
Bradley Points
$99 Starter Kit
Clearance Rack
2020-2021 Annual Catalog
Paper Pumpkin
Thanks for stopping by!
by Tracy | Jul 23, 2020 | Card Sampler, Designer Series Paper, Die-Cutting, Embossing Folders
Quick note: Sometimes I receive an order and the customer chooses No Contact. This means that when I receive notification that an order was placed, Stampin’ Up! does not share the customer’s name with me. I understand and respect this decision but yesterday I received a No Contact order but the customer used my host code for a free card kit. This leads me to believe “No Contact” was selected in error. If you placed an order yesterday AND No Contact was selected in error, please email me (and mention several of the products you ordered) so I can gift you with an extra card kit.
My July Mini Card Sampler is now available but only for a limited time.
Here’s how you can earn my FREE July Mini Card Sampler:
- Place a minimum $35 order (before tax/shipping) at my Stampin’ Up! online store.
- Use my special July Mini Card Sampler Host Code when placing your order: PQFBXYTX
- Place your order on or before Wednesday, July 29, 2020.
- If your order reaches $150 or more, please DO NOT use the host code so you can receive Stampin’ Rewards (free product directly from Stampin’ Up!). Once you place your order, simply drop me an email letting me know that you’d like the Card Sampler (you only need to contact me if your order is over $150).
Here’s What You’ll Receive:
- All the paper and embellishments needed to make 3 cards. The paper will be cut, scored, embossed and die cut for you! You’ll need to supply your own adhesive, ink and stamp set (per Stampin’ Up! I cannot send stamped images). Envelopes will also be provided for each card.
- A PDF Tutorial with instructions, pictures, cutting measurements and a complete supply list of all the products used.
- Bump your order up to $50 and you’ll receive a FREE Bonus Days Coupon directly from Stampin’ Up! For every $50 in product you purchase (before shipping/tax), you’ll receive a $5.00 Bonus Days coupon that can be redeemed between August 4- August 31. For more information about Bonus Days, Click here.
All the Other Important Stuff
- Your kits will ship first-class mail no later than Wednesday, August 5, 2020 and will be mailed to the address used on your online order.
- Your PDF Tutorial will be emailed to you within 48 hours.
- When using the July Mini Card Sampler Host Code to place your order, you will not qualify for my regular Customer Rewards Card Kits.
- Per Stampin’ Up! policy, kits can only be mailed within the United States.
- Limit 1 kit per person
The special July Mini Card Sampler HOST CODE will close at the end of the day on Wednesday, July 29, 2020 and after that date, the card sampler will no longer be available.
Expected ship date of the kits is Wednesday, August 5, 2020.
Click here to place an order!
Supplies Needed to Complete the July Mini Card Sampler
Listed below are the supplies, not included in your kit, that you’ll need to complete the cards exactly as shown (or you can use what you already own). Simply click any of the products and you’ll be taken to my Stampin’ Up! online store. When placing your order, don’t forget to use the special July Card Sampler host code (please do not use host code if your order is over $150 – see above).
Click here to place an order
If you aren’t sure how to use a host code, click here!
If you have questions, please don’t hesitate to contact me!