by Tracy | Feb 9, 2022 | Rectangle Stitched Dies, Tasteful Labels Dies
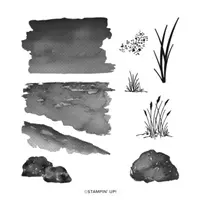
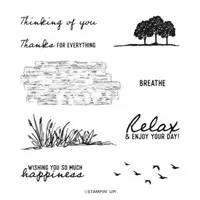
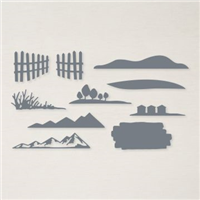
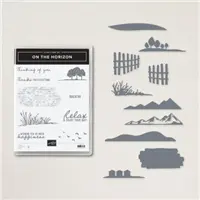
Today’s card features the Stampin’ Up! Oceanfront stamp set and the On the Horizon Bundle which includes the Horizon Dies and On the Horizon stamp set. All three of these products were not on my initial order but after seeing so many cute cards using them, I had to get them. They coordinate so well together!


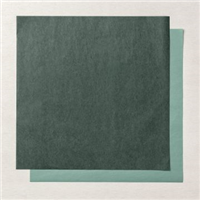
I started with a piece of Just Jade cardstock and then added a layer of Basic White cardstock that I embossed using the Tasteful Textile 3D Embossing Folder. Next, I used the Stitched Rectangles Dies to cut a piece of Basic White cardstock and a larger one out of Just Jade cardstock. On the Basic White rectangle, I used the Oceanfront stamp set to stamp the sky in Balmy Blue, the water in Coastal Cabana and the sand in Crumb Cake (I stamped the sand twice so I’d have more sand). I stamped the grasses (behind the fence) using Just Jade ink. The birds were stamped in Memento Ink using the stamp set, On the Horizon.


I adhered the Basic White rectangle to the Just Jade rectangle and then added Stampin’ Dimensionals to the back before adhering it to my card front. Then I used the Horizon Dies to create the fence using Basic White cardstock and adhered them to the front of the card using Multipurpose Glue. The sentiment I used said “Thanks for everything” but I just wanted “thanks” so I used my Just Jade Stampin’ Write Marker to directly color just those words on the stamp (our markers aren’t sold individually but in a set). I cut the sentiment out using the Tasteful Labels Dies and then adhered it to the front of the card. Want to know why I placed the sentiment where I did? I pressed a little too hard when stamping the birds and one of them looked like a plane so I just covered it up!

I made a bow using our Baker’s Twine Essentials Pack, added a glue dot to the back and placed it on the sentiment piece and then added two Elegant Faceted Gems. I also added a piece of Basic White cardstock to the inside.
Supply List
Below you’ll find all the Stampin’ Up! supplies I used for today’s card. If you need any stamping supplies, I’d love to be your demonstrator! You can place an order by clicking any of the images below to go to my Stampin’ Up! online store.
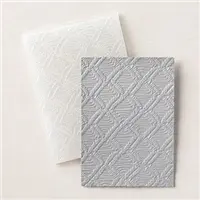
The Specialty Plate is used with 3D Embossing Folders.
Measurements
- Just Jade cardstock: 11″ x 4-1/4″
- Just Jade cardstock (rectangle): approx. 5-1/4″ x 4″
- Basic White cardstock: (2) 5-1/4″ x 4″
- Basic White cardstock (rectangle): approx. 5″ x 3-1/2″
- Basic White cardstock (fence pieces): approx. 4″ x 2″
- Basic White cardstock (sentiment): scrap
All Together Card Sampler
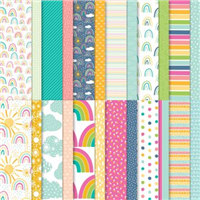
I used All Together Designer Series Paper to create the All Together Card Sampler.

Place a minimum $50 order (before tax/shipping) at my Stampin’ Up! Online Store using this special host code HZQ6YW4C and I’ll send you my All Together Card Sampler. It’s very important that the host code is used when placing your order EXCEPT if your order is $150 or more. Do not use the host code for an order $150 or more so you can receive Stampin’ Rewards from Stampin’ Up!. Contact me after you’ve placed the order to let me know that you’d like the Sampler – you only need to contact me if your order is $150 or more.
With your order, you’ll also receive at least one free Sale-a-Bration gift directly from Stampin’ Up! Orders must be placed by tomorrow, February 10, 2022 and the Card Samplers will be mailed approximately February 19, 2022. Please click HERE for all the details.


Upcoming
- February 10, 2022: Last Day All Together Card Sampler will be available
- February 10, 2022: Last Day to purchase Safari Celebration Paper Pumpkin Kit
- February 28, 2022: Sale-a-Bration Ends
- February 28, 2022: Last Day to Earn two free stamp sets when you purchase the Starter Kit
- March 1, 2022: New Products Being Released: Waves of the Ocean Collection (click here for the flyer)
by Tracy | Feb 8, 2022 | Brilliant Wings Dies, Rectangle Stitched Dies
I made today’s card by using a Sunday Stamps sketch. My card features On the Horizon stamp set, Sunshine & Rainbows Designer Series Paper and the Stitched Rectangles Dies.

Here’s the sketch for Sunday Stamps SSC276.

I started with a piece of Mint Macaron cardstock for the base of my card (you can find all the measurements I used below the Supply List). Then, I used the Stitched Rectangles Dies to cut a piece of Basic White cardstock, ran it through my Stampin’ Cut & Emboss Machine using the Macrame 3D Embossing Folder and then adhered it to the front of the card. I used the Stitched Rectangles Dies to cut a piece of Mint Macaron cardstock and a piece of Sunshine & Rainbows Designer Series Paper (you can earn this paper FREE with a $50 purchase during Sale-a-Bration). I adhered the two panels to the front of the card.


I used the Stitched Rectangles Dies to cut the sentiment piece out of Basic White cardstock and another one out of the same design of Designer Series Paper. I stamped the sentiment using Memento Ink and the stamp set, On the Horizon. I adhered the sentiment to the Designer Series Paper and then added Stampin’ Dimensionals to the back before adhering both to the front of the card.

Again, I used the same design of Sunshine & Rainbows Designer Series Paper to cut a butterfly using the Brilliant Wings Dies. I added one Mini Stampin’ Dimensional to the center of the butterfly before adhering it to the front of the card.


To complete my card, I added a Genial Gem to the center of the butterfly and three more to the front of the card. I also added a piece of Basic White cardstock to the inside.

Supply List
Below you’ll find all the Stampin’ Up! supplies I used for today’s card. If you need any stamping supplies, I’d love to be your demonstrator! You can place an order by clicking any of the images below to go to my Stampin’ Up! online store.
The Specialty Plate is used with 3D Embossing Folders.
Bundle Alert (save 10%) : The On the Horizon Bundle includes the On the Horizon stamp set and the Horizon Dies.
Measurements
- Mint Macaron cardstock: 8-1/2″ x 5-1/2″ score at 4-1/4″
- Mint Macaron cardstock: approx. 4-1/2″ x 3-1/4″
- Basic White cardstock (embossed): approx. 5-3/4″ x 4-1/2″
- Basic White cardstock (inside): 5-1/4″ x 4″
- Basic White cardstock (sentiment): approx. 2-3/4″ x 1″
- Sunshine & Rainbows Designer Series Paper: approx. 4-1/2″ x 3-1/4″
- Sunshine & Rainbows Designer Series Paper (butterfly): approx. 2-3/4″ x 2″
- Sunshine & Rainbows Designer Series Paper (under sentiment): approx. 2-3/4″ x 1″
All Together Card Sampler
Place a minimum $50 order (before tax/shipping) at my Stampin’ Up! Online Store using this special host code HZQ6YW4C and I’ll send you my All Together Card Sampler. It’s very important that the host code is used when placing your order EXCEPT if your order is $150 or more. Do not use the host code for an order $150 or more so you can receive Stampin’ Rewards from Stampin’ Up!. Contact me after you’ve placed the order to let me know that you’d like the Sampler – you only need to contact me if your order is $150 or more.
With your order, you’ll also receive at least one free Sale-a-Bration gift directly from Stampin’ Up! Orders must be placed by February 10, 2022 and the Card Samplers will be mailed approximately February 19, 2022. Please click HERE for all the details.
Sale-a-Bration
Sale-a-Bration is that time of year when you earn FREE product with every $50 or $100 purchase! There’s no limit to how many free items you can earn. Learn all about Sale-a-Bration here.
Coming March 1, 2022 Waves of the Ocean Collection

Click here for the flyer with all the information about this collection.
Upcoming
- February 10, 2022: Last Day All Together Card Sampler will be available
- February 10, 2022: Last Day to purchase Safari Celebration Paper Pumpkin Kit
- February 28, 2022: Sale-a-Bration Ends
- February 28, 2022: Last Day to Earn two free stamp sets when you purchase the Starter Kit
- March 1, 2022: New Products Being Released: Waves of the Ocean Collection
Thanks for stopping by today!
by Tracy | Dec 16, 2021 | Birthday Card, Embossing Folders, Rectangle Stitched Dies, Stampin' Blends
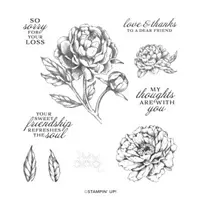
We just returned home from being out of town for a few days to celebrate my mom’s 90th birthday. I feel very blessed that we were there to celebrate her big day with her. Today’s card is the birthday card I made for her and it features the stamp set, Prized Peony.

I started with a base of Thick Basic White cardstock and then added a layer of Basic White cardstock that I embossed using the Tasteful Textile 3D embossing folder. Normally I cut this piece down but it’s full size to cover the entire front of the card.

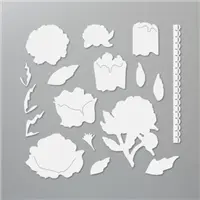
I stamped the peony in Memento Ink onto a piece of Basic White cardstock and then colored it using these Stampin’ Blends: Fresh Freesia (Light and Dark), Highland Heather (Light) and Old Olive (Light). I COMPLETELY forgot that I have the Peony Dies and even had a conversation with myself that I didn’t feel like fussy cutting it out. I just shook my head when I spotted the dies sitting on my crafting desk. It’s that time of year when our heads can only hold so much, right? I did list the Peony Dies in the Supply List below even though I didn’t actually use them (but I will soon!). I mounted the peony onto a piece of Highland Heather cardstock, added Stampin’ Dimensionals to the back and adhered it to the front of the card.
To color the peony using my Stampin’ Blends, I did several petals at one time. First, I colored the entire petal with Light Fresh Freesia. Then, I used Dark Fresh Freesia to color in the highlights (this stamp tells you where the highlights are – the very dark areas). I went over this same area again with Light Highland Heather and then went back in with Light Fresh Freesia to blend it all in. I only used Light Old Olive for the leaves and just colored them in and then went over the darker areas a second time When I tried using Dark Old Olive, I felt it was too dark.

I used the Stitched Rectangle Dies to cut a piece of Basic White cardstock and then stamped the sentiment in Highland Heather ink using the stamp set Artistically Inked. I mounted it onto a piece of Highland Heather cardstock, added Stampin’ Dimensionals to the back and placed it below the peony. To complete the card, I added three Elegant Faceted Gems around the peony.
Supply List
Measurements
- Thick Basic White cardstock: 11″ x 4-1/4″
- Basic White cardstock: 5-1/2″ x 4-1/4″
- Basic White cardstock (peony): 3-7/8″ x 3-5/8″
- Basic White cardstock (sentiment): approx. 3″ x 1-1/8″
- Highland Heather cardstock: 4-1/8″ x 3-7/8″
- Highland Heather cardstock (piece under sentiment): 3″ x 1″

Click here to shop Stampin’ Up! Last Chance Products from the Mini Catalog
All Last Chance Products are available while supplies last or January 3, 2021.
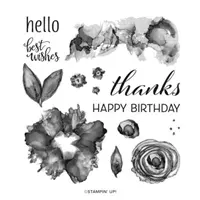
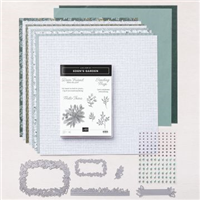
Eden’s Garden Products

The Eden’s Garden stamp set, Eden Dies and Eden’s Garden Bundle are early releases from the January–June 2022 Mini Catalog but the other products in the collection are only available while supplies last. The available while supplies last products are:
All the Eden’s Garden products are listed below. For more information about a product, click the image.

Kisses & Hugs Paper Pumpkin Kit
- Kit contains enough supplies to create 10 cards—5 each of 2 designs—and 10 coordinating envelopes
- Kit features an exclusive Two-Step photopolymer stamp set
- Kit includes a Gray Granite Classic Stampin’ Spot
- Card size: 4-1/2″ x 4-1/4″ heart-shaped cards; folded
- Coordinating colors: Blushing Bride, Flirty Flamingo, Gray Granite, Very Vanilla
Click here to order Kisses & Hugs
You can cancel at any time or even skip a month
This month’s Paper Pumpkin Kit has an Add On (see the photo above)! The coordinated treat boxes are not included in this month’s kit and are only available for purchase separately as an add-on online starting January 25, 2022. You must be a Paper Pumpkin subscriber to purchase and they are only available while supplies last.
Kisses & Hugs Mini Treat Boxes Add On For Paper Pumpkin Subscribers
Available January 25, 2022
Item number: 160147 | $10.00 USD
- Contains 20 mini treat boxes and 20 heart tags
- Gold cord: 10-1/2″ yards (9.6 m)
- Finished size: 1-3/4″ x 1-3/4″ x 1-3/4″
- Printed with gold foil
Upcoming
- December 20, 2021: New Card Sampler Will Be Released (it’s being delayed due to the holidays)
- January 3, 2022: Last Day to Order Last Chance Products
- January 4, 2022: January – June 2022 Mini Catalog Debuts (if you’ve ordered from me in the last six months, a catalog is on it’s way to you
- January 4, 2022: Sale-a-Bration Begins
- January 10, 2022: Last Day to Order Hugs & Kisses Paper Pumpkin
Here’s a picture of my mom and I on her big day (I decided to grow out the white/gray during quarantine)!

by Tracy | Oct 28, 2021 | Designer Series Paper, Fun Fold Card, Rectangle Stitched Dies
Today’s card is another book binding card that I made for a friend who just celebrated her birthday. She loves pink and I think she’ll like this very pinky card!

I started with a piece of Magenta Madness cardstock (you can find the measurements I used below the Supply List) and scored it in two places. Then I folded the card in half and then folded the other piece back. My post the other day shows where to put the adhesive and what the fold looks like. You can see it HERE.

I adhered two pieces of Expressions in Ink Designer Series Paper to the two panels on the front and I added a piece of Basic White cardstock to the inside of the card. I wrapped a piece of Polished Pink Open Weave Ribbon around the left side of the card and tied a knot.


Using the Stitched Rectangles Dies, I cut a small rectangle for the sentiment. The sentiment was heat embossed onto the rectangle using gold embossing powder (included in the Metallics Embossing Powder set) and the stamp set, Artistically Inked. You can see the directions below for heat embossing. It’s very easy to do and gives your card a wow factor.
I adhered the sentiment to a piece of Magenta Madness cardstock, added Stampin’ Dimensionals to the back and adhered it to the front of the card. I didn’t want the pink flower in the middle to be covered up so I placed the sentiment towards the bottom. To complete the card, I added three Wonderful Gems below the sentiment. You might have missed these in the Holiday Catalog. They were in last year’s Mini Catalog and were brought back for this year’s Mini. The clear gems have flecks of gold in them which is just perfect the Expressions in Ink Designer Series Paper because many of the designs also have gold accents.

How to Heat Emboss
Prepare your cardstock by rubbing an anti-static pouch over the surface of the paper as it helps keep away stray particles of embossing powder (Stampin’ Up! no longer carries this product but it’s a must when embossing). Stamp your sentiment or image using a Versamark pad. This is very sticky ink and your embossing powder will stick right to it. Sprinkle embossing powder over the stamped image and then shake off any excess. Before applying heat to your paper, heat the Heat Tool first so the paper won’t warp (about 10 seconds). Direct the heat over your image and watch as your image is transformed!
Bundle Alert (save 10%); The Artistically Inked Bundle includes the stamp set Artistically Inked and the Artistic Dies.

Supply List
Below you’ll find all the Stampin’ Up! supplies I used for today’s card. If you need any stamping supplies, I’d love to be your demonstrator! You can place an order by clicking any of the images below to go to my Stampin’ Up! online store.
Measurements
- Magenta Madness cardstock: 11″ x 4-1/4″ score at 4″ and 5-1/2″
- Magenta Madness cardstock: 3″ x 1″
- Expressions in Ink Designer Series Paper: 4″ x 3-3/4″
- Expressions in Ink Designer Series Paper: 4″ x 1-1/4″
- Basic White cardstock (sentiment): approx. 3-1/8″ x 1″
- Basic White cardstock (inside): 4″ x 3-3/4″

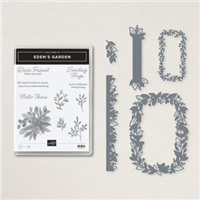
Eden’s Garden Collection – Available November 2, 2021
Click HERE or the image below to see the two page flyer of all the products in the collection.

Gifts Galore Paper Pumpkin Kit

- Kit contains enough supplies to create nine treat packages—three each of three designs—and nine food-safe bags.
- This all-inclusive kit includes printed die cuts, die-cut boxes, cellophane treat bags, adhesive, and more!
- Includes an exclusive stamp set and a Classic Stampin’ Spot
- Coordinating colors: Evening Evergreen, Flirty Flamingo, Old Olive, Pool Party, Poppy Parade
- Subscribe by November 10, 2021
Click here to order Paper Pumpkin
You can cancel at any time or even skip a month
Enjoy your day! Thanks for stopping by!
by Tracy | Oct 11, 2021 | Designer Series Paper, Die-Cutting, Embossing Folders, Punches, Rectangle Stitched Dies
Today’s card features the stamp set Perfectly Plaid, the Pine Tree Punch, the Wintry 3D Embossing Folders and Painted Christmas Designer Series Paper.

I began with a base of Early Espresso cardstock (all the measurements I used can be found below the Supply List) and then added a layer of Evening Evergreen cardstock. Then I added two squares of Painted Christmas Designer Series Paper.


I embossed a piece of Basic White cardstock using one of the Wintry 3D Embossing Folders and then layered it onto a piece of Early Espresso cardstock. I added Stampin’ Dimensionals to the back and adhered it to the front of the card.

I used the Perfectly Plaid stamp set to stamp two trees in Evening Evergreen ink. The tree in the forefront was stamped onto a piece of scrap paper and then stamped onto my Basic White cardstock. The darker tree was adhered using Multipurpse Liquid Glue and the other tree has a Stampin’ Dimensionals on the back. The sentiment was stamped in Early Espresso ink and cut out using the Stitched Rectangles Dies. I added Stampin’ Dimensionals to the back and adhered it below the trees.


To complete my card, I added two Rhinestone Basic Jewels.
Supply List
Below you’ll find all the Stampin’ Up! supplies I used for today’s card. If you need any stamping supplies, I’d love to be your demonstrator! You can place an order by clicking any of the images below to go to my Stampin’ Up! online store.
The Specialty Plate is used with 3D Embossing Folders.
Measurements
- Early Espresso cardstock: 11″ x 4-1/4″ score at 5-1/2″
- Early Espresso cardstock: 4″ x 2-1/2″
- Evening Evergreen cardstock: 5-1/4″ x 4″
- Painted Christmas Designer Series Paper: (2) 2-1/2″ x 2-1/2″
- Basic White cardstock: 5-1/4″ x 4 (inside card)
- Basic White cardstock: 3-3/4″ x 2-1/4″ (embossed piece)
- Basic White cardstock: scraps for trees
- Basic White cardstock: approx. 3″ x 1″
Encircled in Warmth Card Sampler


Tomorrow is the last day my Encircled in Warmth Card Sampler will be available. For all the details, please click here.
Enjoy your day!
by Tracy | Sep 21, 2021 | Designer Series Paper, Die-Cutting, Embossing Folders, Rectangle Stitched Dies, Stampin' Cut & Emboss Machine
Today’s card features Stampin’ Up! Poinsettia Dies, Encircled in Warmth stamp set, Wintry 3D Embossing Folders and Tidings of Christmas 6″ x 6″ Designer Series Paper. If the Poinsettia Dies look familiar, it’s because they debuted in the 2020 Mini Catalog and can now be found in the Stampin’ Up! Annual Catalog. The beauty of many of the dies in this set is that they cut and emboss at the same time! To see what I mean, take a look at the embossing on the poinsettia!


I started with a piece of Evening Evergreen cardstock and then added a layer of Tidings of Christmas Designer Series Paper. Next, I adhered a piece of Soft Succulent cardstock that I ran through one of the Wintry 3D Embossing Folders. These embossing folders are currently on backorder and as of today, they can still be added to your order and will ship when they are back in stock (estimated to be back in stock next week). The rest of your order will ship without the embossing folders.
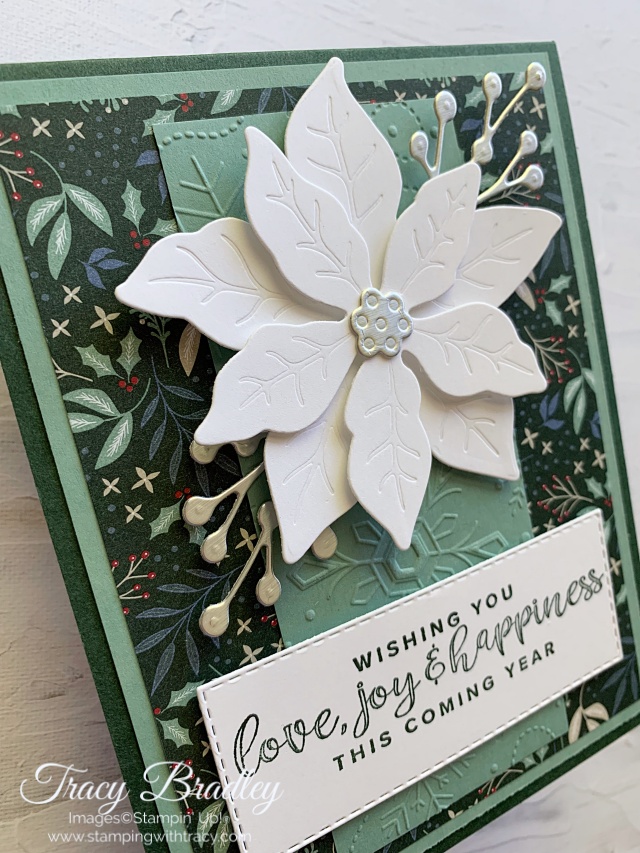
I used the Poinsettia Dies to cut two Silver Foil sprigs. Before running one of the sprigs though the Stampin’ Cut & Emboss machine, I added the little piece for the center of the flower onto the paper. I also cut two poinsettia flowers out of Basic White cardstock. I adhered a Mini Stampin’ Dimensional between the two flower pieces and then added a regular Stampin’ Dimensionals to the back of the larger flower. I used our Mini Glue Dots to adhere the foil sprigs to the back of the poinsettia and then adhered the flower to the front of the card.
When using the poinsettia and leaves dies, you’ll use two dies. One of the dies cuts the flower shape and the other embosses the paper. I used a Sharpie to mark the dies so I would know exactly how the inside piece fits (it’s a big time saver).

I used the Stitched Rectangles Dies to cut a rectangle out of Basic White cardstock and then stamped the sentiment in Evening Evergreen ink. I added Stampin’ Dimensionals to the back and adhered it to the front of the card. To complete the card, I adhered a piece of Basic White cardstock to the inside.


Supply List
Below you’ll find all the Stampin’ Up! supplies I used for today’s card. If you need any stamping supplies, I’d love to be your demonstrator! You can place an order by clicking any of the images below to go to my Stampin’ Up! online store.
The Specialty Plate is used with 3D Embossing Folders.
Measurements
- Evening Evergreen cardstock: 11″ x 4-1/4″ score at 5-1/2″ or 8-1/2″ x 5-1/2″ score at 4-1/4″ (the only difference is how the card opens)
- Soft Succulent cardstock: 5-1/4″ x 4″
- Soft Succulent cardstock (embossed piece): 4-3/4″ x 2″
- Tidings of Christmas Designer Series Paper: 5″ x 3-3/4″
- Basic White cardstock (smaller poinsettia piece): approx. 3″ x 3″
- Basic White cardstock (larger poinsettia piece): approx. 3-1/2″ x 3-1/2″
- Basic White cardstock (sentiment): approx. 3-3/4″ x 1-3/4″
- Basic White cardstock (inside card): 5-1/4″ x 4″
- Silver Foil: (2) approx. 2-3/4″ x 1-1/2″
- Silver Foil: scrap for center of poinsettia


Thanks for stopping by! Enjoy your day!